目录
直方图比较在图像处理中扮演了重要角色。它可以用于图像检索、对象匹配、场景分类等应用。通过比较图像的直方图,我们能够量化图像之间的相似程度。本文将介绍如何使用 OpenCvSharp 实现直方图比较,并提供详细的代码示例。
直方图比较的基本概念
直方图比较是通过计算两个图像的直方图的相似度来量化图像之间的相似性。在 OpenCV 中,有多种方法用于比较直方图,包括:
- 相关性(Correlation)
- 卡方(Chi-Square)
- 交叉(Intersection)
- 巴氏距离(Bhattacharyya distance)
安装 OpenCvSharp
开始之前,请确保你已经安装了 OpenCvSharp。可以通过 NuGet 包管理器进行安装:
PowerShellInstall-Package OpenCvSharp4.Windows -Version 4.0.0.20190108
如何比较直方图
在 OpenCvSharp 中,比较直方图依赖于 Cv2.CompareHist 方法。该方法接受两个直方图和一个比较方法作为参数,返回一个反映两个直方图相似度的值。
实战代码示例
以下示例代码演示如何读取两幅图像、计算它们的直方图并进行比较:
C#static void Main(string[] args)
{
// 读取两幅灰度图像
Mat img1 = Cv2.ImRead("ai.jpg", ImreadModes.Grayscale);
Mat img2 = Cv2.ImRead("ai2.jpg", ImreadModes.Grayscale);
// 检查图像加载是否成功
if (img1.Empty() || img2.Empty())
{
Console.WriteLine("图像加载失败!");
return;
}
// 显示原始灰度图像
Cv2.ImShow("Image 1", img1);
Cv2.ImShow("Image 2", img2);
// 计算两幅图像的直方图
int[] histSize = { 256 }; // 直方图的bin的数量
Rangef[] ranges = { new Rangef(0, 256) }; // 每个bin的范围
Mat hist1 = new Mat();
Mat hist2 = new Mat();
Cv2.CalcHist(new Mat[] { img1 }, new int[] { 0 }, null, hist1, 1, histSize, ranges);
Cv2.CalcHist(new Mat[] { img2 }, new int[] { 0 }, null, hist2, 1, histSize, ranges);
// 归一化直方图用于显示和比较
Cv2.Normalize(hist1, hist1, 0, 255, NormTypes.MinMax);
Cv2.Normalize(hist2, hist2, 0, 255, NormTypes.MinMax);
// 创建图像用于显示直方图
int histImageWidth = 512;
int histImageHeight = 400;
int binWidth = histImageWidth / histSize[0];
Mat histImage1 = new Mat(histImageHeight, histImageWidth, MatType.CV_8UC3, new Scalar(255, 255, 255));
Mat histImage2 = new Mat(histImageHeight, histImageWidth, MatType.CV_8UC3, new Scalar(255, 255, 255));
// 绘制直方图
for (int i = 1; i < histSize[0]; i++)
{
Cv2.Line(
histImage1,
new Point(binWidth * (i - 1), histImageHeight - Math.Round(hist1.Get<float>(i - 1))),
new Point(binWidth * i, histImageHeight - Math.Round(hist1.Get<float>(i))),
new Scalar(0, 0, 0), 2);
Cv2.Line(
histImage2,
new Point(binWidth * (i - 1), histImageHeight - Math.Round(hist2.Get<float>(i - 1))),
new Point(binWidth * i, histImageHeight - Math.Round(hist2.Get<float>(i))),
new Scalar(0, 0, 0), 2);
}
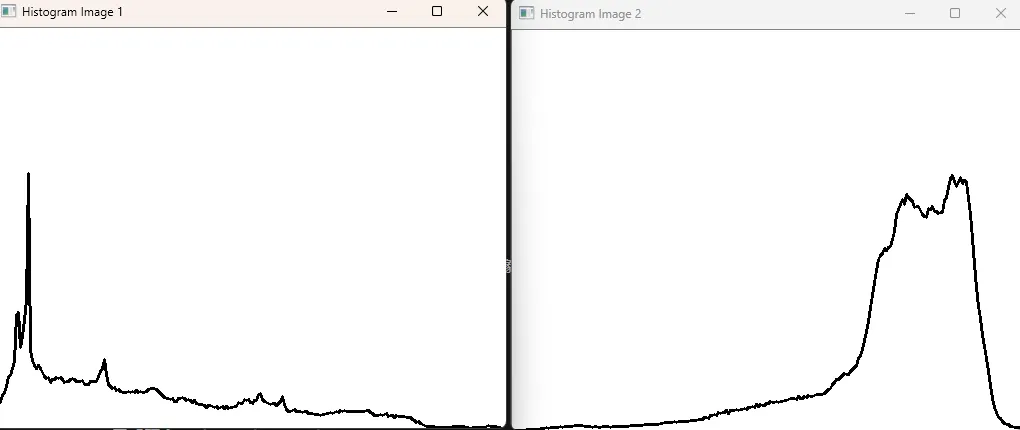
// 显示直方图
Cv2.ImShow("Histogram Image 1", histImage1);
Cv2.ImShow("Histogram Image 2", histImage2);
// 进行直方图比较
Cv2.Normalize(hist1, hist1, 0, 1, NormTypes.MinMax); // 再次归一化为比较准备
Cv2.Normalize(hist2, hist2, 0, 1, NormTypes.MinMax);
double correlation = Cv2.CompareHist(hist1, hist2, HistCompMethods.Correl);
double chiSquare = Cv2.CompareHist(hist1, hist2, HistCompMethods.Chisqr);
double intersection = Cv2.CompareHist(hist1, hist2, HistCompMethods.Intersect);
double bhattacharyya = Cv2.CompareHist(hist1, hist2, HistCompMethods.Bhattacharyya);
Console.WriteLine($"Correlation: {correlation}");
Console.WriteLine($"Chi-Square: {chiSquare}");
Console.WriteLine($"Intersection: {intersection}");
Console.WriteLine($"Bhattacharyya distance: {bhattacharyya}");
// 等待按键输入并释放资源
Cv2.WaitKey(0);
Cv2.DestroyAllWindows();
}

直方图比较应用场景
直方图比较在许多图像处理任务中非常有用,包括但不限于:
- 图像检索: 在一个大型图像数据库中查找与目标图像相似的图像。
- 对象识别: 通过比较特征对象的颜色特征来识别相似对象。
- 图像分类: 根据图像的颜色分布将图像分类到不同的类别中。
通过本篇文章的介绍,我们了解了如何使用 OpenCvSharp 进行直方图比较。本文中提供的代码示例将帮助你入门,并能够应用于更多的图像处理实践中。希望这些内容对你的项目有所帮助!
本文作者:技术老小子
本文链接:
版权声明:本博客所有文章除特别声明外,均采用 BY-NC-SA 许可协议。转载请注明出处!
目录