目录
摘要
- 创建一个新的WinForms应用程序项目。
- 在窗体上添加一个
PictureBox控件,用于绘制仪表盘。 - 在窗体的构造函数,订阅
PictureBox的Paint事件以进行绘制。
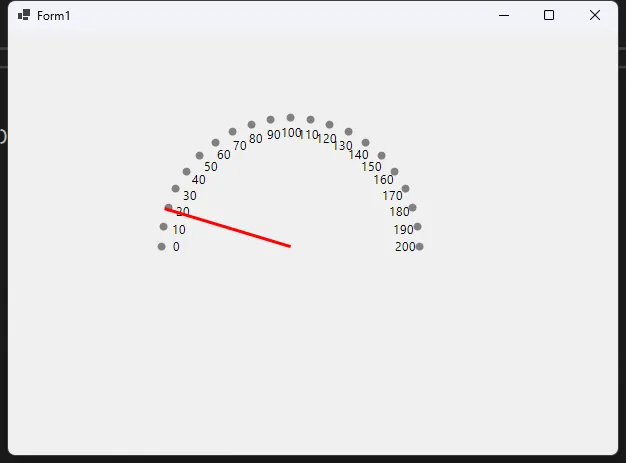
要在WinForms中创建一个仪表盘(Gauge),可以使用GDI+进行自定义绘制。这里是一个简单的示例,展示如何创建一个仪表盘控件并在窗口中显示它。这个示例包括绘制刻度、刻度上的数字以及根据当前值绘制指针。
正文
C#public partial class Form1 : Form
{
    int yourValue = 110;
    Timer timer=new Timer();
    public Form1()
    {
        InitializeComponent();

        pictureBox1.Paint += PictureBox1_Paint;
        timer.Interval = 1000;
        timer.Tick += Timer_Tick;
        timer.Start();
    }

    private void Timer_Tick(object? sender, EventArgs e)
    {
        yourValue=new Random().Next(1,200);
        pictureBox1.Refresh();
    }

    private void PictureBox1_Paint(object? sender, PaintEventArgs e)
    {
        Graphics g = e.Graphics;
        g.SmoothingMode = SmoothingMode.AntiAlias; // 减少毛边

        int centerX = pictureBox1.Width / 2;
        int centerY = pictureBox1.Height / 2;
        int radius = Math.Min(centerX, centerY);
        int totalSteps = 20; // 刻度的总数

        // 自定义颜色
        Color scaleColor = Color.Gray;
        Color textColor = Color.Black;

        Color pointerEndColor = Color.Red; // 指针结束点的颜色

        // 绘制刻度盘
        for (int step = 0; step <= totalSteps; step++)
        {
            double angle = Math.PI * (1 - step / (double)totalSteps); // 此行修改
            int x = centerX + (int)(0.85 * radius * Math.Cos(angle));
            int y = centerY - (int)(0.85 * radius * Math.Sin(angle));

            // 绘制刻度圆点
            int dotRadius = 4;
            g.FillEllipse(new SolidBrush(scaleColor), x - dotRadius, y - dotRadius, dotRadius * 2, dotRadius * 2);

            // 显示刻度上的数字
            int value = step * 10; // 0到200的刻度值
            SizeF textSize = g.MeasureString(value.ToString(), Font);
            int textX = centerX + (int)(0.75 * radius * Math.Cos(angle)) - (int)(textSize.Width / 2);
            int textY = centerY - (int)(0.75 * radius * Math.Sin(angle)) - (int)(textSize.Height / 2);
            g.DrawString(value.ToString(), Font, new SolidBrush(textColor), new PointF(textX, textY));
        }

        // 绘制指针
        int pointerLength = radius - 20;
        double pointerAngle = Math.PI * (yourValue / 200.0); // 根据值计算角度
        int pointerX = centerX + (int)(pointerLength * Math.Cos(pointerAngle));
        int pointerY = centerY - (int)(pointerLength * Math.Sin(pointerAngle));

        // 绘制指针线
        g.DrawLine(new Pen(pointerEndColor, 3), centerX, centerY, pointerX, pointerY);


    }
}
代码解释
- 类定义和初始化:
Form1类继承自Form,包含一个整型变量yourValue来保存仪表盘指针的当前值。Timer类实例用于每秒产生一个随机值并更新仪表盘。
- 构造函数:
- 在构造函数
Form1中,设置pictureBox1的Paint事件以便在需要重绘时调用PictureBox1_Paint方法。 - 设置计时器的时间间隔为1000毫秒(1秒),并在每次
Tick事件触发时调用Timer_Tick方法。 - 启动计时器。
- 在构造函数
- Timer_Tick方法:
- 随机生成一个1到200的值并赋给
yourValue。 - 调用
pictureBox1.Refresh触发重绘。
- 随机生成一个1到200的值并赋给
- PictureBox1_Paint方法:
- 通过参数
e获取Graphics对象,用于绘制操作。 - 设置抗锯齿模式以提高绘图质量。
- 计算仪表盘的中心点和半径。
- 绘制刻度盘,包括刻度的刻画和刻度值的显示。
- 根据当前值计算指针的位置并绘制指针。
- 通过参数
这个示例中,仪表盘的刻度值范围是0到200,每秒随机更新一个值来模拟指针的移动。通过对上述代码的理解,您可以进一步定制和扩展仪表盘控件,例如改变外观、增加功能等。
本文作者:技术老小子
本文链接:
版权声明:本博客所有文章除特别声明外,均采用 BY-NC-SA 许可协议。转载请注明出处!
目录