
目录
🎬 开篇:终端界面,为什么总是"丑"
做过 TUI 工具的开发者大概都有过这样的困惑——功能写完了,界面却像上世纪八十年代的 DOS 程序,组件堆在一起,间距全靠猜,颜色要么全白要么全绿,整体观感很难拿出手。
问题不在于终端本身,而在于缺少一套系统化的样式管理机制。在 Web 开发里,CSS 解决的正是这个问题:把"长什么样"和"做什么事"彻底分离。Textual 把这套思路直接搬进了终端——它有自己的样式语言,叫做 TCSS(Textual CSS),语法和 Web CSS 高度相似,但专门针对终端渲染做了裁剪和扩展。
读完本文,你将掌握:TCSS 的核心语法与选择器用法、如何通过内联样式和外部样式文件管理界面风格、以及几个可以直接复用的样式模板,足以应对日常 Python 开发中大多数 TUI 界面的排版需求。
测试环境:Windows 11 + Python 3.11 + Textual 0.52.1,终端使用 Windows Terminal(UTF-8 编码)。
🔍 问题剖析:没有样式系统,TUI 开发会遇到什么
在没有 TCSS 之前,Textual 早期版本的样式是直接写在 Python 代码里的,用字典或者关键字参数传进去。这种方式有几个明显的问题。
第一,样式与逻辑强耦合。 一个按钮的颜色、边距、对齐方式散落在 compose() 方法里,和事件处理代码混在一起,改一个样式要在业务逻辑里翻来翻去,维护成本很高。
第二,全局主题难以统一。 如果应用有十几个组件,想统一改一下主色调,就得逐个修改,漏掉一个就出现视觉不一致。
第三,复用性差。 同样的卡片样式在不同页面用两次,就要复制两份代码,后续改动也要同步两处。
TCSS 的引入从根本上解决了这些问题。它让 Textual 应用的样式管理达到了 Web 前端的水准——选择器、层叠、伪类、变量,一个都不少。
📐 TCSS 基础:它和 Web CSS 有多像
先看一个最简单的对比。Web CSS 里给一个按钮设样式是这样写的:
cssbutton {
    background-color: #2196F3;
    color: white;
    padding: 8px 16px;
}
TCSS 里给 Textual 的 Button 组件设样式,几乎一模一样:
cssButton {
    background: #2196F3;
    color: white;
    padding: 1 2;
}
区别只有两点:一是组件名首字母大写(因为对应 Python 类名);二是尺寸单位是"格"而非像素,终端里的最小单位是字符格,padding: 1 2 表示上下 1 格、左右 2 格。
这种设计非常聪明。有 Web 开发经验的人几乎零成本上手,没有经验的人也能从 Web CSS 教程里直接迁移知识。
🧩 三种样式写法,按场景选择
方式一:内联 CSS 字符串(快速原型)
最直接的方式是在 App 类里定义 CSS 类属性,把样式字符串直接写进去:
pythonfrom textual.app import App, ComposeResult
from textual.widgets import Header, Footer, Button, Label
from textual.containers import Vertical, Horizontal

class InlineStyleApp(App):
    TITLE = "内联样式示例"

    # 直接在类属性里写 CSS 字符串
    CSS = """
    Screen {
        align: center middle;
        background: #1a1a2e;
    }

    Vertical {
        width: 50;
        height: auto;
        border: round #4a4a8a;
        padding: 1 2;
        background: #16213e;
    }

    Label {
        color: #e0e0e0;
        margin-bottom: 1;
    }

    Button {
        width: 100%;
        margin-top: 1;
    }

    Button.primary {
        background: #0f3460;
        color: white;
    }

    Button.danger {
        background: #e94560;
        color: white;
    }
    """

    BINDINGS = [("q", "quit", "退出")]

    def compose(self) -> ComposeResult:
        yield Header()
        with Vertical():
            yield Label("[bold]操作面板[/bold]")
            yield Button("启动服务", classes="primary", id="start")
            yield Button("停止服务", classes="danger",  id="stop")
        yield Footer()

if __name__ == "__main__":
    InlineStyleApp().run()
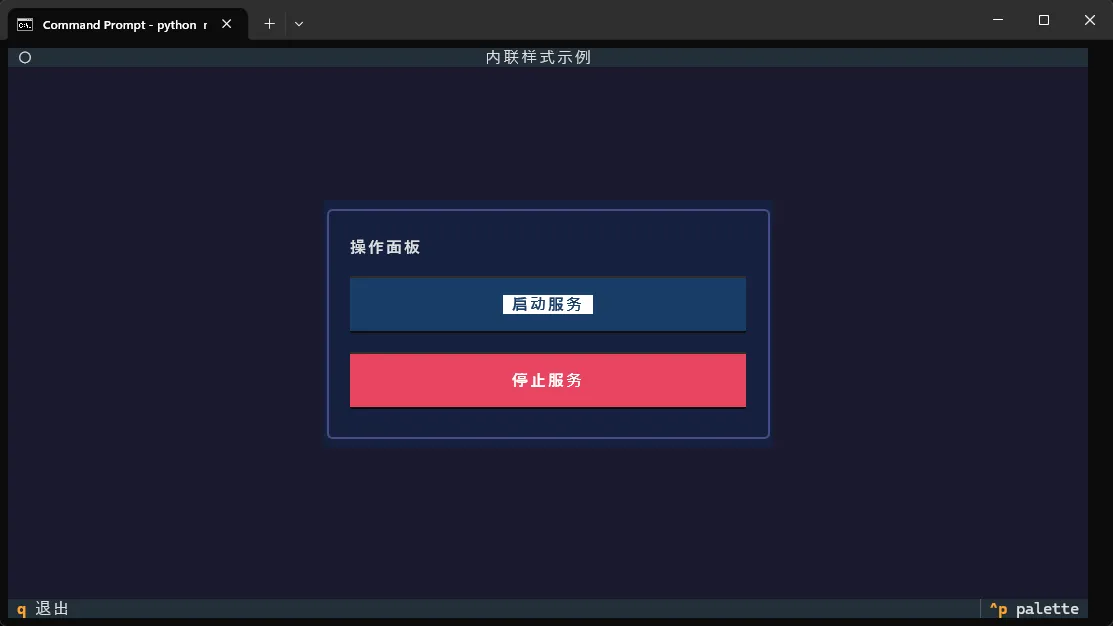
内联写法的优点是所有代码在一个文件里,方便分享和演示。缺点是样式字符串一长就显得臃肿,不适合大型项目。
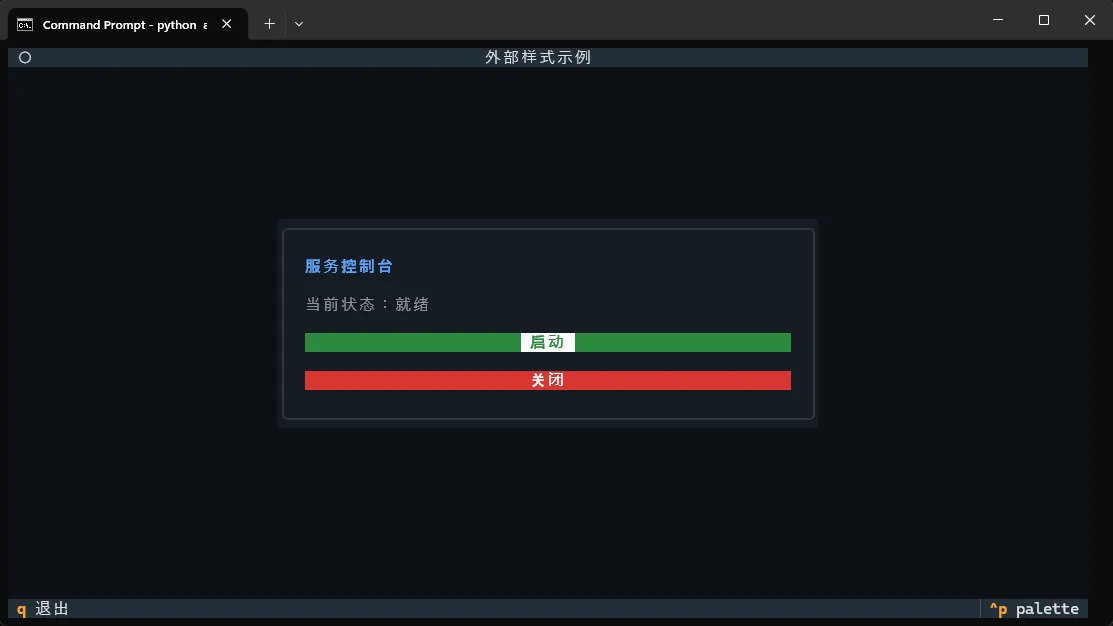
方式二:外部 TCSS 文件(推荐用于正式项目)
把样式单独存放在 .tcss 文件里,通过 CSS_PATH 类属性引用。这是正式项目里最推荐的做法,样式和逻辑彻底分离,维护起来清晰很多。
目录结构:
my_app/
├── app.py
└── styles/
    └── main.tcss
styles/main.tcss 文件内容:
css/* 全局背景 */
Screen {
    background: #0d1117;
    align: center middle;
}

/* 主容器卡片样式 */
#main-panel {
    width: 60;
    height: auto;
    border: round #30363d;
    padding: 1 2;
    background: #161b22;
}

/* 标题标签 */
#panel-title {
    text-style: bold;
    color: #58a6ff;
    text-align: center;
    margin-bottom: 1;
}

/* 状态标签 */
#status {
    color: #8b949e;
    text-align: center;
    margin: 1 0;
}

/* 通用按钮 */
Button {
    width: 100%;
    margin-top: 1;
    border: none;
}

/* 成功状态按钮 */
Button.success {
    background: #238636;
    color: #ffffff;
}

Button.success:hover {
    background: #2ea043;
}

/* 危险操作按钮 */
Button.danger {
    background: #da3633;
    color: #ffffff;
}

Button.danger:hover {
    background: #f85149;
}
app.py 文件内容:
pythonfrom textual.app import App, ComposeResult
from textual.widgets import Header, Footer, Button, Label
from textual.containers import Vertical

class ExternalStyleApp(App):
    TITLE = "外部样式示例"

    # 引用外部 TCSS 文件,路径相对于当前 Python 文件
    CSS_PATH = "styles/main.tcss"

    BINDINGS = [("q", "quit", "退出")]

    def compose(self) -> ComposeResult:
        yield Header()
        with Vertical(id="main-panel"):
            yield Label("服务控制台", id="panel-title")
            yield Label("当前状态:就绪", id="status")
            yield Button("启动", classes="success", id="btn-start")
            yield Button("关闭", classes="danger",  id="btn-stop")
        yield Footer()

    def on_button_pressed(self, event: Button.Pressed) -> None:
        status = self.query_one("#status", Label)
        if event.button.id == "btn-start":
            status.update("[green]当前状态:运行中[/green]")
        elif event.button.id == "btn-stop":
            status.update("[red]当前状态:已停止[/red]")

if __name__ == "__main__":
    ExternalStyleApp().run()
踩坑预警: CSS_PATH 的路径是相对于当前 Python 文件所在目录的,不是相对于工作目录。如果从其他目录运行脚本,路径解析可能出错。更稳妥的写法是用 pathlib 构造绝对路径:
pythonfrom pathlib import Path

class MyApp(App):
    CSS_PATH = Path(__file__).parent / "styles" / "main.tcss"
方式三:运行时动态修改样式
TCSS 不只是静态配置,还可以在运行时动态修改组件样式,实现状态切换、主题切换等效果:
pythonfrom textual.app import App, ComposeResult
from textual.widgets import Header, Footer, Button, Label, Input
from textual.containers import Vertical, Horizontal
from textual.binding import Binding


class DynamicStyleApp(App):
    """
    演示运行时动态修改组件样式:
    1. 深色 / 浅色主题切换(直接修改 panel.styles)
    2. 表单校验失败时输入框边框变红
    """

    TITLE = "动态样式示例"
    SUB_TITLE = "运行时修改 TCSS"

    # 基础布局样式,颜色部分由 Python 代码动态覆盖
    CSS = """
    Screen {
        align: center middle;
        background: #0d1117;
    }

    #main-panel {
        width: 52;
        height: auto;
        padding: 1 2;
        border: round #30363d;
        background: #161b22;
    }

    #panel-title {
        text-style: bold;
        text-align: center;
        color: #58a6ff;
        margin-bottom: 1;
    }

    #theme-bar {
        height: auto;
        align: center middle;
        margin-bottom: 1;
    }

    #btn-dark {
        background: #21262d;
        color: #c9d1d9;
        margin: 0 1;
        min-width: 10;
    }

    #btn-light {
        background: #f0f6fc;
        color: #24292f;
        margin: 0 1;
        min-width: 10;
    }

    #form-section {
        height: auto;
        border-top: solid #30363d;
        padding-top: 1;
        margin-top: 1;
    }

    .field-label {
        color: #8b949e;
        margin-bottom: 0;
    }

    Input {
        margin-bottom: 1;
        border: solid #30363d;
    }

    #btn-submit {
        width: 100%;
        background: #238636;
        color: white;
        margin-top: 1;
    }

    #btn-submit:hover {
        background: #2ea043;
    }

    #feedback {
        text-align: center;
        margin-top: 1;
        height: 1;
    }
    """

    BINDINGS = [
        Binding("q", "quit", "退出"),
        Binding("d", "set_dark", "深色主题"),
        Binding("l", "set_light", "浅色主题"),
    ]

    THEMES = {
        "dark": {
            "panel_bg":     "#161b22",
            "panel_border": ("#30363d", "round"),
            "title_color":  "#58a6ff",
        },
        "light": {
            "panel_bg":     "#ffffff",
            "panel_border": ("#d0d7de", "round"),
            "title_color":  "#0969da",
        },
    }

    def compose(self) -> ComposeResult:
        yield Header()

        with Vertical(id="main-panel"):
            yield Label("动态样式演示", id="panel-title")

            # 主题切换按钮
            with Horizontal(id="theme-bar"):
                yield Button("🌙 深色主题", id="btn-dark")
                yield Button("☀️ 浅色主题", id="btn-light")

            # 表单区域
            with Vertical(id="form-section"):
                yield Label("用户名", classes="field-label")
                yield Input(placeholder="请输入用户名(至少3位)", id="input-username")

                yield Label("邮箱", classes="field-label")
                yield Input(placeholder="请输入邮箱地址", id="input-email")

                yield Label("端口号", classes="field-label")
                yield Input(placeholder="1024 ~ 65535", id="input-port")

                yield Button("提交校验", id="btn-submit")
                yield Label("", id="feedback")

        yield Footer()


    def _apply_theme(self, theme_name: str) -> None:
        """将指定主题的颜色写入组件的 styles 属性"""
        theme = self.THEMES[theme_name]
        panel = self.query_one("#main-panel")
        title = self.query_one("#panel-title", Label)

        # 直接赋值给 styles,立即生效,无需手动刷新
        panel.styles.background = theme["panel_bg"]
        panel.styles.border = (theme["panel_border"][1], theme["panel_border"][0])
        title.styles.color = theme["title_color"]

    def action_set_dark(self) -> None:
        self._apply_theme("dark")

    def action_set_light(self) -> None:
        self._apply_theme("light")

    def _reset_input_styles(self) -> None:
        """把所有输入框边框恢复为默认颜色"""
        for input_id in ("#input-username", "#input-email", "#input-port"):
            inp = self.query_one(input_id, Input)
            inp.styles.border = ("solid", "#30363d")

    def _mark_error(self, input_id: str) -> None:
        """把指定输入框边框改为红色,直观提示校验失败位置"""
        inp = self.query_one(input_id, Input)
        inp.styles.border = ("solid", "#f85149")   # 红色边框

    def _validate_form(self) -> bool:
        """
        逐字段校验,遇到错误立即标红并返回 False。
        全部通过则返回 True。
        """
        username = self.query_one("#input-username", Input).value.strip()
        email    = self.query_one("#input-email",    Input).value.strip()
        port_str = self.query_one("#input-port",     Input).value.strip()
        feedback = self.query_one("#feedback",       Label)

        # 先重置所有输入框样式
        self._reset_input_styles()

        # 校验用户名
        if len(username) < 3:
            self._mark_error("#input-username")
            feedback.update("[red]❌ 用户名至少需要 3 个字符[/red]")
            return False

        # 校验邮箱(简单格式检查)
        if "@" not in email or "." not in email.split("@")[-1]:
            self._mark_error("#input-email")
            feedback.update("[red]❌ 邮箱格式不正确[/red]")
            return False

        # 校验端口号
        try:
            port = int(port_str)
            if not (1024 <= port <= 65535):
                raise ValueError
        except ValueError:
            self._mark_error("#input-port")
            feedback.update("[red]❌ 端口号须为 1024 ~ 65535 的整数[/red]")
            return False

        return True

    def on_button_pressed(self, event: Button.Pressed) -> None:
        btn_id = event.button.id

        if btn_id == "btn-dark":
            self._apply_theme("dark")

        elif btn_id == "btn-light":
            self._apply_theme("light")

        elif btn_id == "btn-submit":
            feedback = self.query_one("#feedback", Label)
            if self._validate_form():
                # 校验通过:所有输入框边框变绿
                for input_id in ("#input-username", "#input-email", "#input-port"):
                    self.query_one(input_id, Input).styles.border = ("solid", "#3fb950")
                feedback.update("[green]✅ 校验通过,配置已保存[/green]")


if __name__ == "__main__":
    DynamicStyleApp().run()
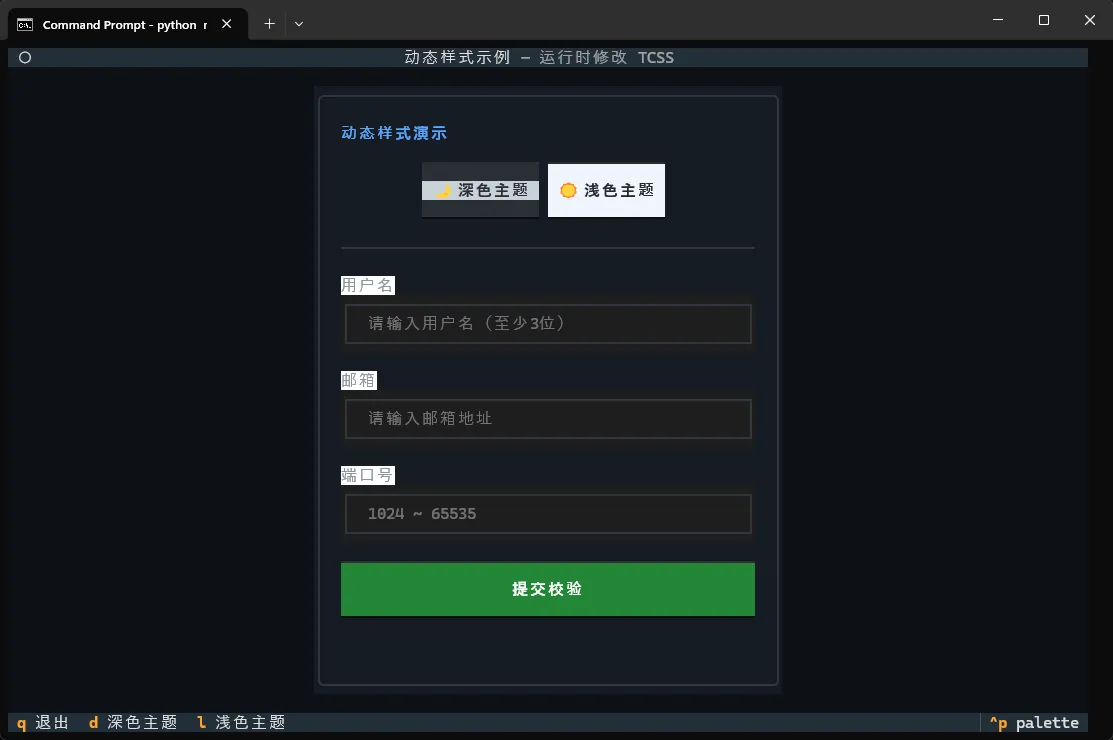
动态修改样式的优先级高于 TCSS 文件,适合做状态反馈(比如表单校验失败时把输入框边框变红)。
🎨 核心属性速查:终端里的 CSS 能做什么
TCSS 支持的属性比 Web CSS 少,但覆盖了终端界面的所有核心需求。以下是最常用的属性分类:
布局与尺寸:
css.card {
    width: 40;          /* 固定宽度 40 格 */
    height: auto;       /* 高度自适应内容 */
    min-width: 20;      /* 最小宽度 */
    max-width: 80;      /* 最大宽度 */
    margin: 1 2;        /* 外边距:上下1格,左右2格 */
    padding: 0 1;       /* 内边距 */
}
对齐方式(Screen 和容器专用):
cssScreen {
    align: center middle;   /* 水平居中 + 垂直居中 */
    align: left top;        /* 左上角对齐 */
}

Horizontal {
    align: center middle;
}
颜色与背景:
css.highlight {
    color: #58a6ff;             /* 前景色,支持十六进制 */
    background: #161b22;        /* 背景色 */
    color: rgb(88, 166, 255);   /* 也支持 rgb() */
    background: transparent;    /* 透明背景 */
}
边框样式:
css.panel {
    border: round green;        /* 圆角边框,绿色 */
    border: solid #444;         /* 实线边框 */
    border: dashed yellow;      /* 虚线边框 */
    border: double white;       /* 双线边框 */
    border: blank;              /* 无边框但保留空间 */
    border: none;               /* 完全无边框 */
}
文字样式:
css.title {
    text-style: bold;           /* 加粗 */
    text-style: italic;         /* 斜体 */
    text-style: bold italic;    /* 组合 */
    text-align: center;         /* 居中对齐 */
    text-align: right;          /* 右对齐 */
}
显示与可见性:
css.hidden {
    display: none;      /* 隐藏且不占空间 */
    visibility: hidden; /* 隐藏但保留占位 */
    opacity: 0.5;       /* 半透明 */
}
🔖 选择器系统:精准定位每一个组件
TCSS 的选择器和 Web CSS 保持高度一致,掌握以下几种就能覆盖绝大多数场景。
类型选择器——直接用组件类名,作用于所有同类组件:
cssButton { background: #333; }
Input  { border: solid #555; }
Label  { color: #ccc; }
ID 选择器——用 #id 精确定位单个组件,优先级高于类型选择器:
css#submit-btn { background: #238636; }
#error-msg  { color: red; }
类选择器——用 .classname 定位带有特定 class 的组件,通过 classes 参数赋予:
css.active   { background: #1f6feb; }
.disabled { opacity: 0.4; }
.warning  { color: #d29922; }
在 Python 代码里给组件加 class:
pythonyield Button("提交", classes="active primary")
yield Label("错误信息", classes="warning")
伪类选择器——响应组件状态变化:
cssButton:hover   { background: #2ea043; }   /* 鼠标悬停 */
Button:focus   { border: solid #58a6ff; } /* 获得焦点 */
Input:focus    { border: solid #58a6ff; }
Button:disabled { opacity: 0.3; }         /* 禁用状态 */
后代选择器——限定作用范围,避免样式污染:
css/* 只影响 #sidebar 内部的 Button */
#sidebar Button {
    width: 100%;
    margin: 0;
}

/* 只影响 .card 内部的 Label */
.card Label {
    color: #8b949e;
}
🚀 完整示例:一个有点像样的监控面板
把上面所有知识点整合进一个完整可运行的示例,模拟一个服务监控面板:
monitor.tcss:
cssScreen {
    background: #0d1117;
}

#layout {
    layout: grid;
    grid-size: 2;
    grid-gutter: 1;
    padding: 1;
}

.metric-card {
    border: round #30363d;
    background: #161b22;
    padding: 1 2;
    height: 7;
}

.card-title {
    text-style: bold;
    color: #8b949e;
    text-align: center;
}

.card-value {
    text-style: bold;
    color: #58a6ff;
    text-align: center;
    margin-top: 1;
}

.card-value.ok     { color: #3fb950; }
.card-value.warn   { color: #d29922; }
.card-value.error  { color: #f85149; }

#control-bar {
    height: 5;
    border: round #30363d;
    background: #161b22;
    margin-top: 1;
    padding: 0 2;
    align: center middle;
}

Button {
    margin: 0 1;
    min-width: 12;
}

Button.start  { background: #238636; color: white; }
Button.stop   { background: #da3633; color: white; }
Button.reload { background: #1f6feb; color: white; }

Button:hover  { opacity: 0.85; }
monitor.py:
pythonfrom textual.app import App, ComposeResult
from textual.widgets import Header, Footer, Button, Label
from textual.containers import Grid, Horizontal
from textual.binding import Binding
from pathlib import Path

class MonitorApp(App):
    TITLE = "服务监控面板"
    SUB_TITLE = "实时状态"
    CSS_PATH = Path(__file__).parent / "monitor.tcss"

    BINDINGS = [
        Binding("q", "quit", "退出"),
        Binding("r", "refresh", "刷新"),
    ]

    def compose(self) -> ComposeResult:
        yield Header()

        with Grid(id="layout"):
            # 卡片 1:CPU 使用率
            with self._make_card("cpu-card"):
                yield Label("CPU 使用率", classes="card-title")
                yield Label("23%", id="cpu-val", classes="card-value ok")

            # 卡片 2:内存占用
            with self._make_card("mem-card"):
                yield Label("内存占用", classes="card-title")
                yield Label("71%", id="mem-val", classes="card-value warn")

            # 卡片 3:磁盘 I/O
            with self._make_card("disk-card"):
                yield Label("磁盘 I/O", classes="card-title")
                yield Label("正常", id="disk-val", classes="card-value ok")

            # 卡片 4:网络状态
            with self._make_card("net-card"):
                yield Label("网络状态", classes="card-title")
                yield Label("异常", id="net-val", classes="card-value error")

        with Horizontal(id="control-bar"):
            yield Button("启动",   id="btn-start",  classes="start")
            yield Button("停止",   id="btn-stop",   classes="stop")
            yield Button("重载配置", id="btn-reload", classes="reload")

        yield Footer()

    def _make_card(self, card_id: str):
        """返回一个带样式类的容器上下文管理器"""
        from textual.containers import Vertical
        return Vertical(id=card_id, classes="metric-card")

    def on_button_pressed(self, event: Button.Pressed) -> None:
        btn_id = event.button.id
        if btn_id == "btn-start":
            self.sub_title = "运行中"
        elif btn_id == "btn-stop":
            self.sub_title = "已停止"
        elif btn_id == "btn-reload":
            self.sub_title = "配置已重载"

    def action_refresh(self) -> None:
        """模拟数据刷新"""
        import random
        cpu = random.randint(10, 95)
        cpu_label = self.query_one("#cpu-val", Label)
        cpu_label.update(f"{cpu}%")
        # 根据数值动态切换样式类
        cpu_label.remove_class("ok", "warn", "error")
        if cpu < 60:
            cpu_label.add_class("ok")
        elif cpu < 85:
            cpu_label.add_class("warn")
        else:
            cpu_label.add_class("error")

if __name__ == "__main__":
    MonitorApp().run()
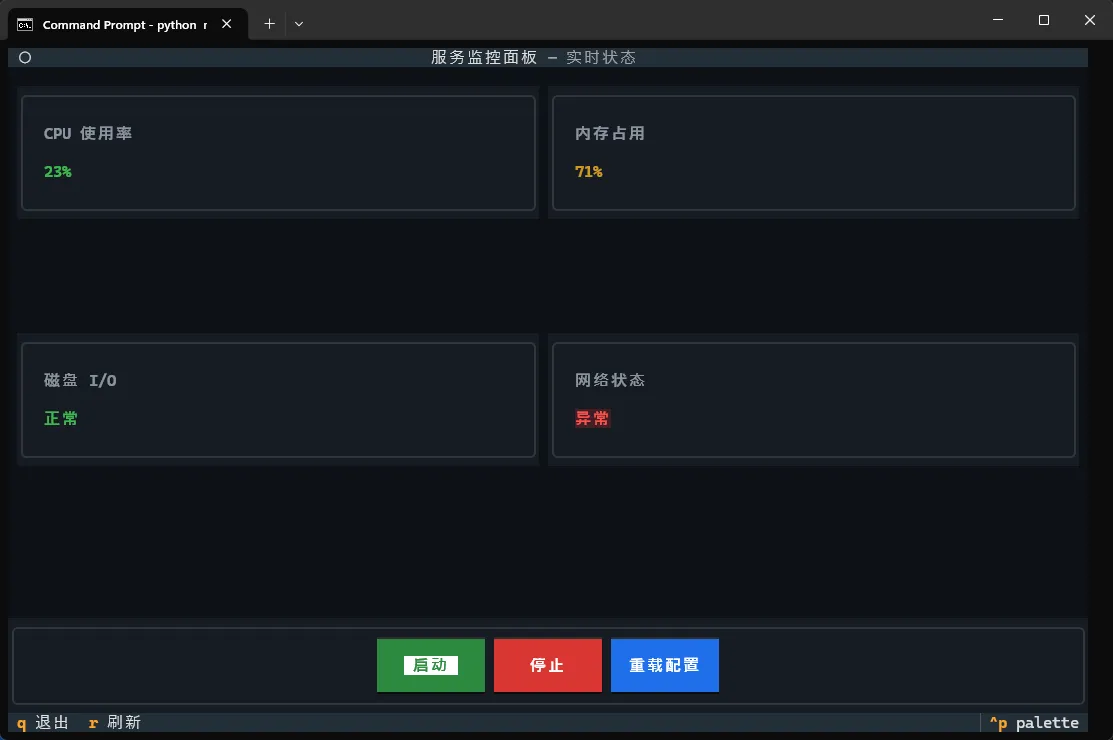
这个示例演示了几个值得关注的细节:remove_class / add_class 可以在运行时动态切换样式类,实现状态颜色联动;Grid 布局配合 grid-size 属性可以快速实现多列卡片排列;_make_card 这种辅助方法可以减少重复的容器声明代码。
⚠️ 常见问题与踩坑记录
Q:TCSS 修改了但界面没变化?
先确认 CSS_PATH 路径是否正确,然后检查选择器优先级。ID 选择器 > 类选择器 > 类型选择器,如果有冲突,低优先级的规则会被覆盖。也可以用 textual run --dev app.py 启动开发模式,按 Ctrl+\ 打开 CSS 检查器实时调试。
Q:align: center middle 不生效?
align 属性只对容器组件有效(Screen、Vertical、Horizontal、Grid),对 Label、Button 等叶子组件无效。叶子组件的文本对齐用 text-align。
Q:width: 100% 和 width: 1fr 有什么区别?
在 Grid 布局里用 1fr 表示按比例分配剩余空间;在普通 Vertical 或 Horizontal 容器里,100% 表示占满父容器宽度,两者效果相近但适用场景不同。
Q:Windows Terminal 下颜色显示不正常?
确保 Windows Terminal 开启了"真彩色"支持(默认已开启),并且终端的配色方案不会覆盖应用输出的颜色。如果颜色仍然不对,尝试在启动脚本前设置环境变量 COLORTERM=truecolor。
🎯 总结
TCSS 给 Textual 带来的最大价值,是把"界面长什么样"和"界面做什么事"彻底分开。样式写在 .tcss 文件里,逻辑写在 Python 文件里,两者通过选择器和 class 名称松耦合地连接在一起。这种分离在项目规模变大之后会带来非常明显的维护收益。
从实用角度来说,掌握三件事就够用了:选择器的优先级规则(避免样式不生效的困惑)、add_class / remove_class 的动态切换(实现状态反馈)、以及外部 .tcss 文件的组织方式(保持代码整洁)。本文的监控面板示例可以直接作为项目模板,按需修改卡片数量和数据来源即可落地使用。
后续如果想深入,可以研究 Textual 的 reactive 响应式变量——它能让数据变化自动触发 UI 更新,配合 TCSS 的动态 class 切换,可以构建出相当复杂的交互逻辑,而代码量却出奇地少。
💬 互动话题
在实际项目里,你是倾向于把样式内联在 Python 代码里,还是单独维护一个样式文件?对于命令行工具的界面设计,你有没有遇到过让自己印象深刻的布局难题,最终是怎么解决的?欢迎在评论区聊聊。
#Python #Textual #TCSS #TUI开发 #Python开发 #终端界面 #编程技巧


本文作者:技术老小子
本文链接:
版权声明:本博客所有文章除特别声明外,均采用 BY-NC-SA 许可协议。转载请注明出处!