
Press Ctrl+ and K to search
目录
在Python开发过程中,你是否遇到过这样的困惑:明明定义了变量,为什么有时候能访问,有时候却报错?函数内部修改的变量,为什么在函数外部没有生效?这些问题的根源都指向一个重要概念——变量作用域。
掌握Python的局部变量与全局变量,不仅能帮你避免90%的变量访问错误,更能让你的代码逻辑更清晰、维护性更强。本文将从实际问题出发,通过具体的代码示例,带你彻底理解Python变量作用域的机制和最佳实践。
🔍 问题分析:变量作用域常见痛点
💥 痛点一:函数内变量修改无效
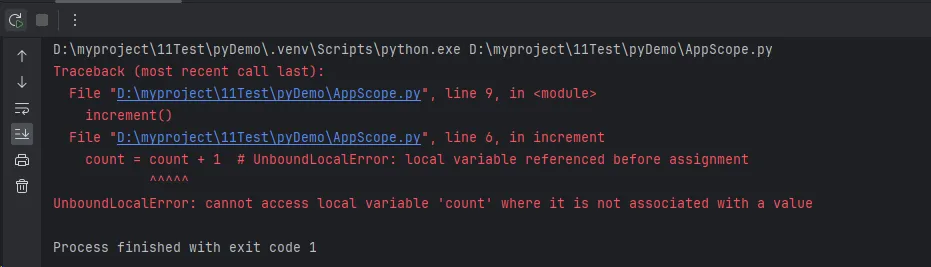
Python# 新手常见错误
count = 0

def increment():
    count = count + 1  # UnboundLocalError: local variable referenced before assignment

increment()
print(count)
💥 痛点二:全局变量污染
Python# 全局变量被意外修改
config_value = "default"

def process_data():
    config_value = "modified"  # 这里创建了局部变量,并未修改全局变量
    print(f"函数内: {config_value}")

process_data()
print(f"函数外: {config_value}")

💥 痛点三:作用域混乱导致的调试困难
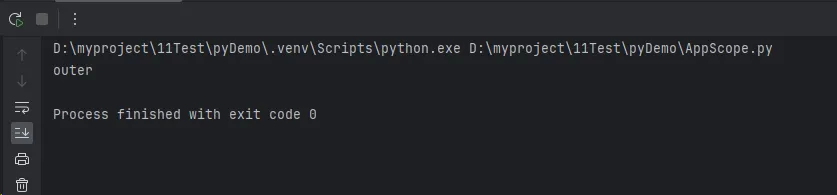
Python# 变量查找顺序不清晰
x = "global"

def outer():
    x = "outer"

    def inner():
        print(x)  # 这里的x是哪一个?

    inner()

outer()
💡 解决方案:深度理解Python变量作用域
🏗️ Python作用域的LEGB规则
Python变量查找遵循LEGB规则:
- L (Local):局部作用域
- E (Enclosing):嵌套函数的外层函数作用域
- G (Global):全局作用域
- B (Built-in):内置作用域
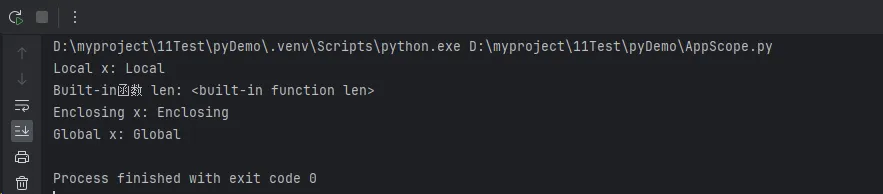
Python# LEGB规则演示
x = "Global"  # G: 全局作用域

def outer():
    x = "Enclosing"  # E: 嵌套函数外层作用域

    def inner():
        x = "Local"  # L: 局部作用域
        print(f"Local x: {x}")
        print(f"Built-in函数 len: {len}")  # B: 内置作用域

    inner()
    print(f"Enclosing x: {x}")

outer()
print(f"Global x: {x}")
🎯 局部变量:函数内部的私有空间
局部变量只在定义它的函数内部有效,函数执行结束后自动销毁。
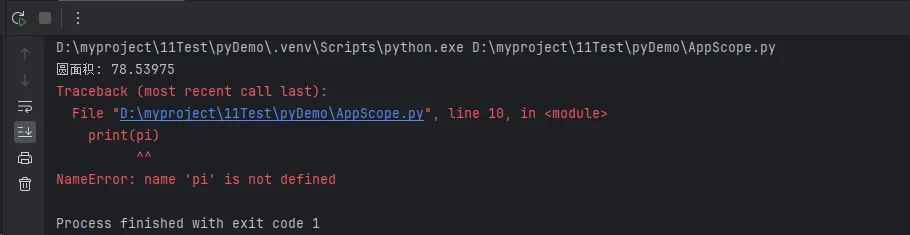
Pythondef calculate_area(radius):
    # pi 是局部变量,只在函数内有效
    pi = 3.14159
    area = pi * radius * radius
    return area

# 函数外部无法访问 pi
result = calculate_area(5)
print(f"圆面积: {result}")
print(pi)
局部变量的优势:
- 封装性强:避免变量名冲突
- 内存效率高:函数结束后自动释放
- 调试友好:作用域明确,便于定位问题
🌍 全局变量:整个模块共享的数据
全局变量在整个模块中都可以访问,但需要谨慎使用。
Python# 全局配置变量
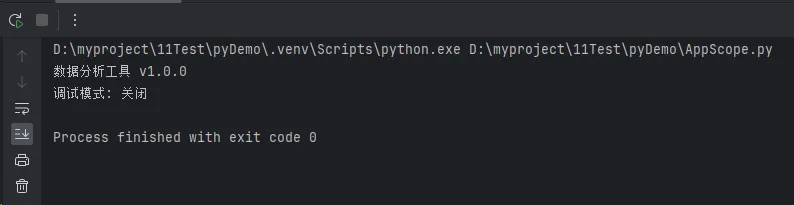
APP_NAME = "数据分析工具"
VERSION = "1.0.0"
DEBUG_MODE = True
def get_app_info():
# 直接读取全局变量
return f"{APP_NAME} v{VERSION}"
def toggle_debug():
# 修改全局变量需要使用 global 关键字
global DEBUG_MODE
DEBUG_MODE = not DEBUG_MODE
print(f"调试模式: {'开启' if DEBUG_MODE else '关闭'}")
print(get_app_info())
toggle_debug()
🚀 代码实战:变量作用域最佳实践
🛠️ 实战案例1:配置管理系统
Pythonclass ConfigManager:
"""配置管理器 - 更优雅的全局变量替代方案"""
def __init__(self):
self._config = {
'database_url': 'localhost:5432',
'api_timeout': 30,
'debug_mode': False
}
def get(self, key, default=None):
return self._config.get(key, default)
def set(self, key, value):
self._config[key] = value
def update_batch(self, **kwargs):
self._config.update(kwargs)
# 全局配置实例
config = ConfigManager()
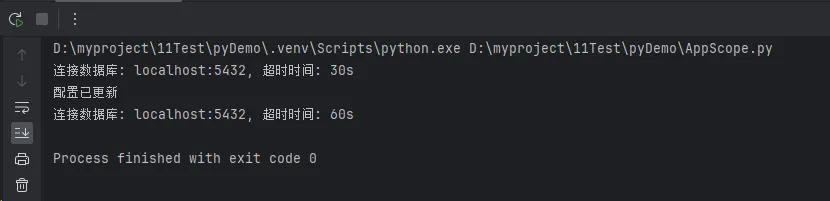
def connect_database():
"""数据库连接函数"""
db_url = config.get('database_url')
timeout = config.get('api_timeout')
print(f"连接数据库: {db_url}, 超时时间: {timeout}s")
def update_settings():
"""更新配置"""
config.update_batch(
debug_mode=True,
api_timeout=60
)
print("配置已更新")
# 使用示例
connect_database()
update_settings()
connect_database()
🛠️ 实战案例2:计数器与状态管理
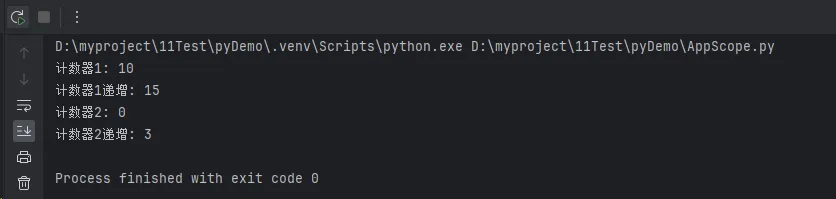
Pythondef create_counter(initial_value=0):
    """闭包实现的计数器 - 利用嵌套作用域"""

    def counter(operation='get', value=1):
        # 使用 nonlocal 修改外层函数的变量
        nonlocal initial_value

        if operation == 'increment':
            initial_value += value
        elif operation == 'decrement':
            initial_value -= value
        elif operation == 'reset':
            initial_value = 0

        return initial_value

    return counter

# 创建多个独立的计数器
counter1 = create_counter(10)
counter2 = create_counter(0)

print(f"计数器1: {counter1()}")
print(f"计数器1递增: {counter1('increment', 5)}")
print(f"计数器2: {counter2()}")
print(f"计数器2递增: {counter2('increment', 3)}")
🛠️ 实战案例3:装饰器中的作用域处理
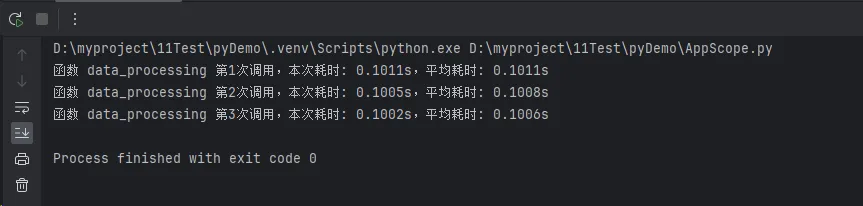
Pythondef performance_monitor(func):
    """性能监控装饰器"""
    import time

    # 使用局部变量存储统计信息
    call_count = 0
    total_time = 0

    def wrapper(*args, **kwargs):
        # 在嵌套函数中修改外层变量
        nonlocal call_count, total_time

        start_time = time.time()
        result = func(*args, **kwargs)
        end_time = time.time()

        call_count += 1
        total_time += (end_time - start_time)

        print(f"函数 {func.__name__} 第{call_count}次调用,"
              f"本次耗时: {end_time - start_time:.4f}s,"
              f"平均耗时: {total_time/call_count:.4f}s")

        return result

    return wrapper

@performance_monitor
def data_processing(data_size):
    """模拟数据处理"""
    import time
    time.sleep(0.1)  # 模拟处理时间
    return f"处理了 {data_size} 条数据"

# 测试性能监控
for i in range(3):
    result = data_processing(1000 * (i + 1))
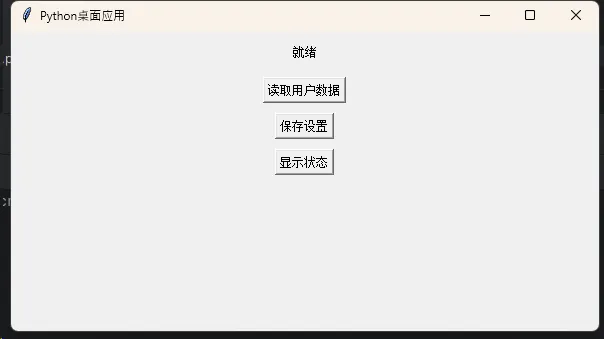
🛠️ 实战案例4:Windows应用开发中的全局状态
Pythonimport tkinter as tk
from tkinter import messagebox

class WindowsApp:
    """Windows桌面应用的状态管理"""

    def __init__(self):
        # 应用级别的状态变量
        self.user_data = {}
        self.app_settings = {
            'theme': 'light',
            'font_size': 12,
            'auto_save': True
        }

        self.root = tk.Tk()
        self.root.title("Python桌面应用")
        self.root.geometry("600x300")

        self.setup_ui()

    def setup_ui(self):
        """设置用户界面"""
        # 状态显示
        self.status_var = tk.StringVar(value="就绪")
        status_label = tk.Label(self.root, textvariable=self.status_var)
        status_label.pack(pady=10)

        # 按钮
        tk.Button(self.root, text="读取用户数据",
                 command=self.load_user_data).pack(pady=5)
        tk.Button(self.root, text="保存设置",
                 command=self.save_settings).pack(pady=5)
        tk.Button(self.root, text="显示状态",
                 command=self.show_status).pack(pady=5)

    def load_user_data(self):
        """加载用户数据"""
        # 模拟从文件加载数据
        self.user_data = {
            'name': 'Python开发者',
            'last_login': '2024-01-15',
            'projects': ['项目A', '项目B', '项目C']
        }
        self.update_status("用户数据已加载")

    def save_settings(self):
        """保存应用设置"""
        # 模拟保存设置到配置文件
        self.app_settings['auto_save'] = True
        self.update_status("设置已保存")

    def update_status(self, message):
        """更新状态显示"""
        self.status_var.set(message)
        self.root.after(2000, lambda: self.status_var.set("就绪"))

    def show_status(self):
        """显示当前状态"""
        status_info = f"""
        用户: {self.user_data.get('name', '未登录')}
        主题: {self.app_settings['theme']}
        自动保存: {'开启' if self.app_settings['auto_save'] else '关闭'}
        项目数量: {len(self.user_data.get('projects', []))}
        """
        messagebox.showinfo("应用状态", status_info)

    def run(self):
        """运行应用"""
        self.root.mainloop()

# 使用示例
if __name__ == "__main__":
    app = WindowsApp()
    app.run()
🔧 高级技巧:变量作用域调试
Pythondef debug_scope():
    """作用域调试工具"""
    import inspect

    global_var = "我是全局变量"

    def outer_function():
        outer_var = "我是外层函数变量"

        def inner_function():
            local_var = "我是局部变量"

            # 获取当前作用域信息
            frame = inspect.currentframe()

            print("=== 作用域调试信息 ===")
            print(f"局部变量: {frame.f_locals}")
            print(f"全局变量keys: {list(frame.f_globals.keys())[-10:]}")  # 显示最后10个

            # 查看变量查找顺序
            print(f"\n变量查找测试:")
            print(f"local_var: {local_var}")
            print(f"outer_var: {outer_var}")  # 来自外层作用域
            print(f"global_var: {global_var}")  # 来自全局作用域

        inner_function()

    outer_function()

# 运行调试
debug_scope()

🎯 总结:Python变量作用域的三个核心要点
🔑 核心要点1:掌握LEGB查找规则
Python变量查找严格按照Local → Enclosing → Global → Built-in的顺序进行。理解这个规则,就能准确预测变量的访问结果,避免90%的作用域相关错误。
🔑 核心要点2:合理使用global和nonlocal
- 使用
global关键字修改全局变量 - 使用
nonlocal关键字修改嵌套函数的外层变量 - 优先考虑函数参数和返回值,减少对全局变量的依赖
🔑 核心要点3:选择合适的变量作用域策略
- 局部变量:函数内部计算的临时数据
- 全局变量:应用级配置和常量
- 类属性:面向对象的状态管理
- 闭包变量:需要保持状态的函数式编程场景
掌握Python变量作用域,不仅能让你的代码更加健壮,还能显著提升编程技巧和调试效率。在实际的Windows应用开发和上位机编程中,合理的作用域设计是构建可维护代码的基石。继续深入学习Python的高级特性,你的编程之路会越走越宽广!
本文作者:技术老小子
本文链接:
版权声明:本博客所有文章除特别声明外,均采用 BY-NC-SA 许可协议。转载请注明出处!
目录