
目录
在AI大模型普及的今天,如何利用Python快速构建一个智能对话应用成为了许多开发者关注的焦点。Deepseek作为国内优秀的大语言模型,凭借其强大的推理能力和便捷的API接口,为Python开发者提供了绝佳的应用开发机会。
本文将手把手教你如何使用Python开发一个完整的Deepseek应用,从环境搭建到代码实战,再到优化部署,让你快速掌握AI应用开发的核心技能。无论你是Python初学者还是有一定基础的开发者,都能从这篇文章中获得实用的开发经验和最佳实践。
🔍 问题分析:为什么选择Deepseek?
💰 成本优势
Deepseek相比GPT-4等国外模型,在API调用费用上有着明显优势:
- 价格透明:按token计费,成本可控
- 免费额度:新用户通常有一定的免费调用额度
- 性价比高:在保证质量的前提下,成本仅为GPT-4的1/10左右
🎯 技术特点
- 推理能力强:在数学、逻辑推理方面表现优异
- 中文理解好:针对中文场景进行了深度优化
- API简单:接口设计简洁,易于集成
🌐 应用场景
- 智能客服系统
- 代码生成助手
- 文档问答机器人
- 教育辅导应用
💡 解决方案:Python开发架构设计
🏗️ 整体架构
Markdown┌─────────────────┐    ┌─────────────────┐    ┌─────────────────┐
│   用户界面层     │    │   业务逻辑层     │    │   数据访问层     │
│   (Streamlit)   │────│   (API调用)     │────│   (数据库/文件)  │
└─────────────────┘    └─────────────────┘    └─────────────────┘
🔧 技术栈选择
- 前端框架:Streamlit(快速构建Web界面)
- HTTP客户端:requests(API调用)
- 数据处理:pandas(对话记录管理)
- 配置管理:python-dotenv(环境变量管理)
💻 代码实战:构建你的第一个Deepseek应用
🚀 环境准备
首先,让我们安装必要的依赖包:
Bashpip install streamlit requests python-dotenv pandas
创建项目目录结构:
Pythondeepseek_app/
├── app.py              # 主应用文件
├── config.py           # 配置文件
├── deepseek_client.py  # Deepseek API客户端
├── .env               # 环境变量文件
└── requirements.txt   # 依赖包列表
🔑 配置管理
创建.env文件存储API密钥:
textDEEPSEEK_API_KEY=your_api_key_here
DEEPSEEK_BASE_URL=https://api.deepseek.com/v1
config.py配置文件:
Pythonimport os
from dotenv import load_dotenv

# 加载环境变量
load_dotenv()

class Config:
    """配置类"""
    DEEPSEEK_API_KEY = os.getenv('DEEPSEEK_API_KEY')
    DEEPSEEK_BASE_URL = os.getenv('DEEPSEEK_BASE_URL', 'https://api.deepseek.com/v1')
    MAX_TOKENS = 2000
    TEMPERATURE = 0.7

    # 验证必要配置
    @classmethod
    def validate(cls):
        if not cls.DEEPSEEK_API_KEY:
            raise ValueError("DEEPSEEK_API_KEY 未设置,请检查.env文件")
        return True
🤖 Deepseek客户端封装
deepseek_client.py:
Pythonimport requests
import json
from typing import List, Dict, Optional
from config import Config

class DeepseekClient:
    """Deepseek API客户端"""

    def __init__(self):
        Config.validate()
        self.api_key = Config.DEEPSEEK_API_KEY
        self.base_url = Config.DEEPSEEK_BASE_URL
        self.headers = {
            'Authorization': f'Bearer {self.api_key}',
            'Content-Type': 'application/json'
        }

    def chat_completion(self,
                       messages: List[Dict[str, str]],
                       model: str = "deepseek-chat",
                       max_tokens: int = None,
                       temperature: float = None) -> Optional[str]:
        """
        调用Deepseek聊天接口

        Args:
            messages: 消息列表
            model: 模型名称
            max_tokens: 最大token数
            temperature: 随机性参数

        Returns:
            str: 模型回复内容
        """
        try:
            url = f"{self.base_url}/chat/completions"

            data = {
                "model": model,
                "messages": messages,
                "max_tokens": max_tokens or Config.MAX_TOKENS,
                "temperature": temperature or Config.TEMPERATURE,
                "stream": False
            }

            response = requests.post(url, headers=self.headers, json=data, timeout=30)
            response.raise_for_status()

            result = response.json()

            if 'choices' in result and len(result['choices']) > 0:
                return result['choices'][0]['message']['content']
            else:
                return "抱歉,我现在无法回答您的问题。"

        except requests.exceptions.Timeout:
            return "请求超时,请稍后重试。"
        except requests.exceptions.RequestException as e:
            return f"网络请求错误:{str(e)}"
        except json.JSONDecodeError:
            return "响应解析错误,请检查API接口。"
        except Exception as e:
            return f"发生未知错误:{str(e)}"

    def stream_chat_completion(self, messages: List[Dict[str, str]], model: str = "deepseek-chat"):
        """
        流式调用Deepseek聊天接口

        Args:
            messages: 消息列表
            model: 模型名称

        Yields:
            str: 逐步返回的内容
        """
        try:
            url = f"{self.base_url}/chat/completions"

            data = {
                "model": model,
                "messages": messages,
                "max_tokens": Config.MAX_TOKENS,
                "temperature": Config.TEMPERATURE,
                "stream": True
            }

            response = requests.post(url, headers=self.headers, json=data, stream=True)
            response.raise_for_status()

            for line in response.iter_lines():
                if line:
                    line = line.decode('utf-8')
                    if line.startswith('data: '):
                        data_str = line[6:]
                        if data_str.strip() == '[DONE]':
                            break
                        try:
                            data = json.loads(data_str)
                            if 'choices' in data and len(data['choices']) > 0:
                                delta = data['choices'][0].get('delta', {})
                                if 'content' in delta:
                                    yield delta['content']
                        except json.JSONDecodeError:
                            continue

        except Exception as e:
            yield f"流式请求错误:{str(e)}"
🎨 Streamlit前端界面
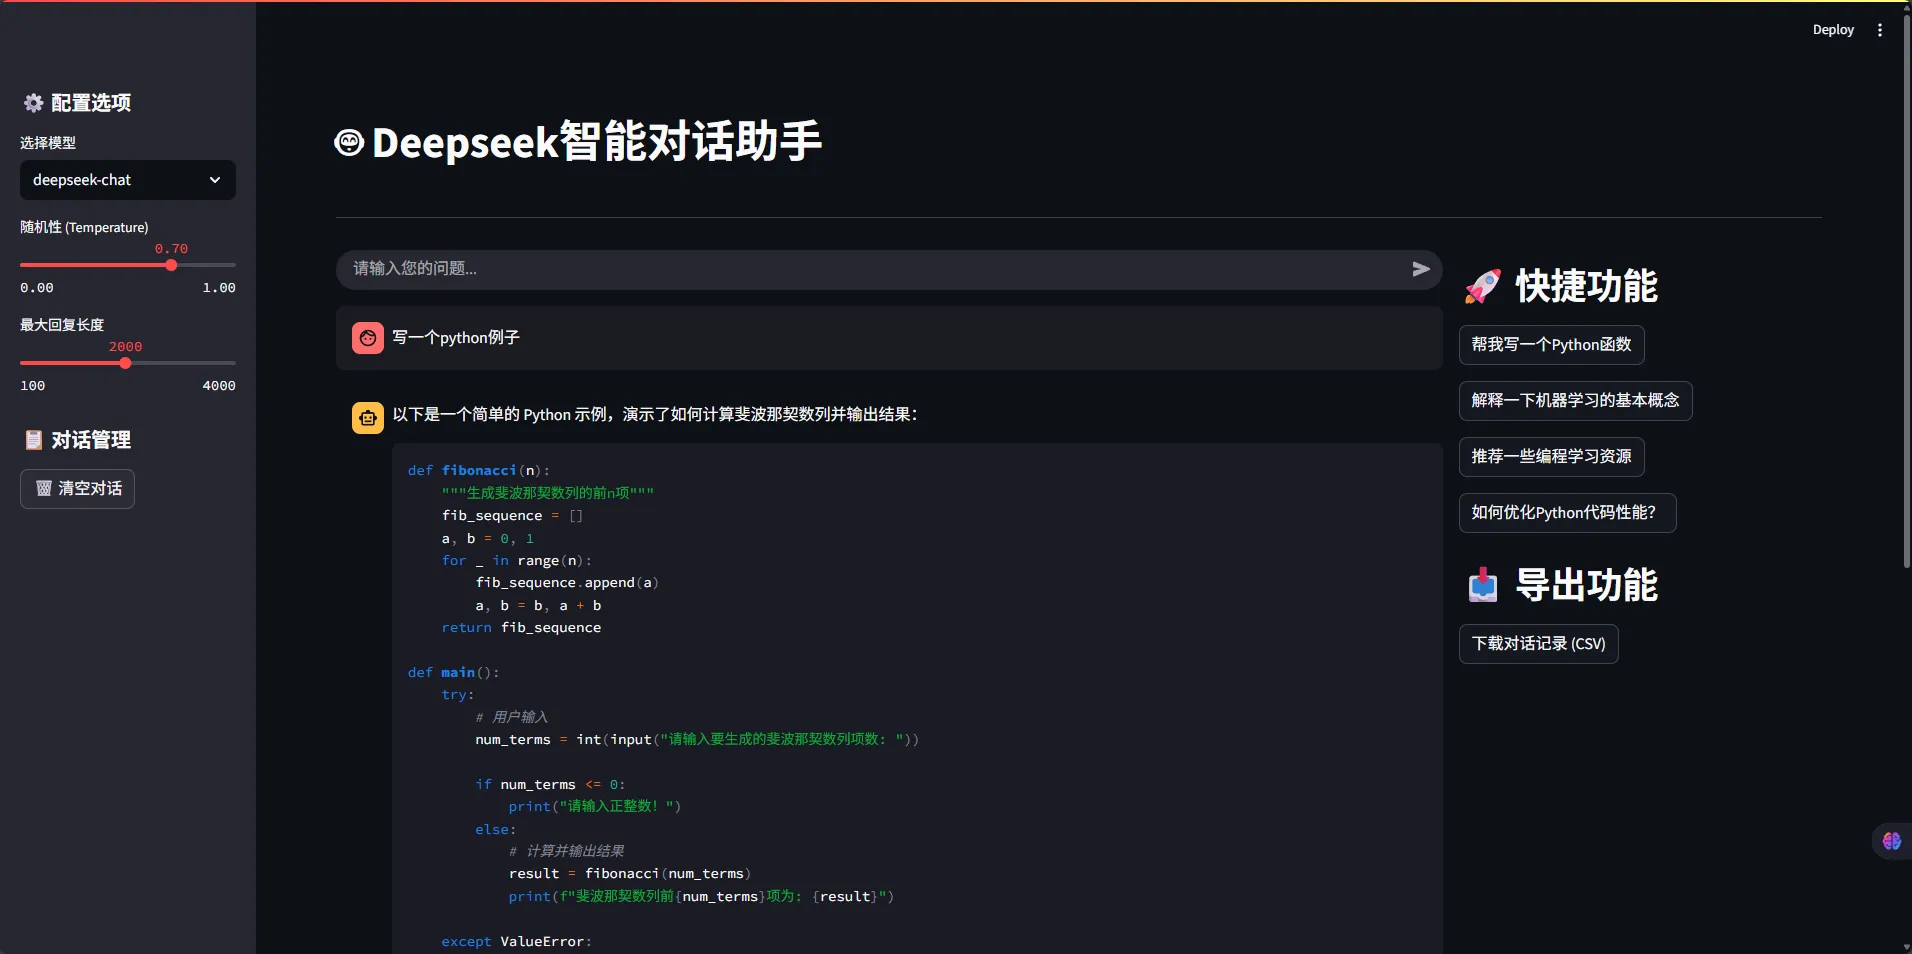
app.py主应用文件:
Pythonimport streamlit as st
import pandas as pd
from datetime import datetime
from deepseek_client import DeepseekClient

# 页面配置
st.set_page_config(
    page_title="Deepseek智能对话助手",
    page_icon="🤖",
    layout="wide",
    initial_sidebar_state="expanded"
)

# 初始化客户端
@st.cache_resource
def init_client():
    """初始化Deepseek客户端"""
    try:
        return DeepseekClient()
    except Exception as e:
        st.error(f"初始化失败:{str(e)}")
        return None

# 初始化会话状态
def init_session_state():
    """初始化会话状态"""
    if 'messages' not in st.session_state:
        st.session_state.messages = []
    if 'chat_history' not in st.session_state:
        st.session_state.chat_history = []

def main():
    """主函数"""
    st.title("🤖 Deepseek智能对话助手")
    st.markdown("---")

    # 初始化
    init_session_state()
    client = init_client()

    if not client:
        st.error("❌ 无法连接到Deepseek服务,请检查配置")
        return

    # 侧边栏配置
    with st.sidebar:
        st.header("⚙️ 配置选项")

        # 模型选择
        model = st.selectbox(
            "选择模型",
            ["deepseek-chat", "deepseek-coder"],
            index=0
        )

        # 参数调整
        temperature = st.slider("随机性 (Temperature)", 0.0, 1.0, 0.7, 0.1)
        max_tokens = st.slider("最大回复长度", 100, 4000, 2000, 100)

        # 对话历史管理
        st.header("📋 对话管理")
        if st.button("🗑️ 清空对话"):
            st.session_state.messages = []
            st.session_state.chat_history = []
            st.success("对话已清空")

        # 显示对话统计
        if st.session_state.messages:
            st.info(f"当前对话轮数:{len(st.session_state.messages)//2}")

    # 主对话区域
    col1, col2 = st.columns([3, 1])

    with col1:
        # 显示对话历史
        chat_container = st.container()
        with chat_container:
            for message in st.session_state.messages:
                with st.chat_message(message["role"]):
                    st.markdown(message["content"])

        # 用户输入
        user_input = st.chat_input("请输入您的问题...")

        if user_input:
            # 添加用户消息
            st.session_state.messages.append({"role": "user", "content": user_input})

            # 显示用户消息
            with st.chat_message("user"):
                st.markdown(user_input)

            # 生成回复
            with st.chat_message("assistant"):
                message_placeholder = st.empty()

                # 准备消息格式
                messages_for_api = [
                    {"role": msg["role"], "content": msg["content"]}
                    for msg in st.session_state.messages
                ]

                # 流式生成回复
                full_response = ""
                for chunk in client.stream_chat_completion(messages_for_api, model):
                    full_response += chunk
                    message_placeholder.markdown(full_response + "▌")

                message_placeholder.markdown(full_response)

            # 添加助手回复
            st.session_state.messages.append({"role": "assistant", "content": full_response})

            # 保存到历史记录
            st.session_state.chat_history.append({
                "timestamp": datetime.now().strftime("%Y-%m-%d %H:%M:%S"),
                "user": user_input,
                "assistant": full_response,
                "model": model,
                "temperature": temperature
            })

    with col2:
        # 快捷功能
        st.header("🚀 快捷功能")

        # 预设问题
        preset_questions = [
            "帮我写一个Python函数",
            "解释一下机器学习的基本概念",
            "推荐一些编程学习资源",
            "如何优化Python代码性能?"
        ]

        for question in preset_questions:
            if st.button(question, key=f"preset_{question[:10]}"):
                st.session_state.messages.append({"role": "user", "content": question})
                st.experimental_rerun()

        # 导出对话记录
        if st.session_state.chat_history:
            st.header("📥 导出功能")

            # 转换为DataFrame
            df = pd.DataFrame(st.session_state.chat_history)

            # 提供下载
            csv = df.to_csv(index=False, encoding='utf-8-sig')
            st.download_button(
                label="下载对话记录 (CSV)",
                data=csv,
                file_name=f"deepseek_chat_{datetime.now().strftime('%Y%m%d_%H%M%S')}.csv",
                mime="text/csv"
            )

if __name__ == "__main__":
    main()
🔧 运行和部署
创建requirements.txt:
textstreamlit==1.28.0
requests==2.31.0
python-dotenv==1.0.0
pandas==2.0.3
运行应用:
Bash# 在项目目录下执行
streamlit run app.py
🎯 高级功能扩展
📊 对话数据分析
添加对话数据分析功能:
Pythondef analyze_chat_data():
    """分析对话数据"""
    if not st.session_state.chat_history:
        return

    df = pd.DataFrame(st.session_state.chat_history)

    # 统计信息
    col1, col2, col3 = st.columns(3)

    with col1:
        st.metric("总对话数", len(df))

    with col2:
        avg_response_length = df['assistant'].str.len().mean()
        st.metric("平均回复长度", f"{avg_response_length:.0f}字")

    with col3:
        models_used = df['model'].unique()
        st.metric("使用模型数", len(models_used))

    # 可视化图表
    if len(df) > 1:
        st.subheader("📈 对话趋势")
        df['timestamp'] = pd.to_datetime(df['timestamp'])
        df['hour'] = df['timestamp'].dt.hour

        hourly_count = df.groupby('hour').size()
        st.bar_chart(hourly_count)
🔐 安全性增强
添加输入验证和安全检查:
Pythonimport re

def validate_input(user_input: str) -> tuple[bool, str]:
    """
    验证用户输入

    Args:
        user_input: 用户输入内容

    Returns:
        tuple: (是否有效, 错误信息)
    """
    # 长度检查
    if len(user_input.strip()) == 0:
        return False, "输入不能为空"

    if len(user_input) > 1000:
        return False, "输入长度不能超过1000字符"

    # 敏感词检查(示例)
    sensitive_words = ['攻击', '恶意', '病毒']
    for word in sensitive_words:
        if word in user_input:
            return False, f"输入包含敏感词:{word}"

    return True, ""
🎨 UI美化
使用自定义CSS美化界面:
Pythondef load_custom_css():
    """加载自定义CSS样式"""
    st.markdown("""
    <style>
    .main-header {
        background: linear-gradient(90deg, #667eea 0%, #764ba2 100%);
        padding: 1rem;
        border-radius: 10px;
        color: white;
        text-align: center;
        margin-bottom: 2rem;
    }

    .chat-container {
        background-color: #f8f9fa;
        border-radius: 10px;
        padding: 1rem;
        margin: 1rem 0;
    }

    .metric-card {
        background: white;
        padding: 1rem;
        border-radius: 8px;
        box-shadow: 0 2px 4px rgba(0,0,0,0.1);
    }
    </style>
    """, unsafe_allow_html=True)
🚀 性能优化技巧
⚡ 缓存策略
Python@st.cache_data(ttl=3600)  # 缓存1小时
def get_model_info(model_name: str):
    """获取模型信息(缓存结果)"""
    # 模拟API调用获取模型信息
    return {
        "name": model_name,
        "max_tokens": 4000,
        "description": "智能对话模型"
    }

@st.cache_resource
def load_prompt_templates():
    """加载提示词模板(全局缓存)"""
    return {
        "code_review": "请帮我审查以下代码:\n\n{code}\n\n请指出潜在问题和改进建议。",
        "translation": "请将以下内容翻译成{target_language}:\n\n{content}",
        "explanation": "请详细解释以下概念:{concept}"
    }
🔄 异步处理
Pythonimport asyncio
import aiohttp

class AsyncDeepseekClient:
    """异步Deepseek客户端"""

    async def async_chat_completion(self, messages: List[Dict[str, str]]):
        """异步聊天完成"""
        async with aiohttp.ClientSession() as session:
            async with session.post(
                f"{self.base_url}/chat/completions",
                headers=self.headers,
                json={
                    "model": "deepseek-chat",
                    "messages": messages,
                    "max_tokens": 2000
                }
            ) as response:
                result = await response.json()
                return result['choices'][0]['message']['content']
🎯 核心要点总结
通过本文的详细讲解,我们成功构建了一个功能完整的Deepseek智能对话应用。让我们总结三个关键要点:
🔧 架构设计的重要性:采用分层架构设计,将API调用、业务逻辑和用户界面分离,使代码更加模块化和可维护。通过配置文件管理API密钥,确保了应用的安全性和灵活性。
⚡ 用户体验的优化:通过流式响应、缓存机制和异常处理,为用户提供了流畅的交互体验。Streamlit框架的使用让我们能够快速构建美观的Web界面,而无需复杂的前端开发。
🚀 扩展性和实用性:代码结构设计考虑了未来的功能扩展,包括对话记录导出、数据分析、多模型支持等功能。这样的设计让应用不仅能满足当前需求,还能适应未来的业务发展。
掌握了这些Python开发技巧后,你就能轻松构建各种AI应用,为你的项目增添智能化功能。继续探索更多编程技巧,让你的上位机开发之路更加精彩!
本文作者:技术老小子
本文链接:
版权声明:本博客所有文章除特别声明外,均采用 BY-NC-SA 许可协议。转载请注明出处!