目录
在本文中,我们将探讨如何使用OpenCvSharp库在C#的WinForms应用程序中实现轮廓匹配功能。轮廓匹配是计算机视觉中的一项重要技术,可用于识别和定位图像中的特定形状或物体。
应用程序概述
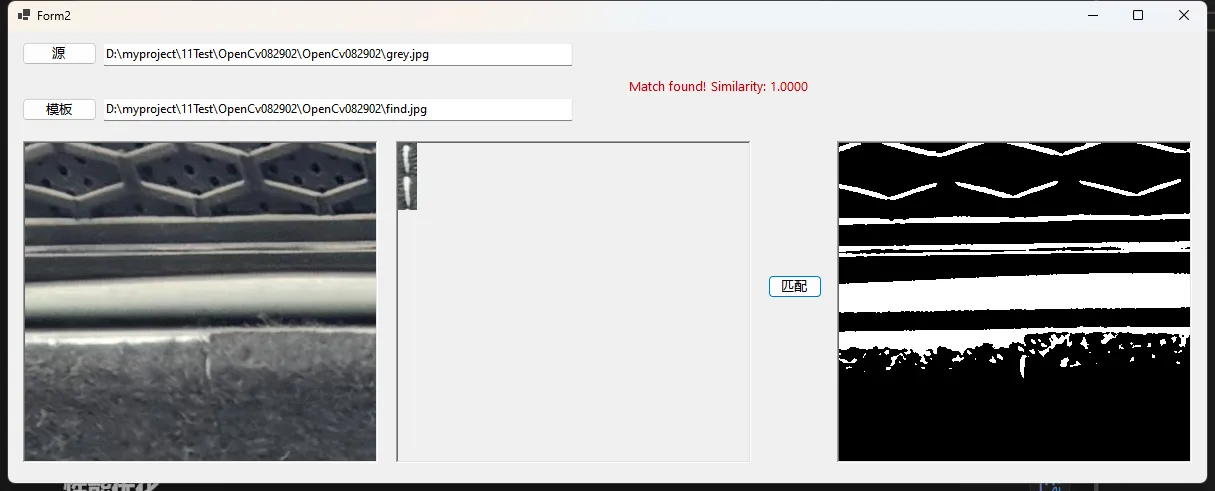
我们的WinForms应用程序允许用户选择两张图片:一张源图像和一张模板图像。程序会在源图像中查找与模板图像最相似的轮廓,并在结果图像中高亮显示匹配的轮廓。
主要功能包括:
- 选择源图像和模板图像
- 显示选择的图像
- 执行轮廓匹配
- 显示匹配结果和相似度
实现细节
1. 图像选择
我们使用OpenFileDialog来允许用户选择源图像和模板图像。选择的图像路径会显示在文本框中,并在PictureBox控件中预览图像。
C#private void btnSelectSource_Click(object sender, EventArgs e)
{
    using (OpenFileDialog openFileDialog = new OpenFileDialog())
    {
        openFileDialog.Filter = "Image files (*.png;*.jpg;*.jpeg)|*.png;*.jpg;*.jpeg|All files (*.*)|*.*";
        if (openFileDialog.ShowDialog() == DialogResult.OK)
        {
            sourcePath = openFileDialog.FileName;
            txtSourcePath.Text = sourcePath;
            pictureBoxSource.Image = System.Drawing.Image.FromFile(sourcePath);
        }
    }
}

private void btnSelectTemplate_Click(object sender, EventArgs e)
{
    using (OpenFileDialog openFileDialog = new OpenFileDialog())
    {
        openFileDialog.Filter = "Image files (*.png;*.jpg;*.jpeg)|*.png;*.jpg;*.jpeg|All files (*.*)|*.*";
        if (openFileDialog.ShowDialog() == DialogResult.OK)
        {
            templatePath = openFileDialog.FileName;
            txtTemplatePath.Text = templatePath;
            pictureBoxTemplate.Image = System.Drawing.Image.FromFile(templatePath);
        }
    }
}
2. 图像预处理
在进行轮廓匹配之前,我们需要对图像进行预处理。这包括将图像转换为灰度图,并应用二值化处理:
C#Cv2.Threshold(source, source, 127, 255, ThresholdTypes.Binary);
Cv2.Threshold(template, template, 127, 255, ThresholdTypes.Binary);
3. 轮廓检测
使用Cv2.FindContours方法来检测源图像和模板图像中的轮廓:
C#Cv2.FindContours(source, out Point[][] sourceContours, out HierarchyIndex[] hierarchy, RetrievalModes.External, ContourApproximationModes.ApproxSimple);
Cv2.FindContours(template, out Point[][] templateContours, out _, RetrievalModes.External, ContourApproximationModes.ApproxSimple);
4. 轮廓匹配
我们使用Cv2.MatchShapes方法来比较模板轮廓与源图像中的每个轮廓的相似度:
C#double match = Cv2.MatchShapes(templateContours[0], sourceContours[i], ShapeMatchModes.I1, 0);
5. 结果显示
如果找到匹配的轮廓(相似度高于阈值),我们会在结果图像中绘制该轮廓并显示相似度:
C#if (bestMatchIndex != -1 && bestMatch < 0.1)
{
    using (Mat result = source.Clone())
    {
        Cv2.CvtColor(result, result, ColorConversionCodes.GRAY2BGR);
        Cv2.DrawContours(result, sourceContours, bestMatchIndex, Scalar.Red, 2);
        pictureBoxResult.Image = BitmapConverter.ToBitmap(result);
    }
    lblResult.Text = $"Match found! Similarity: {1 - bestMatch:F4}";
}
else
{
    lblResult.Text = "No match found.";
}
6.匹配事件
C#private void btnMatch_Click(object sender, EventArgs e)
{
    if (string.IsNullOrEmpty(sourcePath) || string.IsNullOrEmpty(templatePath))
    {
        MessageBox.Show("Please select both source and template images.");
        return;
    }

    try
    {
        using (Mat source = Cv2.ImRead(sourcePath, ImreadModes.GrayScale))
        using (Mat template = Cv2.ImRead(templatePath, ImreadModes.GrayScale))
        {
            Cv2.Threshold(source, source, 127, 255, ThresholdTypes.Binary);
            Cv2.Threshold(template, template, 127, 255, ThresholdTypes.Binary);

            Cv2.FindContours(source, out Point[][] sourceContours, out HierarchyIndex[] hierarchy, RetrievalModes.External, ContourApproximationModes.ApproxSimple);
            Cv2.FindContours(template, out Point[][] templateContours, out _, RetrievalModes.External, ContourApproximationModes.ApproxSimple);

            double bestMatch = double.MaxValue;
            int bestMatchIndex = -1;

            for (int i = 0; i < sourceContours.Length; i++)
            {
                double match = Cv2.MatchShapes(templateContours[0], sourceContours[i], ShapeMatchModes.I1, 0);
                if (match < bestMatch)
                {
                    bestMatch = match;
                    bestMatchIndex = i;
                }
            }

            if (bestMatchIndex != -1 && bestMatch < 0.1) // 设置一个阈值
            {
                using (Mat result = source.Clone())
                {
                    Cv2.CvtColor(result, result, ColorConversionCodes.GRAY2BGR);
                    Cv2.DrawContours(result, sourceContours, bestMatchIndex, Scalar.Red, 2);
                    pictureBoxResult.Image = BitmapConverter.ToBitmap(result);
                }
                lblResult.Text = $"Match found! Similarity: {1 - bestMatch:F4}";
            }
            else
            {
                lblResult.Text = "No match found.";
            }
        }
    }
    catch (Exception ex)
    {
        MessageBox.Show($"An error occurred: {ex.Message}");
    }
}
注意事项
- 图像预处理:二值化阈值(127)可能需要根据实际图像调整以获得最佳结果。
- 匹配阈值:当前代码中使用的阈值(0.1)可能需要根据具体应用场景进行调整。
- 错误处理:代码中包含了基本的错误处理,但在实际应用中可能需要更健壮的错误处理机制。
性能优化
对于大型图像或需要实时处理的应用,可以考虑以下优化方法:
- 图像缩放:在处理之前将大图像缩小到合适的尺寸。
- 并行处理:使用并行循环(Parallel.For)来加速轮廓匹配过程。
- ROI(感兴趣区域):如果知道目标可能出现的大致位置,可以只在特定区域内搜索。
扩展功能
这个基本的轮廓匹配应用可以进一步扩展,以增加其实用性:
- 多模板匹配:允许用户选择多个模板,并在源图像中查找所有匹配的轮廓。
- 实时视频处理:将静态图像处理扩展到视频流,实现实时物体检测。
- 匹配结果保存:添加保存匹配结果图像的功能。
- 批量处理:允许用户选择多个源图像,并自动处理所有图像。
代码结构优化
为了提高代码的可维护性和可读性,可以考虑以下改进:
- 将轮廓匹配逻辑封装到单独的类中,使主窗体代码更加简洁。
- 使用依赖注入来管理OpenCvSharp的依赖,便于单元测试。
- 实现MVVM(Model-View-ViewModel)模式,更好地分离UI和业务逻辑。
用户界面改进
当前的用户界面是功能性的,但可以通过以下方式改进用户体验:
- 添加进度条:在处理大图像时显示进度。
- 图像缩放:允许用户放大/缩小显示的图像。
- 拖放功能:支持直接拖放图像文件到应用程序中。
- 暗黑模式:添加暗色主题选项。
结论
本文介绍了如何使用OpenCvSharp在C# WinForms应用程序中实现基本的轮廓匹配功能。通过结合OpenCV的强大图像处理能力和WinForms的用户界面,我们创建了一个直观的工具来演示轮廓匹配技术。
这个应用程序为更复杂的计算机视觉项目奠定了基础。通过进一步的优化和功能扩展,它可以发展成为一个强大的图像分析工具,适用于各种实际应用场景,如质量控制、医学影像分析或自动化视觉检测系统。
记住,轮廓匹配只是计算机视觉中众多技术之一。根据具体的应用需求,可能还需要结合其他技术,如模板匹配、特征点检测、机器学习等,以获得最佳的识别和分析效果。
本文作者:技术老小子
本文链接:
版权声明:本博客所有文章除特别声明外,均采用 BY-NC-SA 许可协议。转载请注明出处!