
目录
你是否遇到过这样的困惑:刚学会C#语法,想要做一个有界面的程序,却发现不知道从何下手?或者写出来的程序只能在控制台里跑,看起来一点都不"专业"?
无论是企业管理系统、游戏界面,还是日常使用的各种软件,控件都是构建用户交互界面的基础砖块。
今天这篇文章,将带你彻底掌握C#控件的核心概念和实战技巧,让你的程序从"黑窗口"升级为"有颜值有实力"的桌面应用!
🔍 什么是控件?为什么它如此重要?
💡 控件的本质
在C#的世界里,控件(Control)就是用户界面的"乐高积木"。每一个按钮、文本框、列表都是一个控件,它们组合在一起就构成了我们看到的软件界面。
关键点: 所有控件都继承自System.Windows.Forms.Control基类,这意味着它们共享相同的基础功能。
🏗️ 控件的四大核心要素
- 属性(Properties) - 控件的外观和行为特征
- 方法(Methods) - 控件能执行的操作
- 事件(Events) - 控件对用户操作的响应
- 层次结构 - 控件之间的父子关系
其实这么一看是不是就是面向对象类的所有特性
🚀 实战演练:创建你的第一个控件
📝 完整代码示例
C#namespace AppFirstWin
{
public partial class Form1 : Form
{
private Button btnClick; // 声明按钮控件
private TextBox txtInput; // 声明文本输入框
private Label lblResult; // 声明标签控件
public Form1()
{
InitializeComponent();
InitializeControls(); //初始化控件,这块一样不用这么搞
SetupEventHandlers(); // 设置事件处理
}
private void InitializeControls()
{
// 设置窗体基本属性
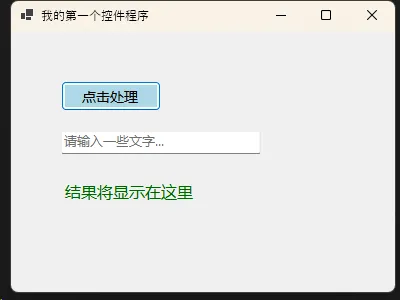
this.Text = "我的第一个控件程序";
this.Size = new Size(400, 300);
this.StartPosition = FormStartPosition.CenterScreen;
// 创建并配置按钮
btnClick = new Button
{
Text = "点击处理",
Location = new Point(50, 50),
Size = new Size(100, 30),
BackColor = Color.LightBlue,
Font = new Font("微软雅黑", 10)
};
// 创建并配置文本框
txtInput = new TextBox
{
Location = new Point(50, 100),
Size = new Size(200, 25),
PlaceholderText = "请输入一些文字..."
};
// 创建并配置标签
lblResult = new Label
{
Text = "结果将显示在这里",
Location = new Point(50, 150),
Size = new Size(300, 50),
ForeColor = Color.DarkGreen,
Font = new Font("微软雅黑", 12)
};
// 将所有控件添加到窗体
this.Controls.AddRange(new Control[]
{
btnClick,
txtInput,
lblResult
});
}
private void SetupEventHandlers()
{
// 按钮点击事件
btnClick.Click += (sender, e) =>
{
string userInput = txtInput.Text;
if (string.IsNullOrWhiteSpace(userInput))
{
lblResult.Text = "请先输入一些内容!";
lblResult.ForeColor = Color.Red;
}
else
{
lblResult.Text = $"你输入了:{userInput}";
lblResult.ForeColor = Color.DarkGreen;
}
};
// 文本框内容改变事件
txtInput.TextChanged += (sender, e) =>
{
if (txtInput.Text.Length > 50)
{
MessageBox.Show("输入内容不能超过50个字符!",
"提示",
MessageBoxButtons.OK,
MessageBoxIcon.Warning);
}
};
}
}
}
🎯 代码解析:每行都有讲究
引用命名空间
System.Drawing- 提供颜色、字体等UI相关类System.Windows.Forms- 包含所有控件类
控件初始化的黄金法则
C#btnClick = new Button
{
    Text = "点击处理",              // 显示文本
    Location = new Point(50, 50), // 位置坐标
    Size = new Size(100, 30),     // 控件大小
    BackColor = Color.LightBlue   // 背景颜色
};
⚠️ 常见坑点提醒:
- 忘记调用
this.Controls.Add()- 控件创建了但不显示 - 事件处理程序内存泄漏 - 使用Lambda表达式要注意作用域
- 控件重叠 - Location设置不当导致控件互相遮挡
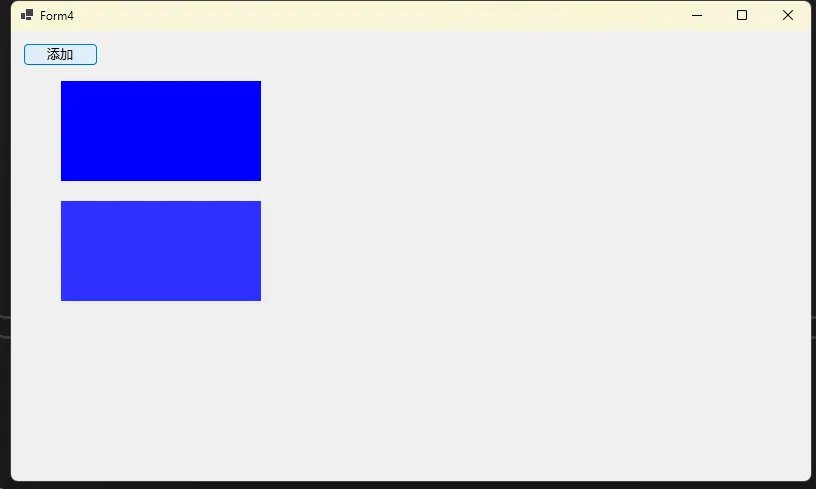
千万不要以为控件布局都要这么手写,实际业务上大多是根组态一样也是拖拉拽实现的。
🛠️ 控件属性完全掌握
📊 核心属性速查表
| 属性名 | 作用 | 实用技巧 |
|---|---|---|
Text | 显示文本 | 支持换行符\n |
Location | 位置坐标 | 使用Point(x, y)设置 |
Size | 控件大小 | Size(width, height) |
Enabled | 是否可用 | false时控件变灰 |
Visible | 是否可见 | 动态显示/隐藏控件 |
Anchor | 锚定方式 | 响应式布局的关键 |
🎨 美化控件的高级技巧
C#using System;
using System.Collections.Generic;
using System.ComponentModel;
using System.Data;
using System.Drawing;
using System.Drawing.Drawing2D;
using System.Linq;
using System.Text;
using System.Threading.Tasks;
using System.Windows.Forms;
namespace AppFirstWin
{
public partial class Form2 : Form
{
public Form2()
{
InitializeComponent();
}
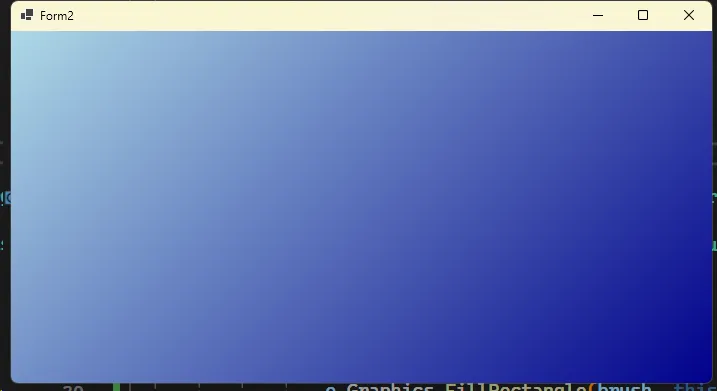
// 设置渐变背景(需要重写Paint事件)
protected override void OnPaint(PaintEventArgs e)
{
using (var brush = new LinearGradientBrush(
this.ClientRectangle,
Color.LightBlue,
Color.DarkBlue,
45f))
{
e.Graphics.FillRectangle(brush, this.ClientRectangle);
}
base.OnPaint(e);
}
}
}
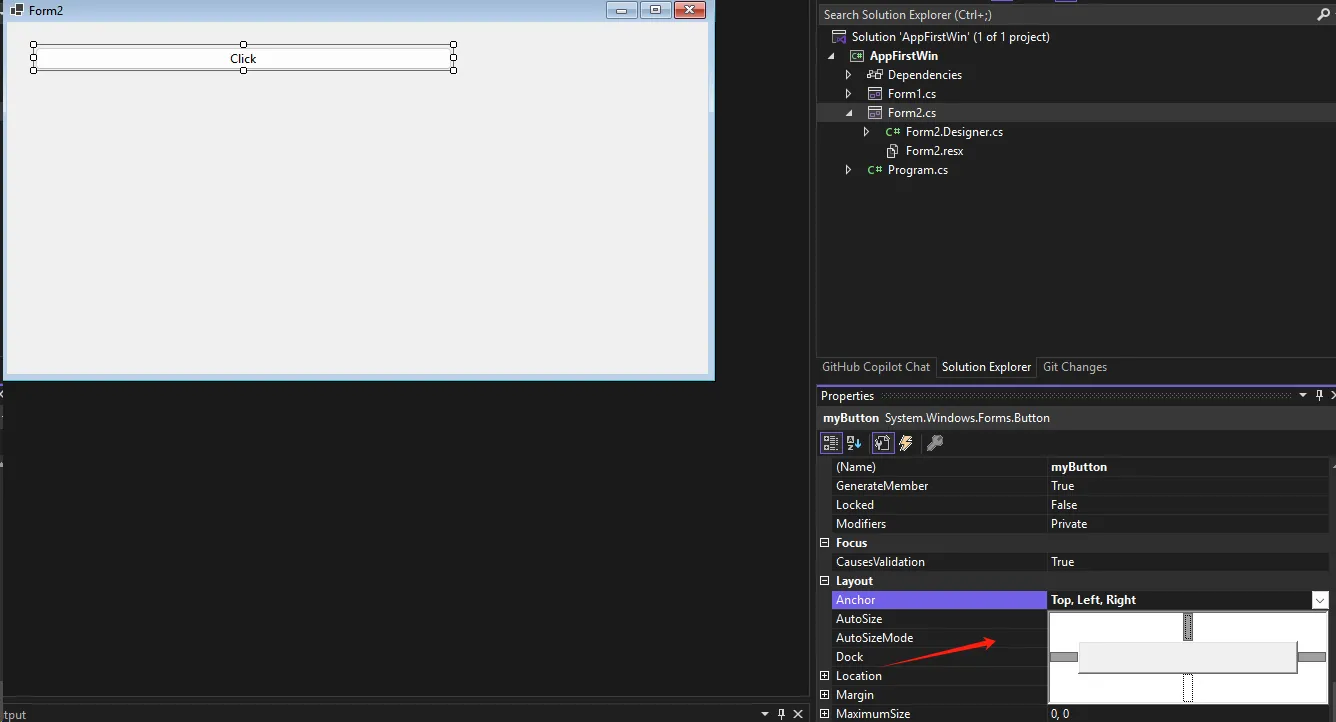
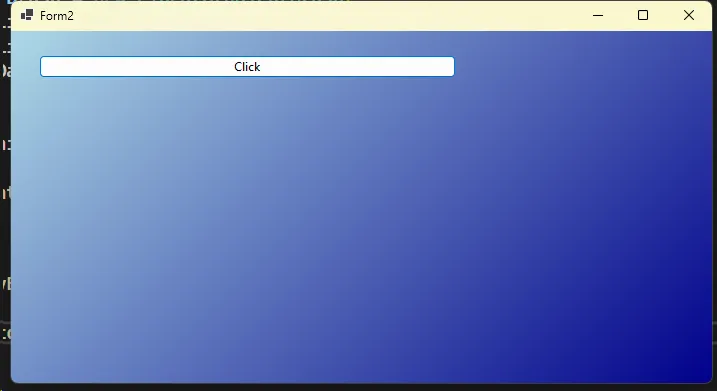
记住窗口其实也是控件
C#// 控件自适应父容器大小
myButton.Anchor = AnchorStyles.Top | AnchorStyles.Left | AnchorStyles.Right;
C#private void myButton_Click(object sender, EventArgs e)
{
    AnimateButton();
}

// 添加控件动画效果
private async void AnimateButton()
{
    for (int i = 0; i < 10; i++)
    {
        myButton.Location = new Point(
            myButton.Location.X + (i % 2 == 0 ? 5 : -5),
            myButton.Location.Y
        );
        await Task.Delay(100);
    }
}
🎪 事件处理:让控件"活"起来
🔥 最常用的5大事件类型
C#// 1️⃣ Click事件 - 最基础也最重要
myButton.Click += (sender, e) =>
{
    MessageBox.Show("按钮被点击了!");
};

// 2️⃣ TextChanged事件 - 实时响应文本变化
textBox.TextChanged += (sender, e) =>
{
    var tb = sender as TextBox;
    label.Text = $"已输入 {tb.Text.Length} 个字符";
};

// 3️⃣ KeyDown事件 - 键盘输入处理
textBox.KeyDown += (sender, e) =>
{
    if (e.KeyCode == Keys.Enter)
    {
        // 回车键触发搜索
        PerformSearch();
        e.Handled = true; // 阻止默认行为
    }
};

// 4️⃣ MouseEnter/MouseLeave事件 - 鼠标悬停效果
button.MouseEnter += (s, e) => button.BackColor = Color.LightGray; //鼠标进入
button.MouseLeave += (s, e) => button.BackColor = SystemColors.Control; //鼠标离开

// 5️⃣ Load事件 - 窗体加载完成
this.Load += (sender, e) =>
{
    // 窗体加载后的初始化操作
};
当你拖拉控件时,这类似的代码vs会帮你写在对应的desginer.cs中
⚡ 事件处理的最佳实践
C#// ✅ 推荐:使用Lambda表达式
button.Click += (sender, e) => ProcessButtonClick();

// ✅ 推荐:分离事件逻辑
private void ProcessButtonClick() //这个是代码生成实际最多的
{
    try
    {
        // 具体业务逻辑
        var result = CalculateResult();
        DisplayResult(result);
    }
    catch (Exception ex)
    {
        ShowErrorMessage(ex.Message);
    }
}

// ❌ 避免:在事件处理程序中写太多代码,这块是代手动写是代码一般生成这样的格式,
// 有时如果只用一回用这个也无妨。
button.Click += (sender, e) =>
{
    // 避免在这里写几十行代码
    // 这样会让代码难以维护和测试
};
📈 进阶技巧:控件集合与动态创建
🏭 批量创建控件的工厂模式
C#public class ControlFactory
{
    public static Button CreateStandardButton(string text, Point location)
    {
        return new Button
        {
            Text = text,
            Location = location,
            Size = new Size(100, 30),
            BackColor = Color.LightBlue,
            FlatStyle = FlatStyle.Flat,
            Font = new Font("微软雅黑", 9)
        };
    }

    public static TextBox CreateValidatedTextBox(Point location, int maxLength = 50)
    {
        var textBox = new TextBox
        {
            Location = location,
            Size = new Size(200, 25),
            MaxLength = maxLength
        };

        // 添加验证逻辑
        textBox.KeyPress += (sender, e) =>
        {
            if (!char.IsControl(e.KeyChar) && !char.IsDigit(e.KeyChar))
            {
                e.Handled = true; // 只允许数字输入
            }
        };

        return textBox;
    }
}
使用工厂创建控件
C#using System;
using System.Collections.Generic;
using System.ComponentModel;
using System.Data;
using System.Drawing;
using System.Linq;
using System.Text;
using System.Threading.Tasks;
using System.Windows.Forms;

namespace AppFirstWin
{
    public partial class Form3 : Form
    {
        public Form3()
        {
            InitializeComponent();
            // 使用工厂创建控件
            var saveButton = ControlFactory.CreateStandardButton("保存", new Point(100, 50));
            var numberInput = ControlFactory.CreateValidatedTextBox(new Point(100, 100));
            this.Controls.AddRange(new Control[] { saveButton, numberInput });
        }
    }
}
🔄 动态控件管理
C#using System;
using System.Collections.Generic;
using System.Linq;
using System.Reflection;
using System.Text;
using System.Threading.Tasks;

namespace AppFirstWin
{
    public class DynamicControlManager
    {
        private Form parentForm;

        public int DynamicControlCount => dynamicControls.Count;

        private List<Control> dynamicControls = new List<Control>();

        public DynamicControlManager(Form form)
        {
            parentForm = form ?? throw new ArgumentNullException(nameof(form));
        }

        private void EnableDoubleBuffering(Control control)
        {
            try
            {
                // 使用反射设置 DoubleBuffered 属性
                PropertyInfo propertyInfo = control.GetType().GetProperty("DoubleBuffered", BindingFlags.Instance | BindingFlags.NonPublic);
                propertyInfo?.SetValue(control, true, null);
            }
            catch (Exception ex)
            {
                System.Diagnostics.Debug.WriteLine($"Double buffering error: {ex.Message}");
            }
        }

        public async Task AddControlWithFadeInAsync(Control control)
        {
            if (control == null)
                throw new ArgumentNullException(nameof(control));

            EnableDoubleBuffering(control); //这里需要反射重写

            // 预设置控件初始状态
            PrepareControlForFadeIn(control);

            // 将控件添加到父窗体
            parentForm.Controls.Add(control);
            dynamicControls.Add(control);

            // 执行淡入动画
            await ExecuteFadeInAnimationAsync(control);
        }

        private void PrepareControlForFadeIn(Control control)
        {
            // 初始设置完全透明
            control.BackColor = Color.FromArgb(0, control.BackColor);
            control.Visible = true;
        }

        private async Task ExecuteFadeInAnimationAsync(Control control)
        {
            control.BackColor = Color.FromArgb(0, control.BackColor);

            // 使用缓动函数创建更自然的fade效果
            for (double t = 0; t <= 1; t += 0.05)
            {
                // 使用正弦缓动函数创建平滑过渡
                int opacity = (int)(Math.Sin(t * Math.PI / 2) * 255);

                try
                {
                    control.SuspendLayout();

                    control.BackColor = Color.FromArgb(
                        Math.Min(255, opacity),
                        control.BackColor.R,
                        control.BackColor.G,
                        control.BackColor.B
                    );

                    control.ResumeLayout(true);

                    await Task.Delay(20);
                }
                catch (Exception ex)
                {
                    System.Diagnostics.Debug.WriteLine($"Fade in animation error: {ex.Message}");
                    break;
                }
            }

            // 确保最终完全不透明
            control.BackColor = Color.FromArgb(255, control.BackColor);

        }

        public void ClearAllDynamicControls()
        {
            foreach (var control in dynamicControls)
            {
                try
                {
                    parentForm.Controls.Remove(control);
                    control.Dispose();
                }
                catch (Exception ex)
                {

                }
            }
            dynamicControls.Clear();
        }
    }
}
🎯 实际应用场景:构建一个完整的用户注册表单
C#using System;
using System.Collections.Generic;
using System.ComponentModel;
using System.Data;
using System.Drawing;
using System.Linq;
using System.Text;
using System.Threading.Tasks;
using System.Windows.Forms;

namespace AppFirstWin
{
    public partial class FrmRegistration : Form
    {
        private TextBox usernameTextBox, emailTextBox, passwordTextBox;
        private Button registerButton, clearButton;
        private Label statusLabel;
        private ProgressBar validationProgress;

        public FrmRegistration()
        {
            InitializeComponent();

            InitializeForm();
        }

        private void InitializeForm()
        {
            this.Text = "用户注册";
            this.Size = new Size(400, 350);
            this.FormBorderStyle = FormBorderStyle.FixedDialog;
            this.MaximizeBox = false;

            // 创建输入控件
            CreateInputControls();

            // 创建按钮
            CreateButtons();

            // 创建状态显示
            CreateStatusControls();
        }

        private void CreateInputControls()
        {
            // 用户名输入
            var usernameLabel = new Label { Text = "用户名:", Location = new Point(30, 30), Size = new Size(80, 23) };
            usernameTextBox = new TextBox { Location = new Point(120, 30), Size = new Size(200, 23) };

            // 邮箱输入
            var emailLabel = new Label { Text = "邮箱:", Location = new Point(30, 70), Size = new Size(80, 23) };
            emailTextBox = new TextBox { Location = new Point(120, 70), Size = new Size(200, 23) };

            // 密码输入
            var passwordLabel = new Label { Text = "密码:", Location = new Point(30, 110), Size = new Size(80, 23) };
            passwordTextBox = new TextBox
            {
                Location = new Point(120, 110),
                Size = new Size(200, 23),
                PasswordChar = '*'
            };

            this.Controls.AddRange(new Control[]
            {
            usernameLabel, usernameTextBox,
            emailLabel, emailTextBox,
            passwordLabel, passwordTextBox
            });
        }

        private void CreateButtons()
        {
            registerButton = new Button
            {
                Text = "注册",
                Location = new Point(120, 180),
                Size = new Size(80, 30),
                BackColor = Color.LightGreen
            };

            clearButton = new Button
            {
                Text = "清空",
                Location = new Point(220, 180),
                Size = new Size(80, 30),
                BackColor = Color.LightCoral
            };

            registerButton.Click += RegisterButton_Click;
            clearButton.Click += (s, e) => ClearAllFields();

            this.Controls.AddRange(new Control[] { registerButton, clearButton });
        }

        private void CreateStatusControls()
        {
            statusLabel = new Label
            {
                Text = "请填写注册信息",
                Location = new Point(30, 230),
                Size = new Size(300, 23),
                ForeColor = Color.Blue
            };

            validationProgress = new ProgressBar
            {
                Location = new Point(30, 260),
                Size = new Size(300, 23),
                Style = ProgressBarStyle.Continuous
            };

            this.Controls.AddRange(new Control[] { statusLabel, validationProgress });
        }

        private async void RegisterButton_Click(object sender, EventArgs e)
        {
            if (await ValidateInputs())
            {
                await SimulateRegistration();
            }
        }

        private async Task<bool> ValidateInputs()
        {
            validationProgress.Value = 0;

            // 验证用户名
            if (string.IsNullOrWhiteSpace(usernameTextBox.Text))
            {
                ShowValidationError("用户名不能为空");
                return false;
            }
            validationProgress.Value = 33;
            await Task.Delay(200);

            // 验证邮箱
            if (!IsValidEmail(emailTextBox.Text))
            {
                ShowValidationError("请输入有效的邮箱地址");
                return false;
            }
            validationProgress.Value = 66;
            await Task.Delay(200);

            // 验证密码
            if (passwordTextBox.Text.Length < 6)
            {
                ShowValidationError("密码长度不能少于6位");
                return false;
            }
            validationProgress.Value = 100;

            statusLabel.Text = "输入验证通过!";
            statusLabel.ForeColor = Color.Green;
            return true;
        }

        private bool IsValidEmail(string email)
        {
            try
            {
                var addr = new System.Net.Mail.MailAddress(email);
                return addr.Address == email;
            }
            catch
            {
                return false;
            }
        }

        private void ShowValidationError(string message)
        {
            statusLabel.Text = message;
            statusLabel.ForeColor = Color.Red;
            validationProgress.Value = 0;
        }

        private async Task SimulateRegistration()
        {
            registerButton.Enabled = false;
            statusLabel.Text = "正在注册...";

            // 模拟网络请求
            await Task.Delay(2000);

            statusLabel.Text = "注册成功!";
            statusLabel.ForeColor = Color.Green;
            MessageBox.Show("注册成功!欢迎加入我们!", "成功", MessageBoxButtons.OK, MessageBoxIcon.Information);

            registerButton.Enabled = true;
        }

        private void ClearAllFields()
        {
            usernameTextBox.Clear();
            emailTextBox.Clear();
            passwordTextBox.Clear();
            statusLabel.Text = "请填写注册信息";
            statusLabel.ForeColor = Color.Blue;
            validationProgress.Value = 0;
        }
    }
}

💡 性能优化与最佳实践
🚀 控件性能优化技巧
C#// 1️⃣ 批量操作时暂停重绘
private void AddManyControls()
{
    this.SuspendLayout(); // 暂停布局计算

    for (int i = 0; i < 100; i++)
    {
        var button = new Button
        {
            Text = $"Button {i}",
            Location = new Point(10, i * 30),
            Size = new Size(100, 25)
        };
        this.Controls.Add(button);
    }

    this.ResumeLayout(true); // 恢复并执行布局
}

// 2️⃣ 及时释放资源
protected override void OnFormClosed(FormClosedEventArgs e)
{
    // 清理事件订阅
    foreach (Control control in this.Controls)
    {
        control.Click -= null; // 移除事件处理程序
    }

    base.OnFormClosed(e);
}

// 3️⃣ 使用控件缓存
private Dictionary<string, Control> controlCache = new Dictionary<string, Control>();

private T GetCachedControl<T>(string key, Func<T> factory) where T : Control
{
    if (!controlCache.ContainsKey(key))
    {
        controlCache[key] = factory();
    }
    return (T)controlCache[key];
}
🎊 总结:掌握控件的三个关键点
通过今天的学习,相信你已经对C#控件有了全面的认识。让我们回顾一下三个最重要的核心点,控件的本质可以概括为属性 + 方法 + 事件,其中属性决定了控件的外观和行为,方法提供了功能操作,而事件则实现了用户交互的响应。在开发过程中,遵循规范化的流程至关重要,包括创建控件实例、设置属性配置、注册事件处理以及将控件添加到父容器中,这一步骤能有效提升代码的条理性与可维护性。性能与维护并重是开发中需要始终关注的原则,合理使用控件缓存、及时释放资源以及分离业务逻辑与UI逻辑,能够确保程序运行高效且便于后续扩展与优化。这些核心要点将为你的C#控件开发提供坚实的基础与指导方向。
🤝 互动时间
问题1: 你在使用控件时遇到过哪些"坑"?欢迎在评论区分享你的踩坑经历!
问题2: 除了文章中提到的控件,你最想了解哪个控件的高级用法?
如果这篇文章对你有帮助,请点赞并转发给更多的C#学习者!让我们一起在编程的道路上互相帮助,共同进步!
💬 留言区见!期待看到你的实战作品和技术心得分享!
本文作者:技术老小子
本文链接:
版权声明:本博客所有文章除特别声明外,均采用 BY-NC-SA 许可协议。转载请注明出处!