
Press Ctrl+ and K to search
目录
下面文章我将用最简单的方式,教你掌握Button、TextBox、Label这三大核心控件的使用技巧,让你的界面开发水平直接提升一个档次。
🎯 为什么WinForms控件这么重要?
在桌面应用开发中,用户界面就是你的"门面"。一个操作流畅、布局合理的界面,往往决定了用户对你产品的第一印象。
WinForms控件开发的三大痛点:
- 控件定位混乱:不知道如何精确控制控件位置
- 事件处理复杂:用户交互逻辑写得一团糟
- 属性配置繁琐:每个控件有几十个属性,不知道哪些是关键的
别担心,接下来我会用实战案例逐一击破这些难题!
🔥 Button控件:用户交互的核心
Button按钮是最基础也是最重要的交互控件。掌握了按钮的使用,你就掌握了WinForms开发的精髓。
💡 关键知识点
- Text属性:按钮显示的文字
- Location属性:按钮在窗体中的坐标位置
- Click事件:用户点击时触发的操作
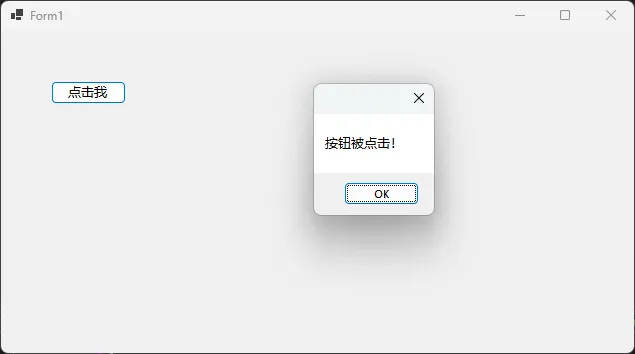
🛠️ 实战代码:创建可点击的按钮
C#namespace AppCommonControls
{
    public partial class Form1 : Form
    {
        private Button myButton;

        public Form1()
        {
            InitializeComponent();

            // 步骤1:初始化按钮控件
            myButton = new Button
            {
                Text = "点击我",  // 按钮显示文字
                Location = new System.Drawing.Point(50, 50)  // 位置:距离左边50px,顶部50px(0,0为左上脚)
            };

            // 步骤2:注册点击事件(重点!)
            myButton.Click += MyButton_Click;

            // 步骤3:将按钮添加到窗体
            this.Controls.Add(myButton);
        }

        // 事件处理程序:用户点击时执行的代码
        private void MyButton_Click(object sender, EventArgs e)
        {
            MessageBox.Show("按钮被点击!");
        }
    }
}
⚠️ 常见坑点提醒:
- 忘记注册Click事件,导致点击无反应
- Location坐标设置错误,按钮跑到窗体外面
- 没有将控件添加到Controls集合,界面上看不到按钮
📝 TextBox控件:文本输入的利器
TextBox是用户输入数据的主要途径,配置好它的属性能大大提升用户体验。
💡 关键属性解析
- Location:文本框位置
- Width:文本框宽度(高度通常自动调整)
- Text:获取或设置文本框中的内容
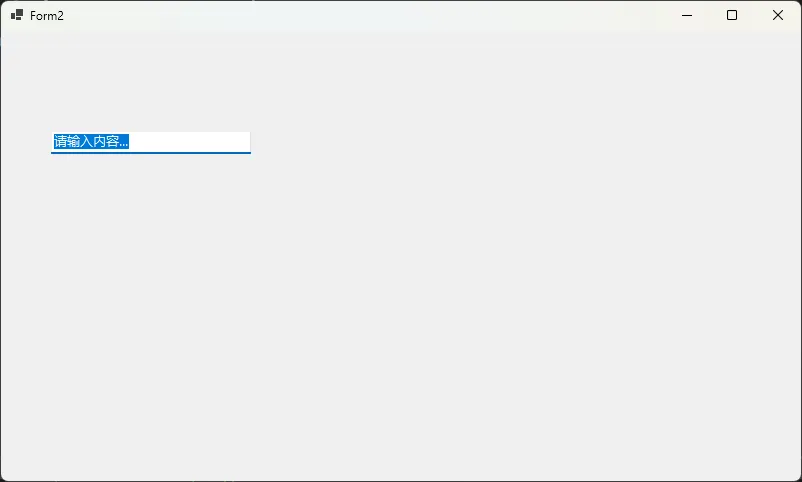
🛠️ 实战代码:创建用户输入框
C#using System;
using System.Collections.Generic;
using System.ComponentModel;
using System.Data;
using System.Drawing;
using System.Linq;
using System.Text;
using System.Threading.Tasks;
using System.Windows.Forms;

namespace AppCommonControls
{
    public partial class Form2 : Form
    {
        private TextBox myTextBox;
        public Form2()
        {
            InitializeComponent();

            // 初始化文本框控件
            myTextBox = new TextBox
            {
                Location = new System.Drawing.Point(50, 100),  // 设置位置
                Width = 200,  // 设置宽度为200像素
                Text = "请输入内容..."  // 设置默认提示文字
            };

            myTextBox.Multiline = true;
            myTextBox.ScrollBars = ScrollBars.Vertical; //垂直滚动条

            // 添加到窗体控件集合
            this.Controls.Add(myTextBox);
        }
    }
}
🔧 进阶技巧:
C#// 设置为密码输入框
myTextBox.PasswordChar = '*';

// 设置为多行文本框
myTextBox.Multiline = true; //这个一般要配合滚动条
myTextBox.ScrollBars = ScrollBars.Vertical; //垂直滚动条
myTextBox.Height = 100;

// 只读模式
myTextBox.ReadOnly = true;
注意:可以用TextBox模拟Label,有一个好处可以COPY内容
🏷️ Label控件:界面信息的指南针
Label用于显示提示文字,是用户界面的"说明书"。合理使用Label能让你的界面更加友好。
💡 核心属性
- Text:显示的文字内容
- AutoSize:自动调整大小适应内容(建议设为true)
- Location:标签位置
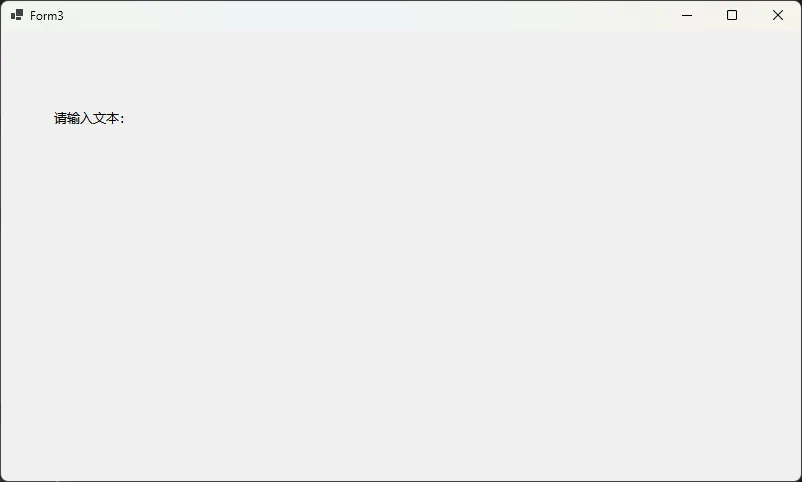
🛠️ 实战代码:创建提示标签
C#using System;
using System.Collections.Generic;
using System.ComponentModel;
using System.Data;
using System.Drawing;
using System.Linq;
using System.Text;
using System.Threading.Tasks;
using System.Windows.Forms;

namespace AppCommonControls
{
    public partial class Form3 : Form
    {
        private Label myLabel;
        public Form3()
        {
            InitializeComponent();

            // 初始化标签控件
            myLabel = new Label
            {
                Text = "请输入文本:",  // 显示的提示文字
                Location = new System.Drawing.Point(50, 80),  // 设置位置
                AutoSize = true  // 重要:自动调整大小
            };

            // 添加到窗体
            this.Controls.Add(myLabel);
        }
    }
}
💡 专业技巧:
C#// 设置字体样式
myLabel.Font = new System.Drawing.Font("微软雅黑", 12F, System.Drawing.FontStyle.Bold);

// 设置前景色
myLabel.ForeColor = System.Drawing.Color.Blue;

// 设置背景色
myLabel.BackColor = System.Drawing.Color.LightGray;
注意:可以用Label就占位,或线条,高度为1,AutoSize为false,给一个背景颜色就可以了。
🎨 组合实战:打造完整的用户表单
现在让我们把三个控件组合起来,创建一个实用的员工信息录入表单。
🛠️ 完整实战代码
C#using System;
using System.Collections.Generic;
using System.ComponentModel;
using System.Data;
using System.Drawing;
using System.Linq;
using System.Text;
using System.Threading.Tasks;
using System.Windows.Forms;

namespace AppCommonControls
{
    public partial class Form4 : Form
    {
        private Button submitButton;
        private TextBox nameTextBox;
        private Label nameLabel;
        public Form4()
        {
            InitializeComponent();

            // 步骤1:创建提示标签
            nameLabel = new Label
            {
                Text = "姓名:",
                Location = new System.Drawing.Point(10, 20),
                AutoSize = true
            };

            // 步骤2:创建输入文本框
            nameTextBox = new TextBox
            {
                Location = new System.Drawing.Point(60, 20),
                Width = 150
            };

            // 步骤3:创建提交按钮
            submitButton = new Button
            {
                Text = "提交",
                Location = new System.Drawing.Point(60, 50)
            };

            // 步骤4:注册按钮点击事件
            submitButton.Click += SubmitButton_Click;

            // 步骤5:将所有控件添加到窗体
            this.Controls.Add(nameLabel);
            this.Controls.Add(nameTextBox);
            this.Controls.Add(submitButton);

            // 设置窗体属性
            this.Text = "员工信息录入";
            this.Size = new System.Drawing.Size(300, 150);
        }

        // 提交按钮点击事件处理
        private void SubmitButton_Click(object sender, EventArgs e)
        {
            // 输入验证
            if (string.IsNullOrWhiteSpace(nameTextBox.Text))
            {
                MessageBox.Show("请输入姓名!", "提示", MessageBoxButtons.OK, MessageBoxIcon.Warning);
                return;
            }

            // 显示录入结果
            MessageBox.Show($"你好,{nameTextBox.Text}!信息录入成功。", "成功", MessageBoxButtons.OK, MessageBoxIcon.Information);

            // 清空输入框,准备下一次录入
            nameTextBox.Clear();
            nameTextBox.Focus();
        }
    }
}
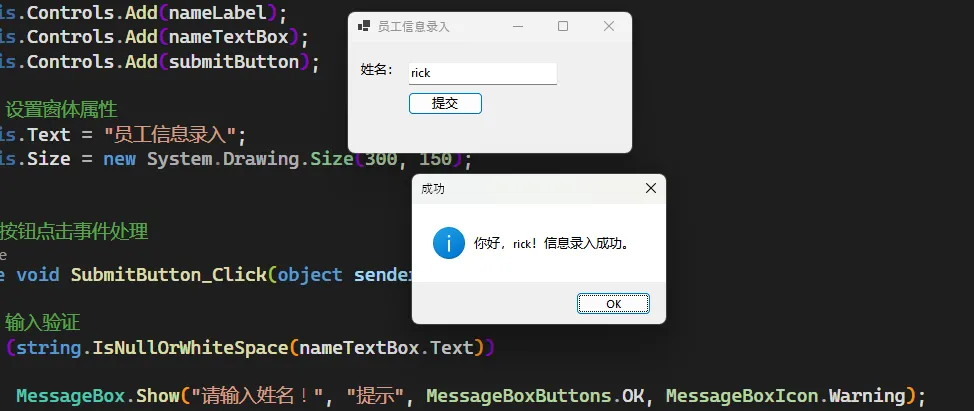
🎯 代码亮点解析
- 输入验证逻辑:防止用户提交空内容
- 用户体验优化:提交后自动清空并聚焦到输入框
- 消息提示分类:用不同图标区分警告和成功消息
- 窗体属性设置:标题和尺寸的合理配置
🏆 最佳实践与进阶技巧
✨ 布局优化技巧
C#// 🎯 技巧1:使用TableLayoutPanel实现自适应布局
TableLayoutPanel tableLayout = new TableLayoutPanel();
tableLayout.ColumnCount = 2;
tableLayout.RowCount = 2;
tableLayout.Dock = DockStyle.Fill;

// 🎯 技巧2:使用Anchor属性实现控件自适应
myTextBox.Anchor = AnchorStyles.Top | AnchorStyles.Left | AnchorStyles.Right;

// 🎯 技巧3:设置Tab顺序优化键盘导航
nameTextBox.TabIndex = 0;
submitButton.TabIndex = 1;
这些具体会在后面写控件时写
🛡️ 安全编码规范
C#// ✅ 正确的事件注册方式
myButton.Click += MyButton_Click;

// ❌ 避免这样写(容易内存泄漏)
myButton.Click += (s, e) => { /* 大量代码 */ }; //真要这么写,这种写法可以考虑改Lambda,后面后讲到
🎯 总结与提升
通过本文的学习,你已经掌握了WinForms开发的核心技能:
- Button控件:实现用户交互,掌握事件处理机制
- TextBox控件:处理用户输入,学会数据验证
- Label控件:优化界面提示,提升用户体验
💎 三个关键收获
- 控件三部曲:初始化→配置属性→添加到窗体,这个流程适用于所有WinForms控件
- 事件驱动思维:界面开发的本质就是响应用户事件,Click事件是最基础也是最重要的
- 用户体验为王:输入验证、反馈提示、操作流程,每个细节都影响用户感受
🤔 互动问题:
- 在你的项目中,还遇到过哪些WinForms控件的使用难题?
- 你觉得哪种布局方式最适合复杂的表单开发?
💡 延伸学习建议:
- 深入学习:DataGridView控件处理表格数据
- 进阶话题:自定义控件开发和控件样式美化
- 性能优化:大量控件的渲染优化技巧
如果这篇文章解决了你的开发难题,请转发给更多需要的同行!我们一起在C#开发的路上越走越远!
本文作者:技术老小子
本文链接:
版权声明:本博客所有文章除特别声明外,均采用 BY-NC-SA 许可协议。转载请注明出处!
目录