
目录
From WinForm to WPF Transition: ListView Fundamental Usage Guide
Many C# developers have encountered similar scenarios. Enterprise applications all need to display list data, while traditional WinForm's ListView makes the UI beautification journey extremely difficult. Every time we want to customize styles, we have to write a lot of Owner Draw code, which is not only inefficient in development but also has particularly high maintenance costs.
The emergence of WPF ListView has completely changed this situation. It not only supports powerful data binding but can also achieve various cool effects through simple XAML configuration. This article will take you from zero to mastering the core usage of WPF ListView through 5 practical solutions, instantly upgrading your application interface to the next level!
🔍 Problem Analysis: Three Major Pain Points of WinForm ListView
Before diving into WPF solutions, let's first clarify the core problems of WinForm ListView:
Pain Point 1: Difficult Style Customization
- Modifying row colors requires rewriting DrawItem events
- Adding icons, buttons, and other controls is extremely complex
- Responsive layout is almost impossible to implement
Pain Point 2: Tedious Data Binding
- Manually creating ListViewItem objects
- Manual UI refresh required when data changes
- Complex implementation of sorting and filtering functions
Pain Point 3: Obvious Performance Bottlenecks
- Severe interface lag with large data volumes
- No virtualization support
- Excessive memory usage
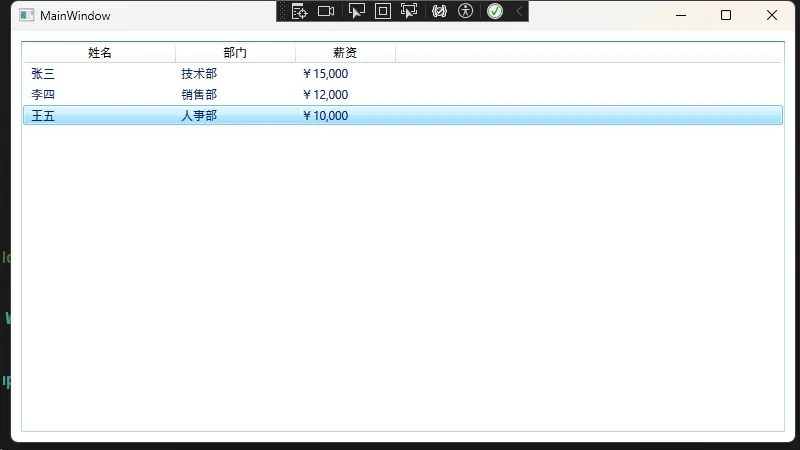
💡 Solution 1: Basic Data Binding Implementation
🎯 Application Scenario
Suitable for scenarios that need to quickly display simple list data, such as employee information, product lists, etc.
📋 Complete Code Implementation
Step 1: Create Data Model
C#using System;
using System.Collections.Generic;
using System.ComponentModel;
using System.Linq;
using System.Runtime.CompilerServices;
using System.Text;
using System.Threading.Tasks;

namespace AppListview
{
    // Employee information model - implements INotifyPropertyChanged interface to support data binding
    public class Employee : INotifyPropertyChanged
    {
        private string _name;
        private string _department;
        private decimal _salary;

        public string Name
        {
            get => _name;
            set
            {
                _name = value;
                OnPropertyChanged(); // Notify UI update when property changes
            }
        }

        public string Department
        {
            get => _department;
            set
            {
                _department = value;
                OnPropertyChanged();
            }
        }

        public decimal Salary
        {
            get => _salary;
            set
            {
                _salary = value;
                OnPropertyChanged();
            }
        }

        // Property change notification event
        public event PropertyChangedEventHandler PropertyChanged;

        // Method to trigger property change notification
        protected virtual void OnPropertyChanged([CallerMemberName] string propertyName = null)
        {
            PropertyChanged?.Invoke(this, new PropertyChangedEventArgs(propertyName));
        }
    }
}
Step 2: XAML Interface Design
XML<Window x:Class="AppListview.MainWindow"
        xmlns="http://schemas.microsoft.com/winfx/2006/xaml/presentation"
        xmlns:x="http://schemas.microsoft.com/winfx/2006/xaml"
        xmlns:d="http://schemas.microsoft.com/expression/blend/2008"
        xmlns:mc="http://schemas.openxmlformats.org/markup-compatibility/2006"
        xmlns:local="clr-namespace:AppListview"
        mc:Ignorable="d"
        Title="MainWindow" Height="450" Width="800">
    <Grid Margin="10">
        <!-- ListView control - ItemsSource binds to backend data source -->
        <ListView Name="EmployeeListView"
                  ItemsSource="{Binding Employees}">
            <ListView.View>
                <GridView>
                    <!-- Name column - DisplayMemberBinding directly binds to property -->
                    <GridViewColumn Header="Name"
                                    DisplayMemberBinding="{Binding Name}"
                                    Width="150"/>

                    <!-- Department column -->
                    <GridViewColumn Header="Department"
                                    DisplayMemberBinding="{Binding Department}"
                                    Width="120"/>

                    <!-- Salary column - uses StringFormat to format display -->
                    <GridViewColumn Header="Salary"
                                    DisplayMemberBinding="{Binding Salary, StringFormat=$${0:N0}}"
                                    Width="100"/>
                </GridView>
            </ListView.View>
        </ListView>
    </Grid>
</Window>
Step 3: Backend Code Implementation
C#using System.Collections.ObjectModel;
using System.Text;
using System.Windows;
using System.Windows.Controls;
using System.Windows.Data;
using System.Windows.Documents;
using System.Windows.Input;
using System.Windows.Media;
using System.Windows.Media.Imaging;
using System.Windows.Navigation;
using System.Windows.Shapes;

namespace AppListview
{
    /// <summary>
    /// Interaction logic for MainWindow.xaml
    /// </summary>
    public partial class MainWindow : Window
    {
        public ObservableCollection<Employee> Employees { get; set; }
        public MainWindow()
        {
            InitializeComponent();
            LoadEmployees();

            // Set data context to support data binding in XAML
            DataContext = this;
        }
        private void LoadEmployees()
        {
            // Initialize employee data
            Employees = new ObservableCollection<Employee>
        {
            new Employee { Name = "John Doe", Department = "Tech", Salary = 15000 },
            new Employee { Name = "Jane Smith", Department = "Sales", Salary = 12000 },
            new Employee { Name = "Bob Johnson", Department = "HR", Salary = 10000 }
        };
        }
    }
}
⚠️ Common Pitfall Reminders
- Must use ObservableCollection: Regular List won't trigger UI updates
- Data model must implement INotifyPropertyChanged: Otherwise property changes won't reflect in the interface
- Don't forget to set DataContext: This is the key to data binding
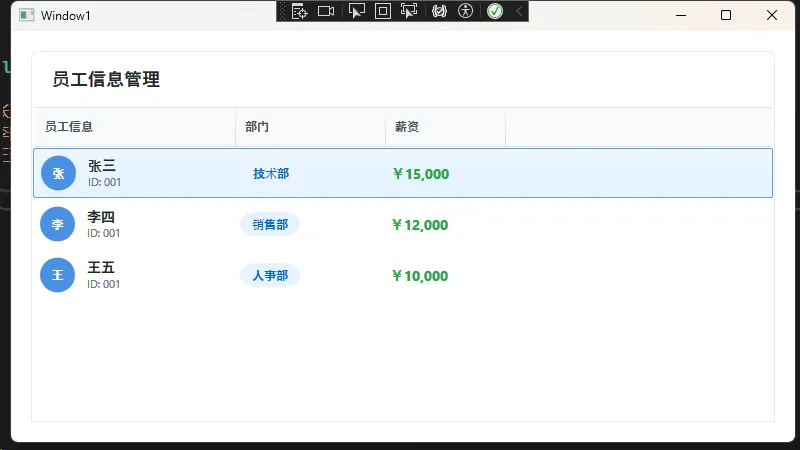
💡 Solution 2: Custom Style Beautification
🎯 Application Scenario
Scenarios that need to improve interface aesthetics and implement modern UI design.
📋 Complete Code Implementation
XML<Window x:Class="AppListview.Window1"
        xmlns="http://schemas.microsoft.com/winfx/2006/xaml/presentation"
        xmlns:x="http://schemas.microsoft.com/winfx/2006/xaml"
        xmlns:d="http://schemas.microsoft.com/expression/blend/2008"
        xmlns:mc="http://schemas.openxmlformats.org/markup-compatibility/2006"
        xmlns:local="clr-namespace:AppListview"
        mc:Ignorable="d"
        Title="Window1" Height="450" Width="800">
    <Window.Resources>
        <local:FirstCharConverter x:Key="FirstCharConverter"/>
        <!-- Custom ListViewItem style -->
        <Style x:Key="ModernListViewItem" TargetType="ListViewItem">
            <Setter Property="Height" Value="50"/>
            <Setter Property="Margin" Value="0,1,0,0"/>
            <Setter Property="Background" Value="White"/>
            <Setter Property="BorderThickness" Value="0"/>

            <!-- Mouse hover and selection effects -->
            <Style.Triggers>
                <Trigger Property="IsMouseOver" Value="True">
                    <Setter Property="Background" Value="#F0F8FF"/>
                </Trigger>
                <Trigger Property="IsSelected" Value="True">
                    <Setter Property="Background" Value="#E6F3FF"/>
                    <Setter Property="BorderBrush" Value="#4A90E2"/>
                    <Setter Property="BorderThickness" Value="1"/>
                </Trigger>
            </Style.Triggers>
        </Style>

        <!-- Header style -->
        <Style x:Key="ModernHeaderStyle" TargetType="GridViewColumnHeader">
            <Setter Property="Background" Value="#F8F9FA"/>
            <Setter Property="Foreground" Value="#495057"/>
            <Setter Property="FontWeight" Value="SemiBold"/>
            <Setter Property="Height" Value="40"/>
            <Setter Property="BorderBrush" Value="#DEE2E6"/>
            <Setter Property="BorderThickness" Value="0,0,1,1"/>
            <Setter Property="HorizontalContentAlignment" Value="Left"/>
            <Setter Property="Padding" Value="10,0"/>
        </Style>
    </Window.Resources>

    <Grid Background="#F8F9FA" Margin="20">
        <Grid.RowDefinitions>
            <RowDefinition Height="Auto"/>
            <RowDefinition Height="*"/>
        </Grid.RowDefinitions>

        <!-- Title area -->
        <Border Grid.Row="0" Background="White"
                CornerRadius="8,8,0,0"
                Padding="20,15"
                BorderBrush="#E9ECEF"
                BorderThickness="1,1,1,0">
            <TextBlock Text="Employee Information Management"
                       FontSize="18"
                       FontWeight="Bold"
                       Foreground="#212529"/>
        </Border>

        <!-- ListView area -->
        <ListView Grid.Row="1"
                  ItemsSource="{Binding Employees}"
                  ItemContainerStyle="{StaticResource ModernListViewItem}"
                  Background="White"
                  BorderBrush="#E9ECEF"
                  BorderThickness="1,0,1,1"
                  ScrollViewer.HorizontalScrollBarVisibility="Disabled">

            <ListView.View>
                <GridView ColumnHeaderContainerStyle="{StaticResource ModernHeaderStyle}">

                    <!-- Avatar + Name column -->
                    <GridViewColumn Header="Employee Info" Width="200">
                        <GridViewColumn.CellTemplate>
                            <DataTemplate>
                                <StackPanel Orientation="Horizontal" VerticalAlignment="Center">
                                    <!-- Avatar placeholder -->
                                    <Border Width="35" Height="35"
                                            CornerRadius="17.5"
                                            Background="#4A90E2"
                                            Margin="0,0,12,0">
                                        <TextBlock Text="{Binding Name, Converter={StaticResource FirstCharConverter}}"
                                                   Foreground="White"
                                                   FontWeight="Bold"
                                                   HorizontalAlignment="Center"
                                                   VerticalAlignment="Center"/>
                                    </Border>

                                    <StackPanel>
                                        <TextBlock Text="{Binding Name}"
                                                   FontWeight="SemiBold"
                                                   FontSize="14"
                                                   Foreground="#212529"/>
                                        <TextBlock Text="ID: 001"
                                                   FontSize="11"
                                                   Foreground="#6C757D"/>
                                    </StackPanel>
                                </StackPanel>
                            </DataTemplate>
                        </GridViewColumn.CellTemplate>
                    </GridViewColumn>

                    <!-- Department tag column -->
                    <GridViewColumn Header="Department" Width="150">
                        <GridViewColumn.CellTemplate>
                            <DataTemplate>
                                <Border Background="#E7F3FF"
                                        CornerRadius="15"
                                        Padding="12,4"
                                        HorizontalAlignment="Center">
                                    <TextBlock Text="{Binding Department}"
                                               Foreground="#0066CC"
                                               FontSize="12"
                                               FontWeight="Medium"/>
                                </Border>
                            </DataTemplate>
                        </GridViewColumn.CellTemplate>
                    </GridViewColumn>

                    <!-- Salary column -->
                    <GridViewColumn Header="Salary" Width="120">
                        <GridViewColumn.CellTemplate>
                            <DataTemplate>
                                <TextBlock Text="{Binding Salary, StringFormat=$${0:N0}}"
                                           FontWeight="Bold"
                                           FontSize="14"
                                           Foreground="#28A745"
                                           VerticalAlignment="Center"/>
                            </DataTemplate>
                        </GridViewColumn.CellTemplate>
                    </GridViewColumn>

                </GridView>
            </ListView.View>
        </ListView>
    </Grid>
</Window>
Add First Character Converter
C#using System;
using System.Collections.Generic;
using System.Globalization;
using System.Linq;
using System.Text;
using System.Threading.Tasks;
using System.Windows.Data;

namespace AppListview
{
    // Converter to get first character of name, used for displaying avatar
    public class FirstCharConverter : IValueConverter
    {
        public object Convert(object value, Type targetType, object parameter, CultureInfo culture)
        {
            if (value is string name && !string.IsNullOrEmpty(name))
            {
                return name.Substring(0, 1).ToUpper(); // Return first character and convert to uppercase
            }
            return "?";
        }

        public object ConvertBack(object value, Type targetType, object parameter, CultureInfo culture)
        {
            throw new NotImplementedException();
        }
    }
}
⚠️ Common Pitfall Reminders
- Resource reference order is important: Converters must be defined before use
- Pay attention to style inheritance: Avoid exceptions caused by circular references
- Performance considerations: Complex styles will affect scrolling performance
💬 Interactive Discussion
After reading these 5 practical solutions, I believe you have a fresh understanding of WPF ListView! I'd like to ask everyone:
- In your projects, what advanced features would you most like ListView to implement? For example: group display, drag-and-drop sorting, or inline editing?
- During the transition from WinForm to WPF, what technical challenges have left a deep impression on you?
Welcome to share your experiences and thoughts in the comments section, let's learn and exchange together!
🎯 Summary
Through this detailed practical guide, we systematically learned the core applications of WPF ListView:
- Data Binding Revolution: Say goodbye to manually managing ListViewItem, embrace MVVM's data binding mechanism, making code cleaner and maintenance easier
- Style Customization Freedom: Through XAML's powerful style system, we can easily implement various modern UI effects, from simple color changes to complex interactive animations
- Performance Optimization Core: Virtualization technology and asynchronous loading strategies allow us to maintain smooth user experience when handling large data volumes
The transition from WinForm to WPF is not only an upgrade of technology stack but also progress in development concepts. WPF ListView has become the standard choice for data display in modern desktop applications, mastering it means mastering the core skills of enterprise application development.
Found this practical guide helpful? Please share it with more colleagues who are learning WPF, let's move forward together on the path of technical growth! 🚀
Follow me for more C# development practical tips and advanced WPF tutorials! Next preview: "WPF DataGrid Advanced Applications: Making Your Tabular Data Processing More Professional"
本文作者:技术老小子
本文链接:
版权声明:本博客所有文章除特别声明外,均采用 BY-NC-SA 许可协议。转载请注明出处!