
Press Ctrl+ and K to search
目录
相信很多C#开发者都遇到过类似的场景。企业级应用都需要展示列表数据,而传统WinForm的ListView让我们在UI美化这条路上走得异常艰难。每次想要自定义样式,都要写大量的Owner Draw代码,不仅开发效率低,维护成本还特别高。
WPF ListView的出现彻底改变了这一现状。它不仅支持强大的数据绑定,还能通过简单的XAML配置实现各种炫酷效果。本文将通过5个实战方案,带你从零掌握WPF ListView的核心用法,让你的应用界面瞬间提升一个档次!
🔍 问题分析:WinForm ListView的三大痛点
在深入WPF解决方案之前,让我们先明确WinForm ListView的核心问题:
痛点一:样式定制困难
- 修改行颜色需要重写DrawItem事件
- 添加图标、按钮等控件极其复杂
- 响应式布局几乎无法实现
痛点二:数据绑定繁琐
- 手动创建ListViewItem对象
- 数据变化时需要手动刷新UI
- 排序、筛选功能实现复杂
痛点三:性能瓶颈明显
- 大数据量时界面卡顿严重
- 没有虚拟化支持
- 内存占用过高
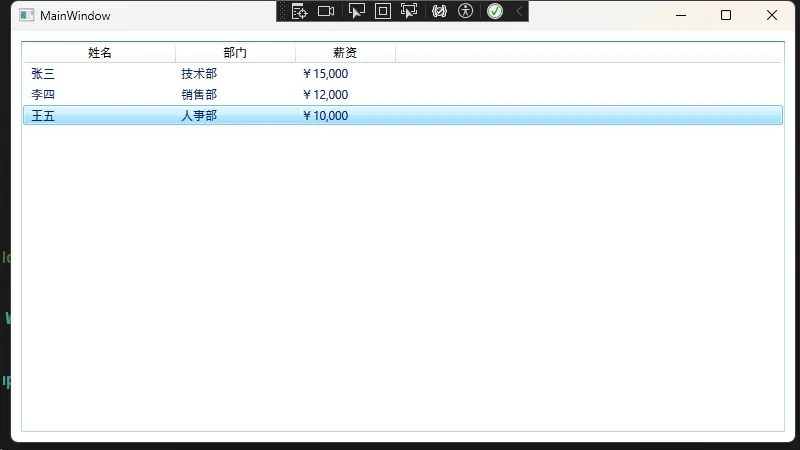
💡 解决方案一:基础数据绑定实现
🎯 应用场景
适用于需要快速展示简单列表数据的场景,如员工信息、产品列表等。
📋 完整代码实现
第一步:创建数据模型
C#using System;
using System.Collections.Generic;
using System.ComponentModel;
using System.Linq;
using System.Runtime.CompilerServices;
using System.Text;
using System.Threading.Tasks;

namespace AppListview
{
    // 员工信息模型 - 实现INotifyPropertyChanged接口支持数据绑定
    public class Employee : INotifyPropertyChanged
    {
        private string _name;
        private string _department;
        private decimal _salary;

        public string Name
        {
            get => _name;
            set
            {
                _name = value;
                OnPropertyChanged(); // 属性变化时通知UI更新
            }
        }

        public string Department
        {
            get => _department;
            set
            {
                _department = value;
                OnPropertyChanged();
            }
        }

        public decimal Salary
        {
            get => _salary;
            set
            {
                _salary = value;
                OnPropertyChanged();
            }
        }

        // 属性变化通知事件
        public event PropertyChangedEventHandler PropertyChanged;

        // 触发属性变化通知的方法
        protected virtual void OnPropertyChanged([CallerMemberName] string propertyName = null)
        {
            PropertyChanged?.Invoke(this, new PropertyChangedEventArgs(propertyName));
        }
    }
}
第二步:XAML界面设计
XML<Window x:Class="AppListview.MainWindow"
        xmlns="http://schemas.microsoft.com/winfx/2006/xaml/presentation"
        xmlns:x="http://schemas.microsoft.com/winfx/2006/xaml"
        xmlns:d="http://schemas.microsoft.com/expression/blend/2008"
        xmlns:mc="http://schemas.openxmlformats.org/markup-compatibility/2006"
        xmlns:local="clr-namespace:AppListview"
        mc:Ignorable="d"
        Title="MainWindow" Height="450" Width="800">
    <Grid Margin="10">
        <!-- ListView控件 - ItemsSource绑定到后台数据源 -->
        <ListView Name="EmployeeListView"
                  ItemsSource="{Binding Employees}">
            <ListView.View>
                <GridView>
                    <!-- 姓名列 - DisplayMemberBinding直接绑定到属性 -->
                    <GridViewColumn Header="姓名"
                                    DisplayMemberBinding="{Binding Name}"
                                    Width="150"/>

                    <!-- 部门列 -->
                    <GridViewColumn Header="部门"
                                    DisplayMemberBinding="{Binding Department}"
                                    Width="120"/>

                    <!-- 薪资列 - 使用StringFormat格式化显示 -->
                    <GridViewColumn Header="薪资"
                                    DisplayMemberBinding="{Binding Salary, StringFormat=¥{0:N0}}"
                                    Width="100"/>
                </GridView>
            </ListView.View>
        </ListView>
    </Grid>
</Window>
第三步:后台代码实现
C#using System.Collections.ObjectModel;
using System.Text;
using System.Windows;
using System.Windows.Controls;
using System.Windows.Data;
using System.Windows.Documents;
using System.Windows.Input;
using System.Windows.Media;
using System.Windows.Media.Imaging;
using System.Windows.Navigation;
using System.Windows.Shapes;

namespace AppListview
{
    /// <summary>
    /// Interaction logic for MainWindow.xaml
    /// </summary>
    public partial class MainWindow : Window
    {
        public ObservableCollection<Employee> Employees { get; set; }
        public MainWindow()
        {
            InitializeComponent();
            LoadEmployees();

            // 设置数据上下文,支持XAML中的数据绑定
            DataContext = this;
        }
        private void LoadEmployees()
        {
            // 初始化员工数据
            Employees = new ObservableCollection<Employee>
        {
            new Employee { Name = "张三", Department = "技术部", Salary = 15000 },
            new Employee { Name = "李四", Department = "销售部", Salary = 12000 },
            new Employee { Name = "王五", Department = "人事部", Salary = 10000 }
        };
        }
    }
}
⚠️ 常见坑点提醒
- 必须使用ObservableCollection:普通List不会触发UI更新
- 数据模型要实现INotifyPropertyChanged:否则属性变化不会反映到界面
- 不要忘记设置DataContext:这是数据绑定的关键
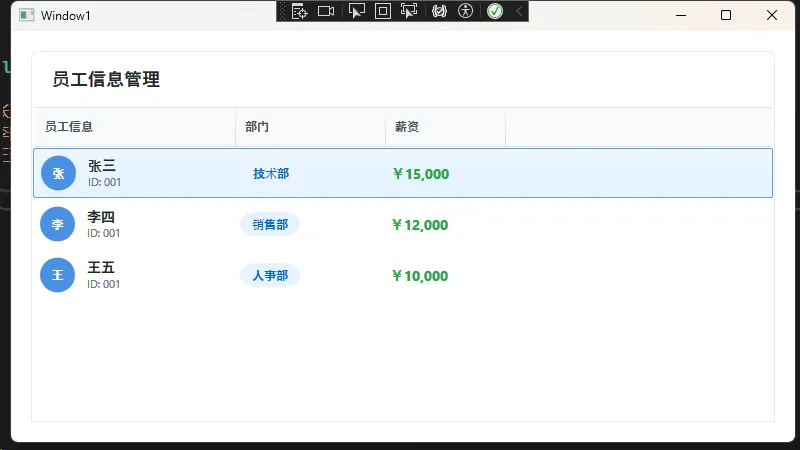
💡 解决方案二:自定义样式美化
🎯 应用场景
需要提升界面美观度,实现现代化UI设计的场景。
📋 完整代码实现
XML<Window x:Class="AppListview.Window1"
        xmlns="http://schemas.microsoft.com/winfx/2006/xaml/presentation"
        xmlns:x="http://schemas.microsoft.com/winfx/2006/xaml"
        xmlns:d="http://schemas.microsoft.com/expression/blend/2008"
        xmlns:mc="http://schemas.openxmlformats.org/markup-compatibility/2006"
        xmlns:local="clr-namespace:AppListview"
        mc:Ignorable="d"
        Title="Window1" Height="450" Width="800">
    <Window.Resources>
        <local:FirstCharConverter x:Key="FirstCharConverter"/>
        <!-- 自定义ListViewItem样式 -->
        <Style x:Key="ModernListViewItem" TargetType="ListViewItem">
            <Setter Property="Height" Value="50"/>
            <Setter Property="Margin" Value="0,1,0,0"/>
            <Setter Property="Background" Value="White"/>
            <Setter Property="BorderThickness" Value="0"/>

            <!-- 鼠标悬停和选中效果 -->
            <Style.Triggers>
                <Trigger Property="IsMouseOver" Value="True">
                    <Setter Property="Background" Value="#F0F8FF"/>
                </Trigger>
                <Trigger Property="IsSelected" Value="True">
                    <Setter Property="Background" Value="#E6F3FF"/>
                    <Setter Property="BorderBrush" Value="#4A90E2"/>
                    <Setter Property="BorderThickness" Value="1"/>
                </Trigger>
            </Style.Triggers>
        </Style>

        <!-- 表头样式 -->
        <Style x:Key="ModernHeaderStyle" TargetType="GridViewColumnHeader">
            <Setter Property="Background" Value="#F8F9FA"/>
            <Setter Property="Foreground" Value="#495057"/>
            <Setter Property="FontWeight" Value="SemiBold"/>
            <Setter Property="Height" Value="40"/>
            <Setter Property="BorderBrush" Value="#DEE2E6"/>
            <Setter Property="BorderThickness" Value="0,0,1,1"/>
            <Setter Property="HorizontalContentAlignment" Value="Left"/>
            <Setter Property="Padding" Value="10,0"/>
        </Style>
    </Window.Resources>

    <Grid Background="#F8F9FA" Margin="20">
        <Grid.RowDefinitions>
            <RowDefinition Height="Auto"/>
            <RowDefinition Height="*"/>
        </Grid.RowDefinitions>

        <!-- 标题区域 -->
        <Border Grid.Row="0" Background="White"
                CornerRadius="8,8,0,0"
                Padding="20,15"
                BorderBrush="#E9ECEF"
                BorderThickness="1,1,1,0">
            <TextBlock Text="员工信息管理"
                       FontSize="18"
                       FontWeight="Bold"
                       Foreground="#212529"/>
        </Border>

        <!-- ListView区域 -->
        <ListView Grid.Row="1"
                  ItemsSource="{Binding Employees}"
                  ItemContainerStyle="{StaticResource ModernListViewItem}"
                  Background="White"
                  BorderBrush="#E9ECEF"
                  BorderThickness="1,0,1,1"
                  ScrollViewer.HorizontalScrollBarVisibility="Disabled">

            <ListView.View>
                <GridView ColumnHeaderContainerStyle="{StaticResource ModernHeaderStyle}">

                    <!-- 头像+姓名列 -->
                    <GridViewColumn Header="员工信息" Width="200">
                        <GridViewColumn.CellTemplate>
                            <DataTemplate>
                                <StackPanel Orientation="Horizontal" VerticalAlignment="Center">
                                    <!-- 头像占位符 -->
                                    <Border Width="35" Height="35"
                                            CornerRadius="17.5"
                                            Background="#4A90E2"
                                            Margin="0,0,12,0">
                                        <TextBlock Text="{Binding Name, Converter={StaticResource FirstCharConverter}}"
                                                   Foreground="White"
                                                   FontWeight="Bold"
                                                   HorizontalAlignment="Center"
                                                   VerticalAlignment="Center"/>
                                    </Border>

                                    <StackPanel>
                                        <TextBlock Text="{Binding Name}"
                                                   FontWeight="SemiBold"
                                                   FontSize="14"
                                                   Foreground="#212529"/>
                                        <TextBlock Text="ID: 001"
                                                   FontSize="11"
                                                   Foreground="#6C757D"/>
                                    </StackPanel>
                                </StackPanel>
                            </DataTemplate>
                        </GridViewColumn.CellTemplate>
                    </GridViewColumn>

                    <!-- 部门标签列 -->
                    <GridViewColumn Header="部门" Width="150">
                        <GridViewColumn.CellTemplate>
                            <DataTemplate>
                                <Border Background="#E7F3FF"
                                        CornerRadius="15"
                                        Padding="12,4"
                                        HorizontalAlignment="Center">
                                    <TextBlock Text="{Binding Department}"
                                               Foreground="#0066CC"
                                               FontSize="12"
                                               FontWeight="Medium"/>
                                </Border>
                            </DataTemplate>
                        </GridViewColumn.CellTemplate>
                    </GridViewColumn>

                    <!-- 薪资列 -->
                    <GridViewColumn Header="薪资" Width="120">
                        <GridViewColumn.CellTemplate>
                            <DataTemplate>
                                <TextBlock Text="{Binding Salary, StringFormat=¥{0:N0}}"
                                           FontWeight="Bold"
                                           FontSize="14"
                                           Foreground="#28A745"
                                           VerticalAlignment="Center"/>
                            </DataTemplate>
                        </GridViewColumn.CellTemplate>
                    </GridViewColumn>

                </GridView>
            </ListView.View>
        </ListView>
    </Grid>
</Window>
添加首字符转换器
C#using System;
using System.Collections.Generic;
using System.Globalization;
using System.Linq;
using System.Text;
using System.Threading.Tasks;
using System.Windows.Data;

namespace AppListview
{
    // 获取姓名首字符的转换器,用于显示头像
    public class FirstCharConverter : IValueConverter
    {
        public object Convert(object value, Type targetType, object parameter, CultureInfo culture)
        {
            if (value is string name && !string.IsNullOrEmpty(name))
            {
                return name.Substring(0, 1).ToUpper(); // 返回首字符并转为大写
            }
            return "?";
        }

        public object ConvertBack(object value, Type targetType, object parameter, CultureInfo culture)
        {
            throw new NotImplementedException();
        }
    }
}
⚠️ 常见坑点提醒
- 资源引用顺序很重要:转换器要在使用前定义
- 样式继承要注意:避免循环引用导致的异常
- 性能考虑:复杂样式会影响滚动性能
💬 互动讨论
看完这5个实战方案,相信你对WPF ListView有了全新的认识!我想问问大家:
- 在你的项目中,你最希望ListView实现哪种高级功能? 比如:分组显示、拖拽排序、或者行内编辑?
- 从WinForm转到WPF的过程中,你遇到过哪些让你印象深刻的技术难点?
欢迎在评论区分享你的经验和想法,让我们一起交流学习!
🎯 总结
通过这篇详细的实战指南,我们系统学习了WPF ListView的核心应用:
- 数据绑定革命:告别手动管理ListViewItem,拥抱MVVM的数据绑定机制,让代码更简洁、维护更轻松
- 样式定制自由:通过XAML的强大样式系统,我们可以轻松实现各种现代化UI效果,从简单的颜色变化到复杂的动画交互
- 性能优化核心:虚拟化技术和异步加载策略,让我们在处理大数据量时依然能保持流畅的用户体验
从WinForm到WPF的转型不仅是技术栈的升级,更是开发理念的进步。WPF ListView已经成为现代桌面应用数据展示的标准选择,掌握它就等于掌握了企业级应用开发的核心技能。
觉得这篇实战指南对你有帮助?请转发给更多正在学习WPF的同行,让我们在技术成长的路上携手前行! 🚀
关注我,获取更多C#开发实战技巧和WPF进阶教程!下期预告:《WPF DataGrid高级应用:让你的表格数据处理更专业》
本文作者:技术老小子
本文链接:
版权声明:本博客所有文章除特别声明外,均采用 BY-NC-SA 许可协议。转载请注明出处!
目录