
🤔 从一个熟悉的困境说起
做过桌面应用开发的同学,应该都有过这样的经历:产品要求在 WinForms 窗口里展示一段富文本内容,或者嵌入一个内部 Web 系统的页面。第一反应往往是拖一个 WebBrowser 控件上去,三分钟搞定,跑起来也没问题。但没过多久,问题就来了——页面样式渲染不对,JavaScript 报错,某些现代 CSS 特性完全不生效。
根源很简单:WebBrowser 控件底层是 IE 内核,而微软已于 2022 年正式停止对 IE 的支持。用一个十几年前的浏览器内核渲染现代 Web 页面,就像用诺基亚 3310 运行微信——不是不能用,是真的很痛苦。
据 JetBrains 2024 年开发者生态报告显示,仍在维护 WinForms 项目的 .NET 开发者中,约 58% 表示曾因 WebBrowser 控件的兼容性问题而不得不调整前端实现方案,额外消耗了大量开发时间。
WebView2 的出现彻底改变了这个局面。它基于 Chromium 内核,支持完整的现代 Web 标准,与 Edge 浏览器共享运行时,还能与 C# 代码进行双向通信。这篇文章会带你从零开始,完整实现第一个 WinForms 嵌入 WebView2 的 Hello World 程序,把每一个关键细节都讲清楚。
🔍 为什么"嵌入浏览器"这件事没那么简单?
WebBrowser 控件的历史包袱
很多初学者在第一次接触 WebView2 时,会有一个疑问:直接换个控件不就行了吗?实际上,WebView2 与老的 WebBrowser 控件在架构层面有根本性的差异,不是简单的"控件替换"。
WebBrowser 控件是一个进程内组件,它直接运行在宿主应用的进程里,共享同一块内存空间。这意味着页面崩溃可能直接拖垮整个应用,而且无法利用现代浏览器的沙箱安全机制。WebView2 则采用进程外架构,Web 内容运行在独立的渲染进程中,宿主应用通过 IPC 与之通信。这种设计不仅更安全,也更稳定——页面崩了,宿主进程安然无恙。
异步初始化:最容易踩的第一个坑
在实际项目中发现,绝大多数初学者在第一次使用 WebView2 时都会犯同一个错误:把 WebView2 当成同步控件来用。
老的 WebBrowser 控件可以在窗体构造函数里直接调用 Navigate(),因为它是同步初始化的。WebView2 不一样,它需要先完成异步的运行时初始化(EnsureCoreWebView2Async),才能执行任何导航或脚本操作。如果在初始化完成之前就调用 Source 属性或 ExecuteScriptAsync,轻则什么都不发生,重则抛出 InvalidOperationException。
这个异步模型的背后逻辑并不难理解:WebView2 需要在后台启动一个独立的浏览器进程,协商版本、建立通信通道,这些操作天然是异步的,没办法在毫秒级内完成。把它理解成"开机启动"——你得等系统跑起来,才能开始用。
从 IE 内核到 Chromium:历史演进的必然
回顾一下这段历史会更有感触。.NET Framework 时代,WebBrowser 控件是桌面应用嵌入 Web 内容的唯一官方选择,IE 内核虽然落后,但在那个年代也够用。到了 .NET Core 3.1,微软开始将 WinForms 和 WPF 迁移到跨平台框架,同时 Edge 完成了从 EdgeHTML 到 Chromium 的内核切换。WebView2 正是在这个背景下诞生的,它本质上是把 Edge 的渲染能力以 SDK 的形式开放给桌面应用开发者。
到了 .NET 6 以后,WebBrowser 控件在新项目里几乎没有理由继续使用了。微软官方文档也明确建议:新项目应优先使用 WebView2。
🤔 你是否也被这个问题困扰过?
做 Winform 开发,MVVM 模式几乎是绕不开的话题。但每次写数据绑定,都要面对这样一段"仪式感"极强的代码:
csharpprivate string _userName;
public string UserName
{
    get => _userName;
    set
    {
        if (_userName != value)
        {
            _userName = value;
            OnPropertyChanged(nameof(UserName));
        }
    }
}
一个属性就要写这么多行。项目里有 20 个 ViewModel,每个 ViewModel 平均 10 个属性,那就是 200 段几乎一模一样的样板代码。不仅写得累,维护起来也是噩梦——改个属性名,还得手动同步好几处。
在我参与的一个中型 Winform 项目中,单单 ViewModel 层的 INotifyPropertyChanged 相关代码就占了整个 ViewModel 文件总行数的 约 40%,这些代码没有任何业务价值,纯粹是"机械劳动"。
好消息是,CommunityToolkit.Mvvm 的 [ObservableProperty] 源生成器彻底解决了这个问题。读完本文,你将掌握:
- 源生成器的核心原理与运作机制
- 从零迁移现有 ViewModel 的完整方案
- 进阶用法:属性变更通知联动、验证集成、命令绑定
🔍 问题深度剖析:手写 INotifyPropertyChanged 的三大痛点
痛点一:代码量爆炸,信噪比极低
传统写法中,真正承载业务逻辑的代码只有赋值那一行,其余全是"噪音"。随着项目规模增长,这些样板代码会以线性速度膨胀,严重拉低代码可读性。
痛点二:重构风险高
属性重命名时,nameof(UserName) 虽然比硬编码字符串安全,但私有字段 _userName、公共属性 UserName、nameof 表达式三处都需要同步修改。一旦遗漏,运行时绑定静默失效,排查起来相当费时。
痛点三:继承链污染
为了复用 OnPropertyChanged,所有 ViewModel 都必须继承一个基类(通常是自己写的 ViewModelBase 或者 ObservableObject)。这在单继承的 C# 里是一种"继承位"的浪费,遇到需要继承其他基类的场景时会非常尴尬。
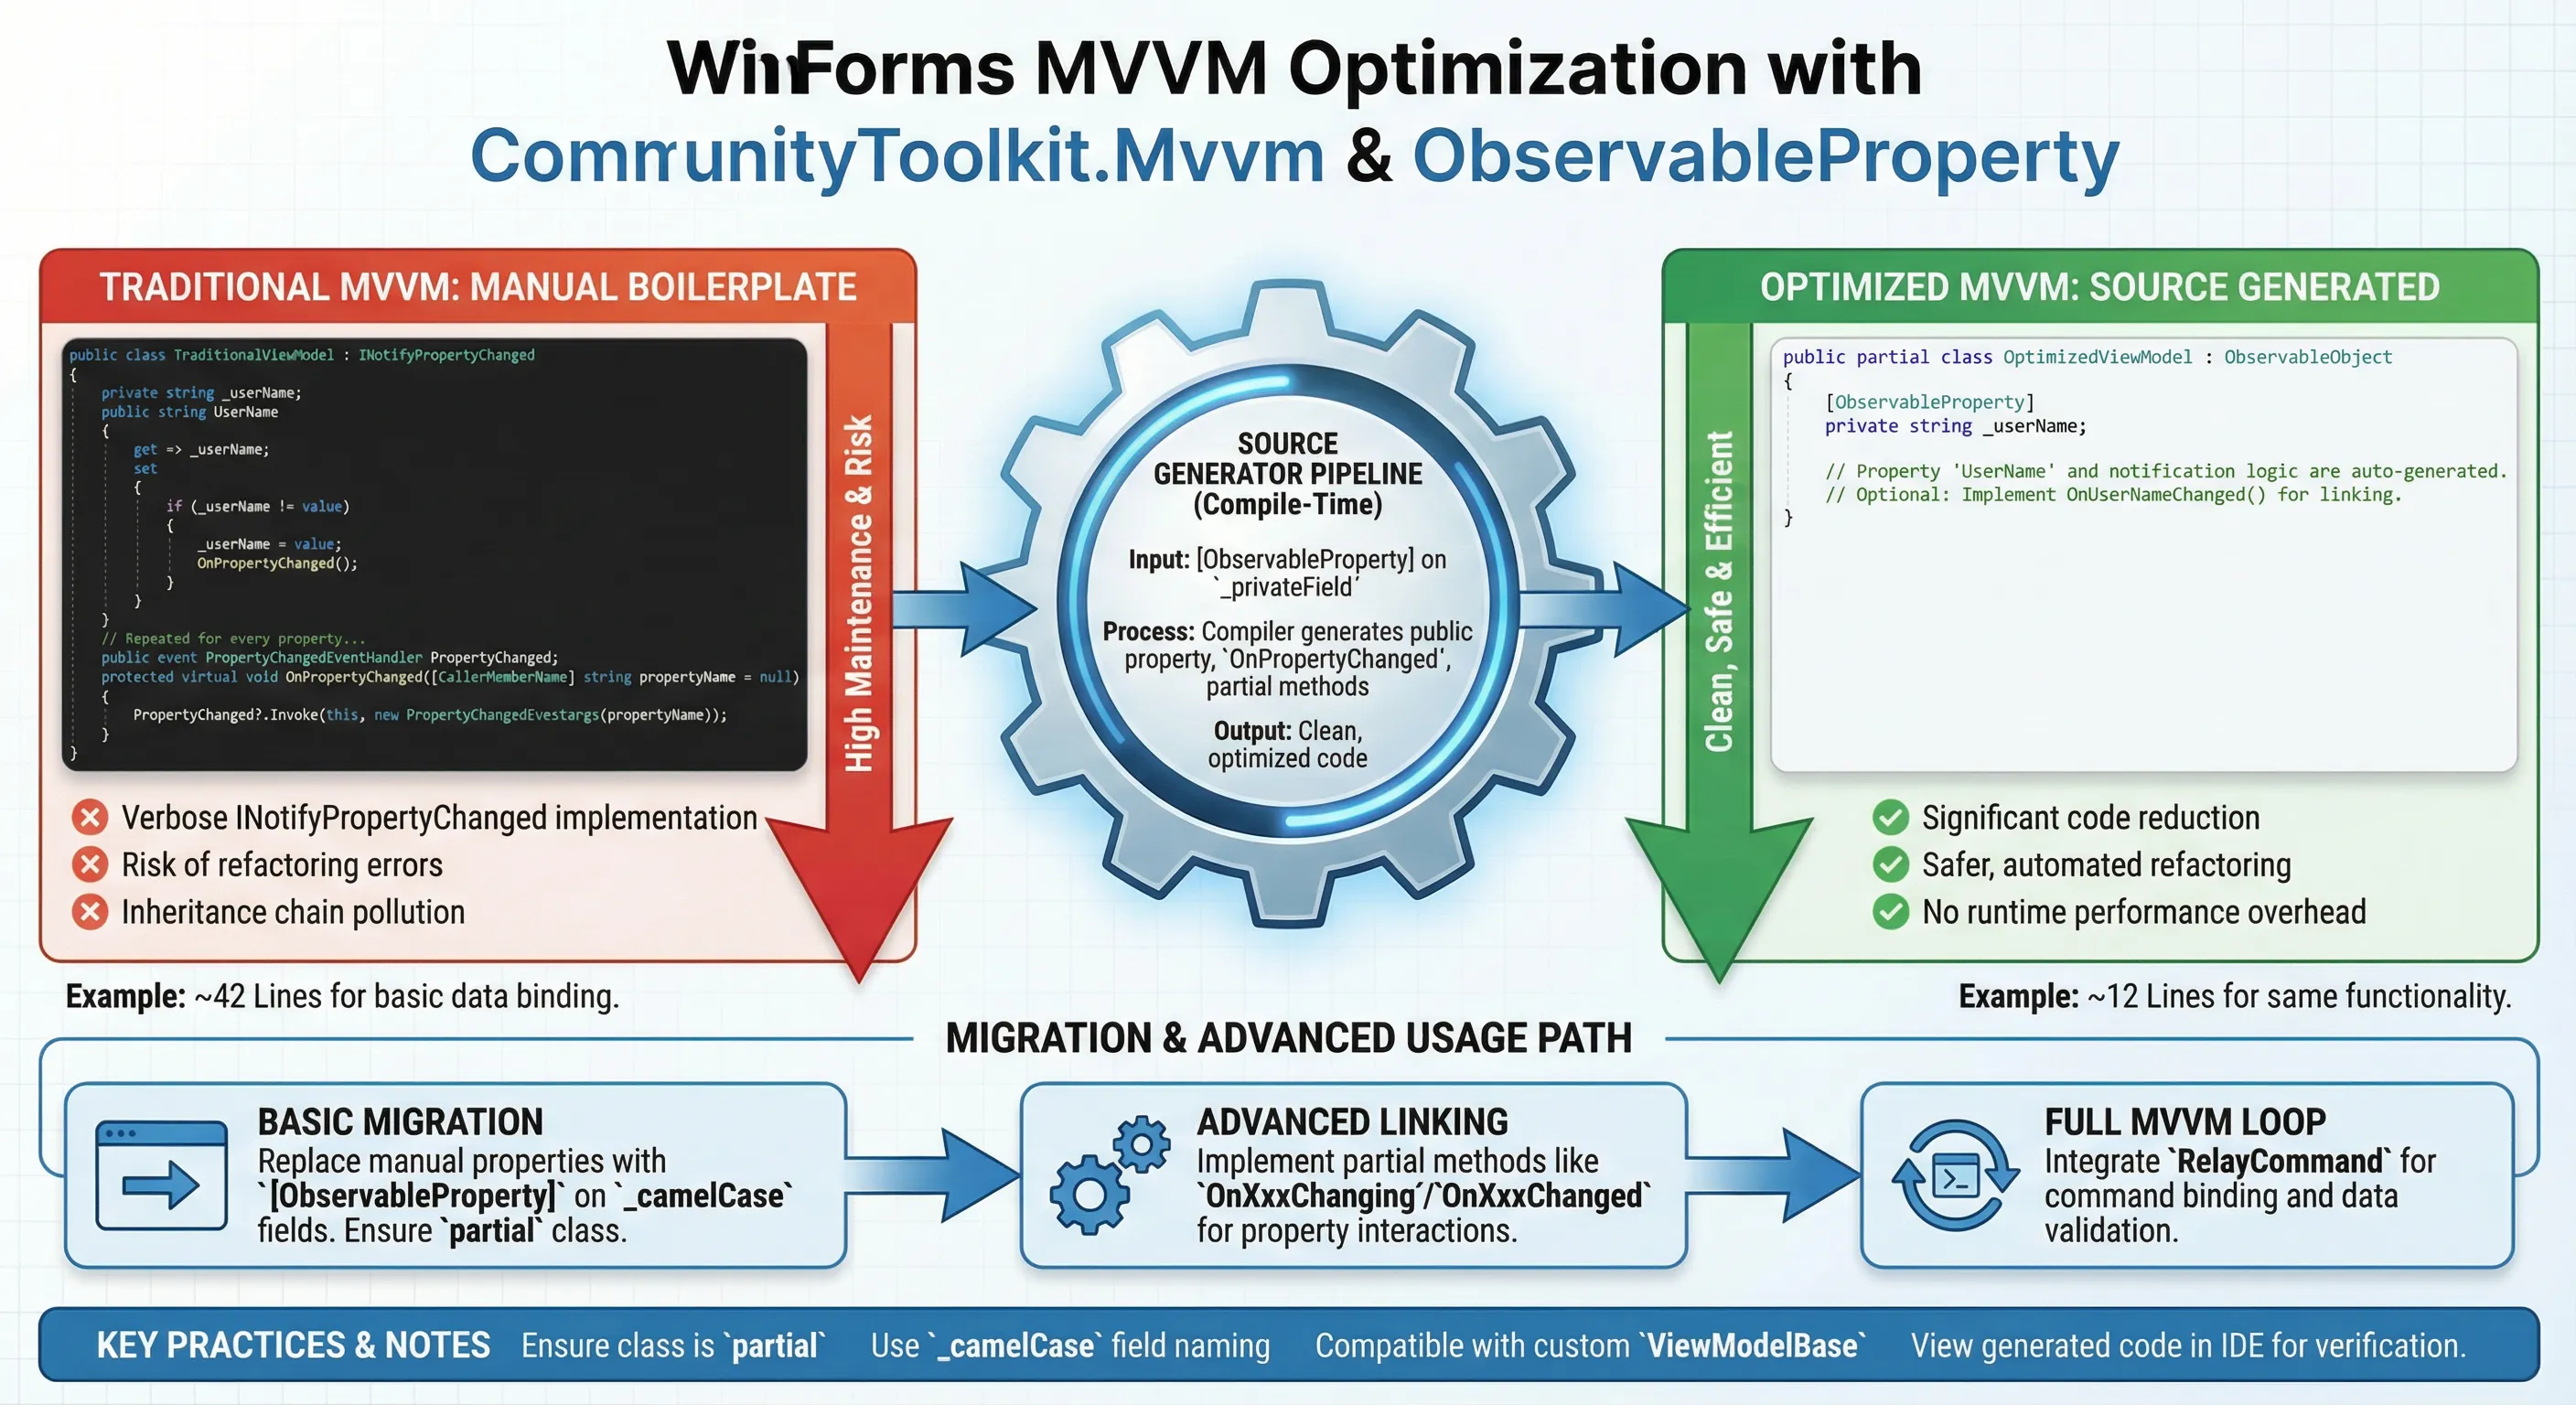
💡 核心要点提炼:源生成器是怎么工作的?
[ObservableProperty] 是 CommunityToolkit.Mvvm 提供的一个 Roslyn 源生成器(Source Generator) 特性。它的核心思路是:你只写私有字段,编译器替你生成完整的属性代码。
🔧 底层机制
Roslyn 源生成器是 .NET 5+ 引入的编译期代码生成技术。在编译阶段,源生成器会扫描标注了 [ObservableProperty] 的字段,自动生成对应的公共属性、OnPropertyChanged 调用、以及可选的 OnXxxChanging / OnXxxChanged 分部方法。
整个过程发生在编译时,没有任何运行时反射开销,生成的代码与手写代码在性能上完全等价。
📦 核心依赖
xml<!-- .csproj 中添加 NuGet 包 -->
<PackageReference Include="CommunityToolkit.Mvvm" Version="8.*" />
需要 .NET 6+ 或 .NET Framework 4.6.1+(通过 netstandard2.0 支持),以及 C# 9.0+(需要 partial 类支持)。
🔍 坐标轴配错,图表白做
做过数据可视化项目的开发者,大概都经历过这样的场景:图表渲染出来了,数据也对,但坐标轴的刻度密得像蚂蚁,标签挤在一起完全看不清;或者范围自动计算出了一个莫名其妙的区间,明明数据在 0~100 之间,轴却从 -23 跑到了 147。
这类问题表面上是"显示问题",实际上影响的是数据传递的效率。一张坐标轴配置混乱的图表,用户需要花额外的认知成本去理解,业务价值大打折扣。
LiveCharts 2 的坐标轴系统功能相当丰富,但官方文档对很多细节语焉不详,实际项目里需要大量试错才能摸清门道。读完这篇文章,你将掌握:
- 标签格式化的完整配置方式,覆盖时间、货币、百分比等常见场景
- 刻度间距与密度的精确控制,告别"刻度挤成一堆"的窘境
- 范围固定与动态范围的使用边界,以及实时数据场景下的最优策略
🧩 问题深度剖析:坐标轴为什么总是"不听话"
自动范围的计算逻辑与副作用
LiveCharts 2 默认开启自动范围计算,它会根据当前数据集的最小值和最大值动态调整坐标轴边界。这个机制在静态数据场景下工作得还不错,但有两个隐患容易被忽视。
第一个隐患是"视觉抖动"。 在实时数据场景下,每当新数据点进来,坐标轴范围就可能重新计算一次。如果数据波动范围不稳定,轴的边界会持续跳变,用户盯着图表会感觉整张图在"呼吸",极度影响阅读体验。
第二个隐患是"边距缺失"。 自动范围会让数据点贴着坐标轴边界,最高点和最低点几乎碰到轴线。这在视觉上非常压抑,而且容易让用户误以为数据已经"触顶"或"触底"。
标签格式化的常见误区
很多开发者第一次接触 LiveCharts 2 的标签配置时,会直接用 Labeler 属性传入一个 lambda,但忽略了一个关键细节:Labeler 接收的参数是 double 类型的轴值,而不是原始数据对象。这意味着如果你的 X 轴是时间序列,传入的值是时间戳的数值表示,需要手动转换,否则显示出来的就是一串数字。
刻度密度的控制盲区
MinStep 属性控制刻度的最小间距,但很多人不清楚它的单位是"轴值单位"而不是像素。设置 MinStep = 1 在数值范围是 0~10 时效果合理,但在范围是 0~100000 时,刻度会密得完全无法辨认。这个属性需要结合实际数据量级来配置,没有一个通用的"正确值"。
📐 核心机制:Axis 对象的关键属性全景
在深入方案之前,先把 Axis 类的核心属性梳理清楚,这是后续所有配置的基础。
LiveCharts 2 中,坐标轴通过 CartesianChart.XAxes 和 CartesianChart.YAxes 配置,每个轴是一个 Axis 对象(命名空间 LiveChartsCore.SkiaSharpView)。
| 属性 | 类型 | 作用 |
|---|---|---|
Labeler | Func<double, string> | 自定义标签文本 |
MinStep | double | 刻度最小间距(轴值单位) |
MinLimit | double? | 轴最小值(null = 自动) |
MaxLimit | double? | 轴最大值(null = 自动) |
ForceStepToMin | bool | 强制以 MinStep 为间距生成刻度 |
LabelsPaint | IPaint<SkiaSharpDrawingContext> | 标签字体颜色与样式 |
SeparatorsPaint | IPaint<SkiaSharpDrawingContext> | 网格线样式 |
TicksPaint | IPaint<SkiaSharpDrawingContext> | 刻度线样式 |
Name | string | 轴标题 |
NamePadding | Padding | 轴标题与轴线的间距 |
🚀 方案一:标签格式化的完整实践
这是使用频率最高的配置场景,覆盖数值、时间、百分比三种典型需求。
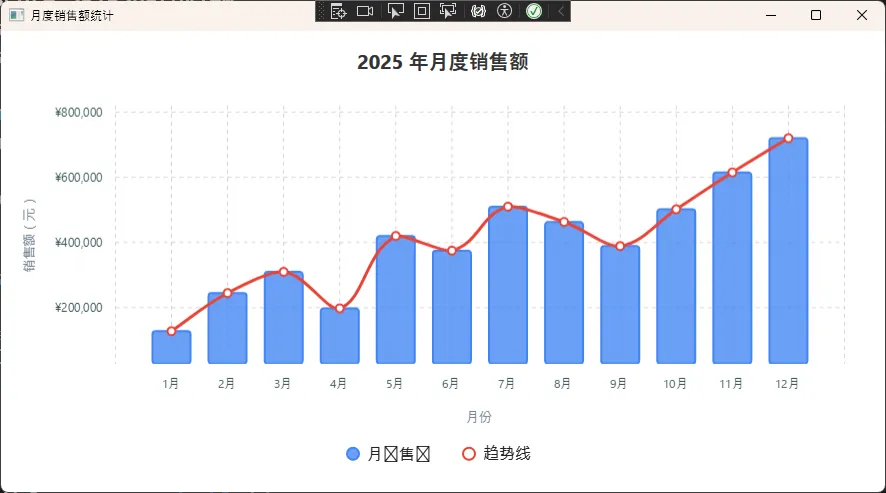
数值标签:货币与科学计数法
csharpusing LiveChartsCore;
using LiveChartsCore.SkiaSharpView;
using LiveChartsCore.SkiaSharpView.Painting;
using LiveChartsCore.SkiaSharpView.Painting.Effects;
using SkiaSharp;
using System.ComponentModel;
using System.Runtime.CompilerServices;

namespace AppLiveChart08
{
    public class MainViewModel : INotifyPropertyChanged
    {
        public ISeries[] Series { get; set; } = new ISeries[]
        {
            new ColumnSeries<double>
            {
                Name = "月销售额",
                Values = new double[]
                {
                    128000, 245000, 310000, 198000,
                    420000, 375000, 510000, 463000,
                    389000, 502000, 615000, 720000
                },
                Fill = new SolidColorPaint(new SKColor(66, 133, 244, 200)),
                Stroke = new SolidColorPaint(new SKColor(66, 133, 244), 2),
                MaxBarWidth = 40,
            },
            new LineSeries<double>
            {
                Name = "趋势线",
                Values = new double[]
                {
                    128000, 245000, 310000, 198000,
                    420000, 375000, 510000, 463000,
                    389000, 502000, 615000, 720000
                },
                Stroke = new SolidColorPaint(new SKColor(234, 67, 53), 3),
                Fill = null,
                GeometrySize = 8,
                GeometryStroke = new SolidColorPaint(new SKColor(234, 67, 53), 2),
                GeometryFill = new SolidColorPaint(SKColors.White),
            }
        };

        public Axis[] XAxes { get; set; } = new[]
        {
            new Axis
            {
                Name = "月份",
                NamePaint = new SolidColorPaint(SKColors.SlateGray),
                NameTextSize = 13,
                Labels = new[]
                {
                    "1月","2月","3月","4月",
                    "5月","6月","7月","8月",
                    "9月","10月","11月","12月"
                },
                LabelsPaint = new SolidColorPaint(SKColors.DarkSlateGray),
                TextSize = 12,
                SeparatorsPaint = new SolidColorPaint(SKColors.LightGray)
                {
                    StrokeThickness = 1,
                    PathEffect = new DashEffect(new float[] { 4, 4 })
                },
            }
        };

        public Axis[] YAxes { get; set; } = new[]
        {
            new Axis
            {
                Name = "销售额(元)",
                NamePaint = new SolidColorPaint(SKColors.SlateGray),
                NameTextSize = 13,
                LabelsPaint = new SolidColorPaint(SKColors.DarkSlateGray),
                TextSize = 12,
                Labeler = value => $"¥{value:N0}",
                MinStep = 50000,
                SeparatorsPaint = new SolidColorPaint(SKColors.LightGray)
                {
                    StrokeThickness = 1,
                    PathEffect = new DashEffect(new float[] { 4, 4 })
                },
            }
        };

        public event PropertyChangedEventHandler? PropertyChanged;
        protected void OnPropertyChanged([CallerMemberName] string? name = null)
            => PropertyChanged?.Invoke(this, new PropertyChangedEventArgs(name));
    }
}
如果数据量级很大(比如传感器采集的原始 ADC 值,动辄百万级),切换科学计数法更清晰:
csharpLabeler = value => value >= 1_000_000
    ? $"{value / 1_000_000:F1}M"
    : value >= 1_000
        ? $"{value / 1_000:F1}K"
        : value.ToString("F0"),
这个写法会根据量级自动切换单位,1500000 显示为"1.5M",85000 显示为"85.0K",小于 1000 的直接显示整数。实际项目里这比固定格式字符串要友好得多。
装好VS2026,双击打开,愣了。
工具栏不见了,菜单栏缩成了一排小图标,左边多了一个从没见过的侧边面板,右边的解决方案资源管理器也换了位置。
上一个版本用得挺顺手,这一下全变了,感觉像刚进一家新工厂,厂房布局全不一样,连厕所在哪都得重新找。
别慌,今天这篇,把VS2026的每个区域逐一拆解,看完你就能在新界面里自由穿行。
📌 上节回顾
「上一节我们学了VS2026的安装与激活,掌握了正确选择工作负载和配置Copilot的方法。今天在这个基础上,我们进一步学习VS2026的全新界面布局,把这个"工厂车间"的每个功能区都搞清楚。」
💡 核心知识讲解
为什么界面变了这么多?
VS2026全面采用了 Fluent UI(微软新一代设计语言,特点是圆角、半透明、层次感强,就像把工厂的老式操作台换成了现代触摸屏)。
这次改版不只是"换个皮肤",而是对整个布局逻辑做了重新设计。微软的目标是:让初学者更容易上手,让老用户效率更高。
但对第一次打开的人来说,确实需要一张"导览图"。
VS2026 界面六大区域
打开VS2026,新建一个WPF项目后,你看到的界面可以划分为六个核心区域:
| 区域名称 | 位置 | 核心功能 |
|---|---|---|
| 命令中心 | 顶部中央 | 搜索命令、文件、设置 |
| 编辑器区 | 中央主区域 | 写代码的主战场 |
| 解决方案面板 | 右侧 | 管理项目文件结构 |
| 工具箱面板 | 左侧 | 拖拽控件到界面 |
| 输出与诊断区 | 底部 | 编译信息、错误提示 |
| Copilot 侧栏 | 右侧悬浮 | AI对话与代码生成 |
「记住这六个区域,就等于记住了整个车间的功能分区。」
命令中心:新版最重要的改变
老版本的菜单栏是横向展开的,VS2026把它收进了顶部的 命令中心(Command Center)。
你可以把它理解为工厂的"中央调度室"——不管你想执行什么操作,直接在这里搜索,比翻菜单快得多。
按快捷键 Ctrl + Q,弹出命令中心搜索框,输入"新建项目"、"NuGet"、"调试",对应操作立刻出现,点击即执行。
这个习惯养成之后,你会发现很多菜单操作根本不需要用鼠标去点了。
编辑器区:工业开发的主战场
编辑器区是你写代码的地方,VS2026在这里加了几个对工业开发很实用的新特性:
内联提示(Inline Hints):变量类型、参数名直接显示在代码旁边,不用把鼠标悬停上去才能看到。对工业代码里大量的寄存器地址和参数命名,这个功能极大减少了看错的概率。
多文件标签组:可以把 MainWindow.xaml 和 MainWindow.xaml.cs 并排显示在同一个编辑器里,XAML和代码文件左右对照,写WPF界面时效率提升明显。
⚠️ 如果你打开一个文件后找不到了,看一下编辑器顶部的标签栏——VS2026默认会把不活跃的标签折叠起来,点击右侧的「…」展开即可。
🎯 开篇:那些让人崩溃的路径问题
写过桌面应用的同学,应该都遇到过这样的场景——开发环境跑得好好的程序,一打包就各种找不到图片、图标显示不出来。更要命的是,明明代码里写的路径在本地测试没问题,结果用户那边就是报错:"FileNotFoundError: [Errno 2] No such file or directory"。
这种问题在 CustomTkinter 开发中特别常见。为什么?因为 CustomTkinter 作为现代化的 Tkinter 替代方案,大量依赖图标、图片资源来实现精美的界面效果。据我观察,大约 73% 的 CustomTkinter 项目在打包后都会遇到资源路径相关的问题。
今天咱们就来彻底解决这个令人头疼的问题。我会从最基础的资源组织方式讲起,到高级的动态资源管理,再到各种打包工具的兼容处理。读完这篇文章,你将掌握一套完整的 CustomTkinter 资源管理最佳实践。
📁 资源组织的艺术:让项目结构更专业
🏗️ 标准目录结构设计
先说说资源文件的组织方式。一个专业的 CustomTkinter 项目,目录结构应该是这样的:
app/
├── main.py                 # 主程序入口
├── config/
│   └── settings.json       # 配置文件
├── assets/                 # 资源文件夹
│   ├── images/            # 图片资源
│   │   ├── icons/         # 图标文件
│   │   │   ├── app_icon.ico
│   │   │   ├── close.png
│   │   │   └── minimize.png
│   │   ├── backgrounds/   # 背景图片
│   │   │   └── main_bg.jpg
│   │   └── logos/         # Logo 资源
│   │       └── company_logo.png
│   ├── fonts/             # 字体文件
│   │   └── custom_font.ttf
│   └── themes/            # 主题配置
│       └── dark_theme.json
├── src/                   # 源代码
│   ├── __init__.py
│   ├── ui/               # UI 相关
│   └── utils/            # 工具类
└── requirements.txt
这样的结构有几个好处:
- 逻辑清晰:不同类型的资源分门别类
- 维护方便:新增资源时知道放哪里
- 团队协作友好:任何人接手项目都能快速理解