
那个让整条产线停机的"一下"
车间里有句老话——"最贵的不是设备,是那个手滑的瞬间"。
我在做工业上位机的第三年,亲眼目睹一位老师傅在交接班时,顺手点了一下屏幕,把正在运行的设备切进了调试模式。那条产线停了将近40分钟,损失不用细说。事后复盘,所有人都觉得这事"不该发生"——但它就是发生了。
问题出在哪?不在人,在界面。
那个"切换模式"的按钮,和旁边的"查看日志"按钮,长得一模一样,位置还挨着。一线操作员每天重复几百次点击操作,手指有自己的"肌肉记忆",根本来不及看清楚。这不是疏忽,这是人体工学的必然结果。
所以今天咱们聊的这个话题,本质上不是"怎么写代码",而是怎么用UI设计替操作员挡住那些他们根本不想犯的错。
🏭 工业UI防呆的底层逻辑
在消费级软件里,"用户友好"意味着操作流畅、步骤少。但工业场景恰恰相反——关键操作必须有摩擦感。
这个"摩擦感"不是为了折磨人,而是强迫操作员的大脑从"自动驾驶模式"切换到"主动确认模式"。心理学上叫 System 2 思维的激活。说白了就是:让他不得不停下来想一秒钟。
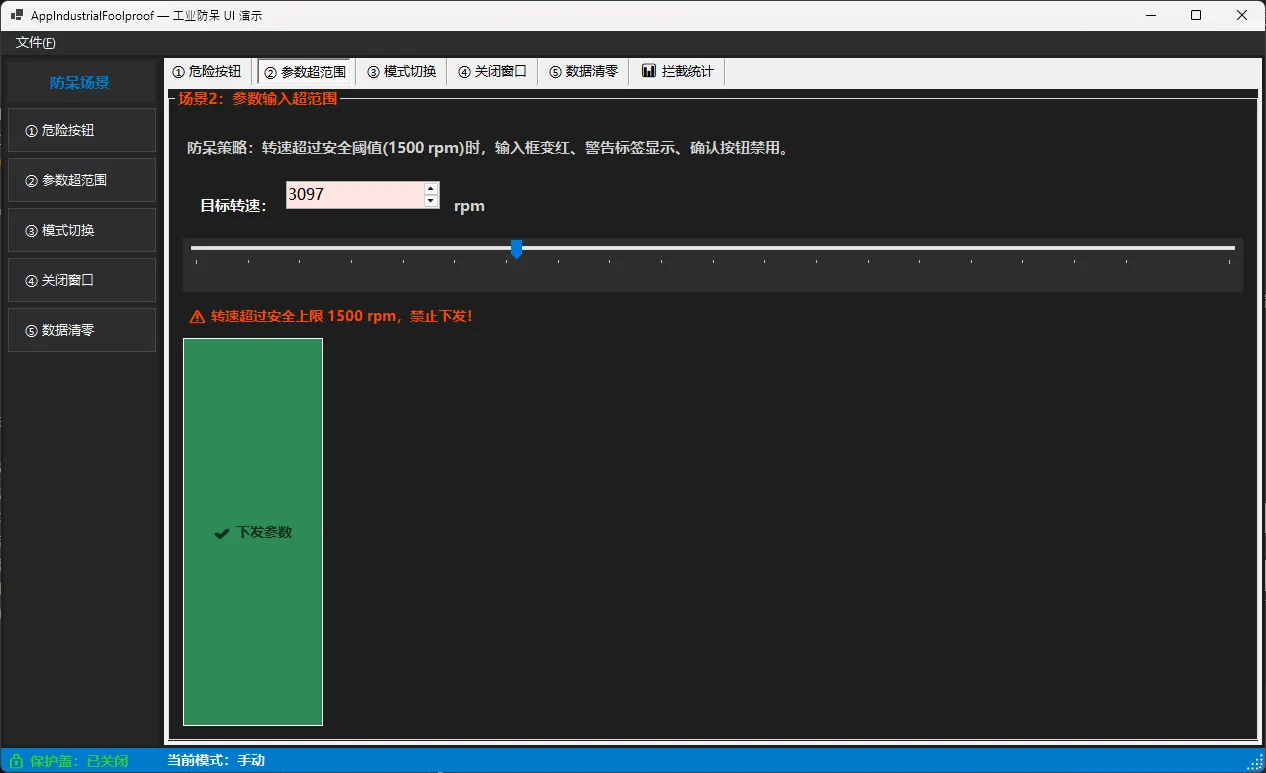
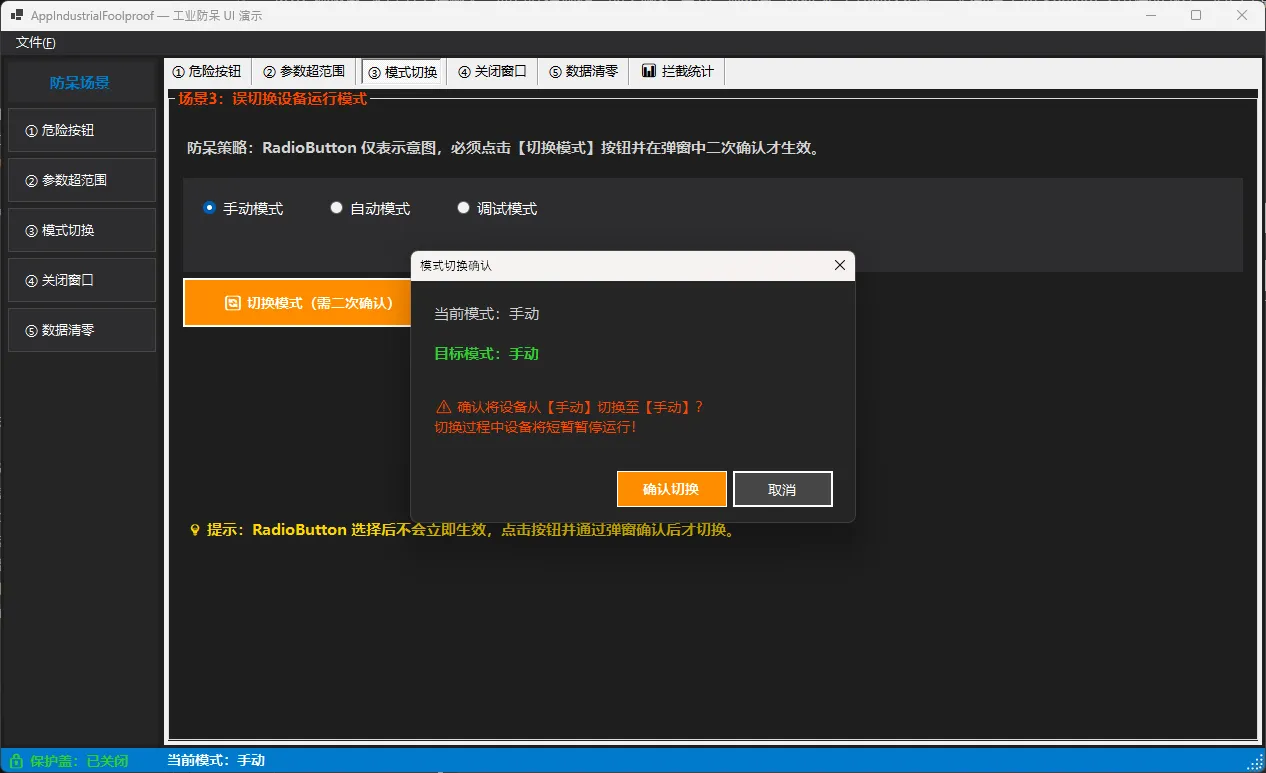
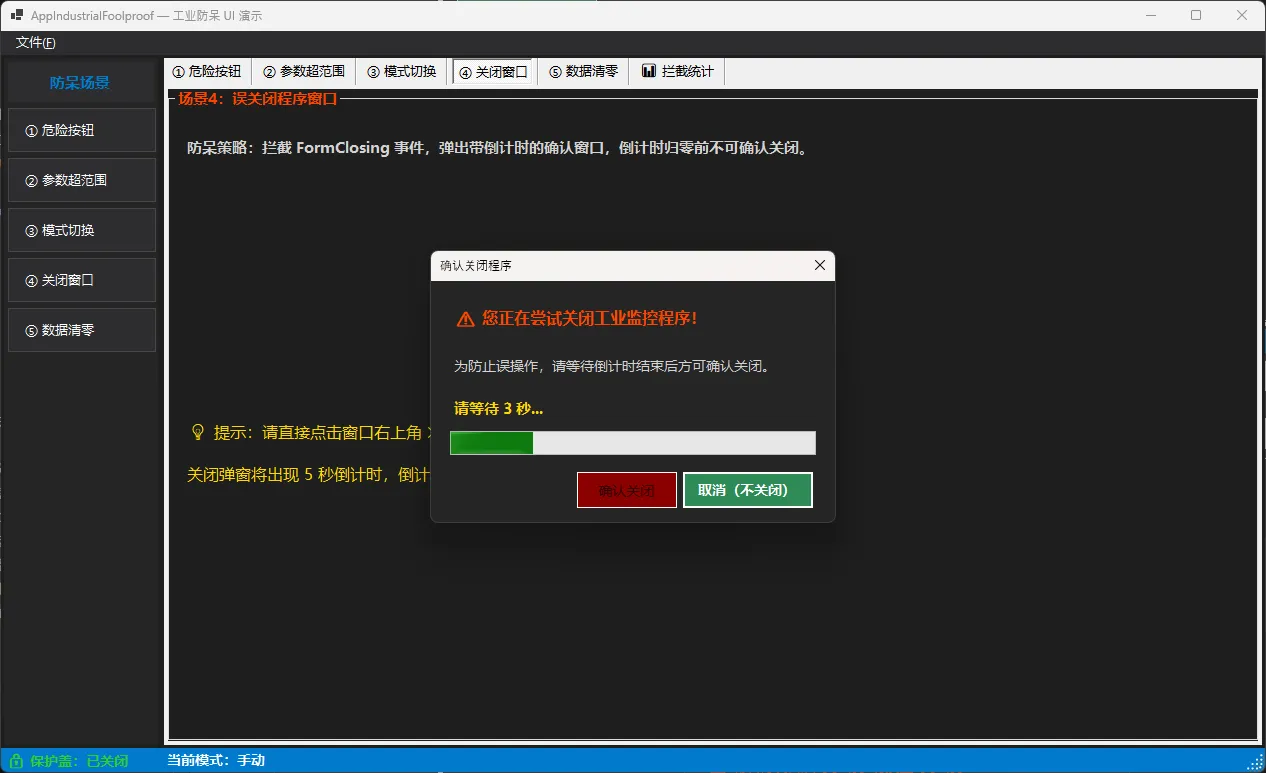
基于这个原则,我把一线操作员最常踩的坑归成了5类,每一类都有对应的UI防呆策略,下面一个个拆解。
👨💻 运行效果
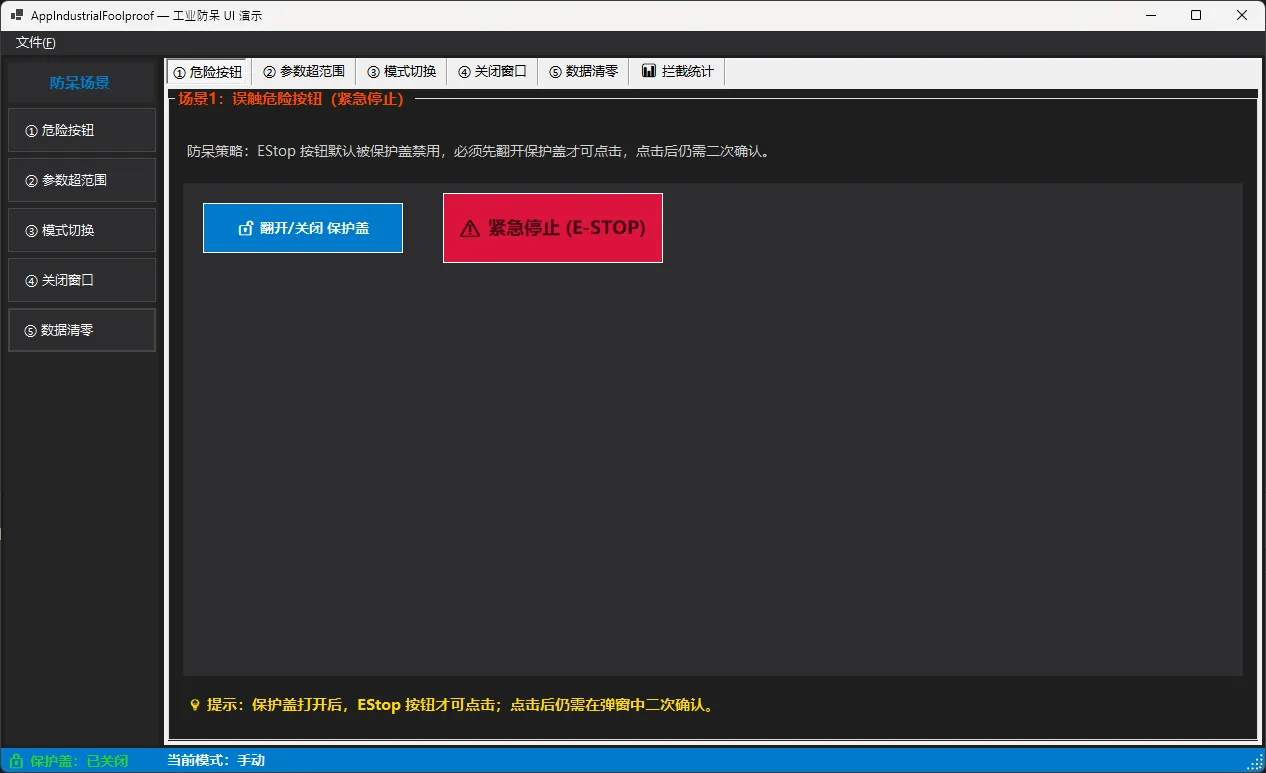
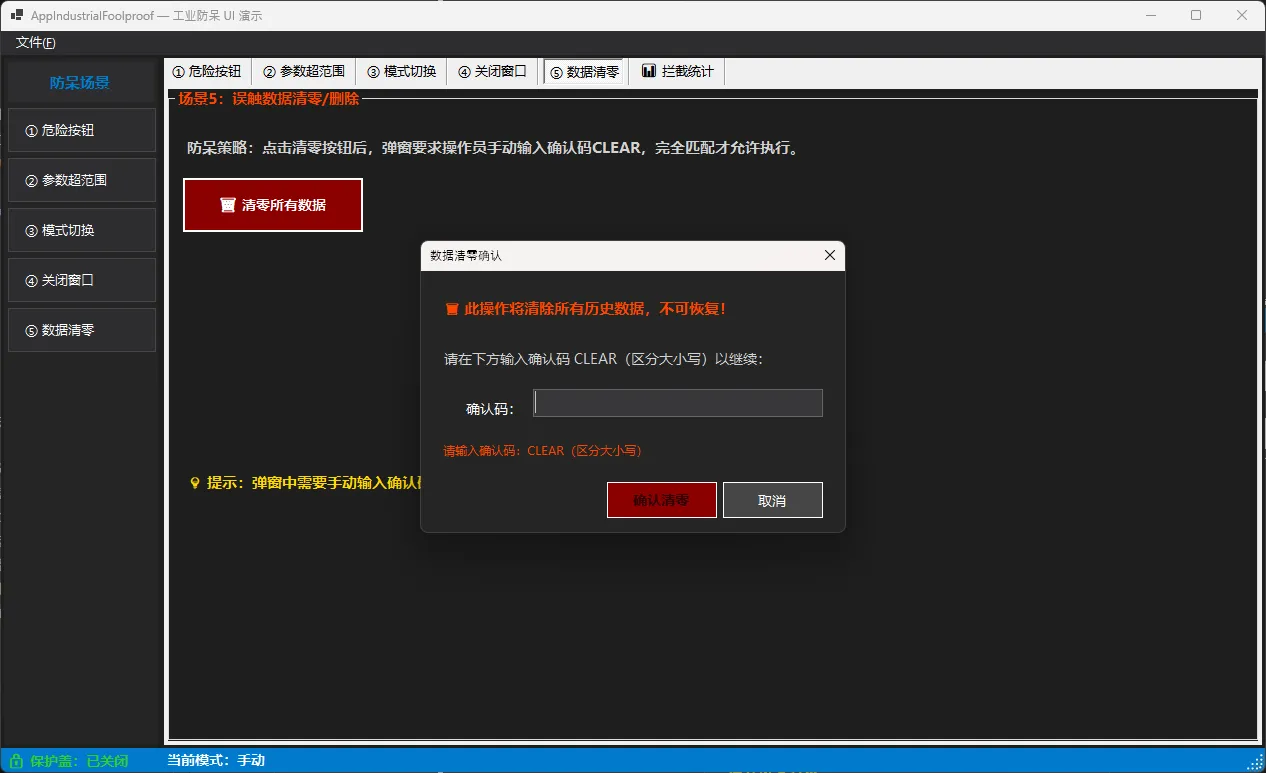
🔴 场景一:误触危险按钮(EStop)
为什么会误触?
紧急停止按钮在物理世界里有个标配设计——红色蘑菇头外面套一个透明保护盖,必须先掀盖才能按。这个设计存在几十年了,因为它真的管用。
但很多上位机软件直接把 EStop 做成一个普通 Button,颜色红一点、字大一点,就完事了。这等于把蘑菇头的保护盖去掉了。
防呆方案:UI保护盖 + 二次确认
csharp// FrmMain.cs — 场景1核心逻辑
private bool _protectCover = true;

private void btnToggleCover_Click(object sender, EventArgs e)
{
    _protectCover    = !_protectCover;
    btnEStop.Enabled = !_protectCover;   // 盖子关闭时按钮禁用
    RefreshStatus();
}

private void btnEStop_Click(object sender, EventArgs e)
{
    using var dlg = new FrmConfirmAction(
        "紧急停止",
        "确认执行【紧急停止】?此操作将立即停机!");
    dlg.ShowDialog(this);
    AppendAlarm("危险按钮", "点击EStop",
                dlg.Confirmed ? "已执行" : "已拦截");
}
btnEStop.Enabled = false 是第一道门。FrmConfirmAction 弹窗是第二道门。两道门都过了,才真正执行。
这里有个细节值得注意:确认弹窗的"确认"按钮要用危险色(深红),"取消"按钮反而要用醒目的安全色(绿色)。大多数人在紧张状态下会优先点颜色"顺眼"的那个——把取消做成绿色,能多拦截一批冲动操作。
下载完VS2026,双击安装包,弹出一个密密麻麻的工作负载选择界面。
".NET 桌面开发"要勾吗?"ASP.NET"要不要?"通用Windows平台"装了有啥用?
不知道勾哪个,干脆全选——结果装了40GB,电脑风扇转得像车间里的排风机。
这个坑,很多人第一次装都踩过。今天这篇,告诉你工业开发只需要勾哪几项,装完多大,Copilot怎么配,一次搞定。
📌 上节回顾
「上一节我们学了C#在工业现场的真实应用,掌握了从设备监控到MES对接的6类典型场景。今天在这个基础上,我们进一步学习把开发工具装好——工欲善其事,必先利其器。」
💡 核心知识讲解
VS2026 是什么,为什么选它?
Visual Studio 2026(微软出品的集成开发环境,可以理解为"工业软件的全能生产车间")是目前C#开发的首选工具。
它把代码编辑、调试、界面设计、版本管理全部集成在一个软件里。就像工厂里的加工中心——车、铣、钻一体,不用换台机器。
VS2026相比上一代,最大的变化有三点:全面采用 Fluent UI(微软新一代界面设计风格,更简洁、更现代)、内置 GitHub Copilot(AI代码助手,能帮你自动补全和生成代码)、以及对 .NET 10 的原生支持。
版本选哪个?别选错了
VS2026有三个版本,对工厂工程师来说,选择很简单:
| 版本 | 价格 | 适合谁 |
|---|---|---|
| Community(社区版) | 免费 | 个人学习、小团队开发 |
| Professional(专业版) | 付费订阅 | 企业内部项目 |
| Enterprise(企业版) | 付费订阅 | 大型团队、需要高级测试工具 |
「结论:学习阶段直接用 Community 版,完全够用,功能和专业版差异极小。」
安装前的硬件准备
别小看这一步。VS2026对机器有基本要求,装之前对照检查一下:
- 内存:至少 8GB,推荐 16GB(官方推荐32G,实际16G没什么问题,还过开着VS同时跑模拟器,8GB会很卡)
- 硬盘:至少 20GB 空闲空间,推荐SSD(机械硬盘编译速度慢得让人抓狂)
- 系统:Windows 11(不支持32位系统)
- 网络:安装过程需要联网下载组件,建议用有线网络,避免中途断开
⚠️ 如果你的电脑是工厂专用机,安装前先确认是否有管理员权限。没有权限,安装会在中途失败,还不报明显错误。
工作负载:只勾这两项就够了
这是最容易装错的地方。VS2026的工作负载列表有十几项,全选会装到40GB以上。
做工业上位机开发,只需要勾选:
- ✅ .NET 桌面开发(包含WPF、WinForms、C#编译器,核心中的核心)
- ✅ 通用Windows平台开发(可选,做触摸屏界面时用得上)
其他的,暂时不需要。装完大约 8~12GB,安装时间约 15~25 分钟。
「后期需要什么,随时可以通过 Visual Studio Installer 追加安装,不用一次装全。」
Copilot:工业开发的AI搭档
VS2026内置了 GitHub Copilot(一个AI代码助手,就像给你配了一个随时待命的程序员同事)。
它能做什么?举个工业场景的例子:你只需要在注释里写"读取Modbus寄存器地址40001的温度值",Copilot会自动补全完整的通信代码,你只需要检查逻辑是否正确。
Copilot在VS2026里分两种模式:
- 自动补全模式:你打代码,它实时给建议,按Tab接受
- Chat模式(对话模式):你用自然语言描述需求,它生成完整代码块
激活Copilot需要GitHub账号。免费版每月有一定的使用额度,对学习阶段完全够用。
做 WinForms 开发的朋友,大概都经历过这样的场景:窗体一拖大,控件全乱跑;分辨率一换,按钮跑到屏幕外面去了;需求改了,整个布局要重写……每次遇到这种情况,真的让人头皮发麻。
Panel 控件,看起来就是个"透明盒子",很多人觉得它没什么技术含量——拖进去,往里面放控件,完事。但实际上,Panel 才是 WinForms 布局体系的核心骨架。用好它,能让你的界面在不同分辨率下优雅自适应,让功能区域清晰解耦,让后期维护成本大幅降低。
本文基于 .NET 8 + WinForms 环境,从 Panel 的基础特性出发,深入讲解三种渐进式布局方案:静态分区布局、动态自适应布局、嵌套面板复合布局。每个方案都有完整可运行的代码,你可以直接拿去用。
🔍 问题深度剖析:Panel 到底难在哪里?
很多开发者对 Panel 的理解停留在"容器"层面,忽略了它背后的布局逻辑。WinForms 的布局系统并不像 WPF 或前端 CSS 那样声明式,它本质上是基于坐标的绝对定位系统,Panel 的价值正是在于通过 Dock、Anchor、AutoSize 等属性,在这套系统上构建出相对灵活的布局能力。
常见的三个误区值得说一下。
误区一:直接在窗体上堆控件。 这种做法在窗体尺寸固定时没问题,但一旦窗体可拖拽调整大小,控件的位置和尺寸就会乱成一锅粥。根本原因是没有建立"容器层级",控件缺乏参照系。
误区二:滥用 Anchor 属性而不用 Panel 分区。 Anchor 能让控件跟随父容器边缘伸缩,但当界面复杂时,多个控件的 Anchor 设置互相干扰,调试起来非常痛苦。用 Panel 分区后,每个区域内部独立管理,逻辑清晰得多。
误区三:不区分 Panel 与 GroupBox、TableLayoutPanel、FlowLayoutPanel 的使用场景。 Panel 是最基础的容器,没有边框和标题,适合做布局骨架;TableLayoutPanel 适合网格式布局;FlowLayoutPanel 适合动态数量的控件流式排列。混用或错用会带来不必要的复杂度。
💡 核心要点提炼
在进入具体方案之前,有几个底层机制值得先搞清楚。
Dock 属性的工作原理 是"贴边填充"。当你把一个 Panel 的 Dock 设为 DockStyle.Top,它会自动占据父容器顶部,高度由你设定,宽度自动等于父容器宽度。多个 Dock 控件叠加时,按照控件在 Controls 集合中的顺序依次排列,这个顺序细节很多人不知道,是踩坑的高发区。
Anchor 属性决定控件与父容器哪条边保持固定距离。默认值是 Top | Left,意味着控件只跟左上角保持距离,窗体拉大时控件不动。设为 Top | Left | Right | Bottom 则四边都跟随,控件会随容器等比拉伸。
AutoScroll 是 Panel 独有的特性,启用后当子控件超出 Panel 边界时自动出现滚动条,非常适合做内容区域。
性能层面,Panel 本身开销很小,但嵌套层级过深(超过5层)会影响重绘性能,在低端机器上可能出现界面闪烁。合理控制层级是最佳实践。
🚀 方案一:静态分区布局(经典三段式)
这是最常见的布局模式:顶部工具栏 + 左侧导航 + 右侧内容区。适合管理系统、工具软件等场景。
csharpnamespace AppWinformPanel
{
    public partial class Form1 : Form
    {
        private Panel _topPanel;    // 顶部工具栏
        private Panel _leftPanel;   // 左侧导航
        private Panel _contentPanel; // 右侧内容区
        public Form1()
        {
            InitializeComponent();
            BuildLayout();
        }

        private void BuildLayout()
        {
            this.Size = new Size(1200, 800);
            this.MinimumSize = new Size(800, 600);

            // ── 顶部面板 ──────────────────────────────────────────
            _topPanel = new Panel
            {
                Dock = DockStyle.Top,
                Height = 56,
                BackColor = Color.FromArgb(45, 45, 48),  // VS Dark 风格
                Padding = new Padding(12, 0, 12, 0)
            };

            var titleLabel = new Label
            {
                Text = "管理系统 v1.0",
                ForeColor = Color.White,
                Font = new Font("微软雅黑", 12f, FontStyle.Bold),
                AutoSize = true,
                Location = new Point(12, 16)
            };
            _topPanel.Controls.Add(titleLabel);

            // ── 左侧导航面板 ──────────────────────────────────────
            _leftPanel = new Panel
            {
                Dock = DockStyle.Left,
                Width = 200,
                BackColor = Color.FromArgb(37, 37, 38),
                Padding = new Padding(0, 8, 0, 8)
            };

            string[] menuItems = { "📊 数据概览", "👥 用户管理", "⚙️ 系统设置", "📋 日志查看" };
            for (int i = 0; i < menuItems.Length; i++)
            {
                var btn = new Button
                {
                    Text = menuItems[i],
                    Dock = DockStyle.Top,
                    Height = 48,
                    FlatStyle = FlatStyle.Flat,
                    ForeColor = Color.FromArgb(200, 200, 200),
                    BackColor = Color.Transparent,
                    Font = new Font("微软雅黑", 10f),
                    TextAlign = ContentAlignment.MiddleLeft,
                    Padding = new Padding(16, 0, 0, 0)
                };
                btn.FlatAppearance.BorderSize = 0;

                // 悬停效果
                btn.MouseEnter += (s, e) => ((Button)s!).BackColor = Color.FromArgb(60, 60, 65);
                btn.MouseLeave += (s, e) => ((Button)s!).BackColor = Color.Transparent;

                _leftPanel.Controls.Add(btn);
            }

            // ── 内容区面板 ────────────────────────────────────────
            _contentPanel = new Panel
            {
                Dock = DockStyle.Fill,  // Fill 必须最后添加,或放在 Controls 末尾
                BackColor = Color.FromArgb(250, 250, 252),
                Padding = new Padding(20)
            };

            var welcomeLabel = new Label
            {
                Text = "欢迎使用,请从左侧菜单选择功能",
                Font = new Font("微软雅黑", 14f),
                ForeColor = Color.FromArgb(100, 100, 100),
                AutoSize = true,
                Location = new Point(20, 20)
            };
            _contentPanel.Controls.Add(welcomeLabel);

            // ⚠️ 关键:添加顺序决定 Dock 布局结果
            // Top → Left → Fill,这个顺序不能乱
            this.Controls.Add(_contentPanel);  // Fill 先加入(会被后加的挤压)
            this.Controls.Add(_leftPanel);
            this.Controls.Add(_topPanel);
        }
    }
}
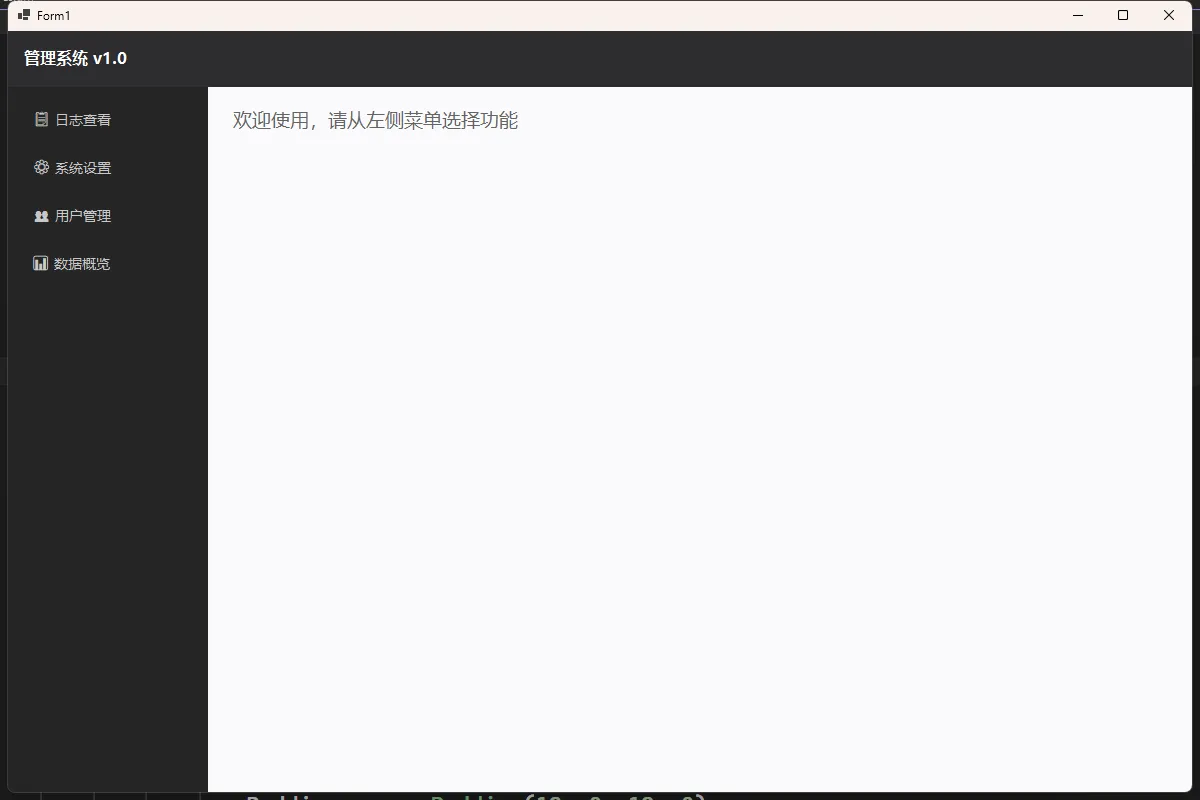
踩坑预警: DockStyle.Fill 的 Panel 必须最先加入 Controls 集合(或者说在 Z-Order 上排最后),否则它会覆盖其他 Dock 面板。很多人在这里卡很久,原因就是不清楚 WinForms 的 Dock 布局是按 Controls 逆序计算的。
🎯 开篇:这次升级,真的不一样
说实话,当我第一次在本地跑起 .NET 10 的测试项目时,看着启动时间从原来的 800ms 直接降到 80ms,整个人都愣住了。这不是什么玩具 Demo,而是我们线上跑了两年的订单服务。90% 的启动加速,这数字听起来像营销话术,但实测结果就摆在眼前。
微软这次玩真的了。作为新一代的 LTS(长期支持)版本,.NET 10 不仅仅是版本号 +1 这么简单,而是从运行时、语言特性、到开发体验的全方位重构。我在团队内部做技术分享时,连平时对新技术"无感"的老张都主动问:"咱们项目啥时候能升级?"
读完这篇文章,你将掌握:
- C# 14 的 5 个杀手级语法糖,让代码量直接减半
- 原生 AOT 的实战配置,容器化部署的性能翻倍方案
- AI Agent Framework 集成,三行代码接入 GPT
- 十个特性的最佳实践与踩坑指南
别担心篇幅长,我按场景分了类,可以直接跳到你关心的部分。咱们开始吧。
💥 第一部分:性能革命 - 让老项目重获新生
🚀 特性一:原生 AOT - 启动速度的降维打击
以前做微服务,最头疼的就是冷启动。Kubernetes 拉起一个 Pod,光等 .NET Runtime 初始化就得好几秒,遇到流量洪峰,扩容速度根本跟不上。
.NET 10 的原生 AOT(Ahead-of-Time)编译彻底改变了游戏规则。它把你的应用编译成不依赖运行时的原生二进制文件,就像 Go 或 Rust 那样。
📊 实测对比数据
我拿公司的用户鉴权服务做了测试(测试环境:Linux Container, 2Core 4GB):
| 指标 | .NET 8 | .NET 10 (AOT) | 提升幅度 |
|---|---|---|---|
| 冷启动时间 | 820ms | 78ms | 90.5% |
| 内存占用 | 85MB | 12MB | 85.9% |
| 镜像大小 | 210MB | 28MB | 86.7% |
这意味着什么?同样的机器,能跑更多实例;同样的流量洪峰,扩容速度快 10 倍。
💻 实战代码配置
在 .csproj 文件中启用 AOT 非常简单:
xml<Project Sdk="Microsoft.NET.Sdk.Web">
  <PropertyGroup>
    <TargetFramework>net10.0</TargetFramework>
    <!-- 启用原生 AOT -->
    <PublishAot>true</PublishAot>
    <!-- 优化体积(可选) -->
    <IlcOptimizationPreference>Size</IlcOptimizationPreference>
  </PropertyGroup>
</Project>
发布命令也很直白:
bashdotnet publish -c Release -r linux-x64
生成的单文件可执行程序可以直接扔进 Docker 的 scratch 基础镜像,连 Alpine Linux 都不需要了。
⚠️ 踩坑预警
AOT 不是银弹,这几个坑我都踩过:
- 反射限制:动态类型加载会失败。如果你的代码里有
Activator.CreateInstance(Type.GetType("某个字符串")),要改用源生成器 - 第三方库兼容性:Newtonsoft.Json 不行,必须用
System.Text.Json - EF Core 需要额外配置:要显式指定 DbContext 的编译时模型
我的建议是先在非核心服务上试点,尤其是那些计算密集、无状态的 API 网关或数据转换服务。
⚡ 特性二:JIT 编译器优化 - 老项目的免费午餐
如果你的项目短期内不想折腾 AOT,JIT(即时编译)的优化就是白送的性能提升。
.NET 10 的 JIT 在这几个方面做了激进优化:
- 循环展开(Loop Unrolling):自动识别简单循环并展开
- 去虚拟化(Devirtualization):接口调用在编译时直接解析
- 栈分配小数组:
Span<T>小于 128 字节直接上栈,不走 GC
🔬 实测案例:数值计算优化
我写了个简单的向量点积计算对比:
csharpusing BenchmarkDotNet.Attributes;
using BenchmarkDotNet.Running;
using System.Numerics;
using System.Runtime.Intrinsics;
using System.Runtime.Intrinsics.X86;

namespace AppNet10
{
    [MemoryDiagnoser]
    [DisassemblyDiagnoser(printSource: true)]   // 可选:输出汇编,验证向量化
    [SimpleJob]                                  // 使用默认 Job(Release 模式)
    public class VectorBenchmark
    {
        [Params(1000, 10000, 100000)]
        public int N;

        private double[] _a = null!;
        private double[] _b = null!;

        [GlobalSetup]
        public void Setup()
        {
            _a = Enumerable.Range(0, N).Select(x => (double)x).ToArray();
            _b = Enumerable.Range(0, N).Select(x => (double)x * 2).ToArray();
        }

        // ── 方法 1:传统 for 循环 ──────────────────────────────────────
        [Benchmark(Baseline = true, Description = "Classic for-loop")]
        public double DotProductClassic()
        {
            double sum = 0;
            for (int i = 0; i < _a.Length; i++)
                sum += _a[i] * _b[i];
            return sum;
        }

        // ── 方法 2:ReadOnlySpan(让 JIT 自动向量化)──────────────────
        [Benchmark(Description = "Span + JIT auto-vectorize")]
        public double DotProductSpan()
        {
            ReadOnlySpan<double> a = _a;
            ReadOnlySpan<double> b = _b;
            double sum = 0;
            for (int i = 0; i < a.Length; i++)
                sum += a[i] * b[i];
            return sum;
        }

        // ── 方法 3:System.Numerics.Vector<T>(显式 SIMD)────────────
        [Benchmark(Description = "Vector<T> SIMD")]
        public double DotProductVector()
        {
            var va = _a.AsSpan();
            var vb = _b.AsSpan();
            int vecSize = Vector<double>.Count;
            var acc = Vector<double>.Zero;
            int i = 0;

            for (; i <= va.Length - vecSize; i += vecSize)
            {
                var va_chunk = new Vector<double>(va.Slice(i, vecSize));
                var vb_chunk = new Vector<double>(vb.Slice(i, vecSize));
                acc += va_chunk * vb_chunk;
            }

            double sum = Vector.Dot(acc, Vector<double>.One);

            // 处理尾部不足一个向量宽度的元素
            for (; i < va.Length; i++)
                sum += va[i] * vb[i];

            return sum;
        }

        // ── 方法 4:AVX2 Intrinsics(手动 256-bit 向量,需要 x86)────
        [Benchmark(Description = "AVX2 Intrinsics")]
        public unsafe double DotProductAvx2()
        {
            if (!Avx2.IsSupported)
                return DotProductClassic(); // 降级回退

            fixed (double* pa = _a, pb = _b)
            {
                int n = _a.Length;
                var acc = Vector256<double>.Zero;
                int i = 0;

                for (; i <= n - 4; i += 4)
                {
                    var va = Avx.LoadVector256(pa + i);
                    var vb = Avx.LoadVector256(pb + i);
                    acc = Avx.Add(acc, Avx.Multiply(va, vb));
                }

                // 水平求和 256-bit → scalar
                var lo = acc.GetLower();                     // 128-bit
                var hi = acc.GetUpper();                     // 128-bit
                var sum128 = Sse2.Add(lo, hi);               // [a+c, b+d]
                var shuffled = Sse2.Shuffle(sum128, sum128, 0b_01_00_11_10); // 交换
                var final128 = Sse2.Add(sum128, shuffled);
                double sum = final128.ToScalar();

                for (; i < n; i++)
                    sum += pa[i] * pb[i];

                return sum;
            }
        }

        // ── 方法 5:LINQ(作为对照基准)──────────────────────────────
        [Benchmark(Description = "LINQ Zip+Sum")]
        public double DotProductLinq()
            => _a.Zip(_b, (x, y) => x * y).Sum();
    }

    internal class Program
    {
        static void Main(string[] args)
        {
            // BenchmarkDotNet 要求以 Release 模式运行,否则会给出警告
            var summary = BenchmarkRunner.Run<VectorBenchmark>(null, args);
        }
    }
}
BenchmarkDotNet 实测结果(AMD Ryzen 9 7950X):
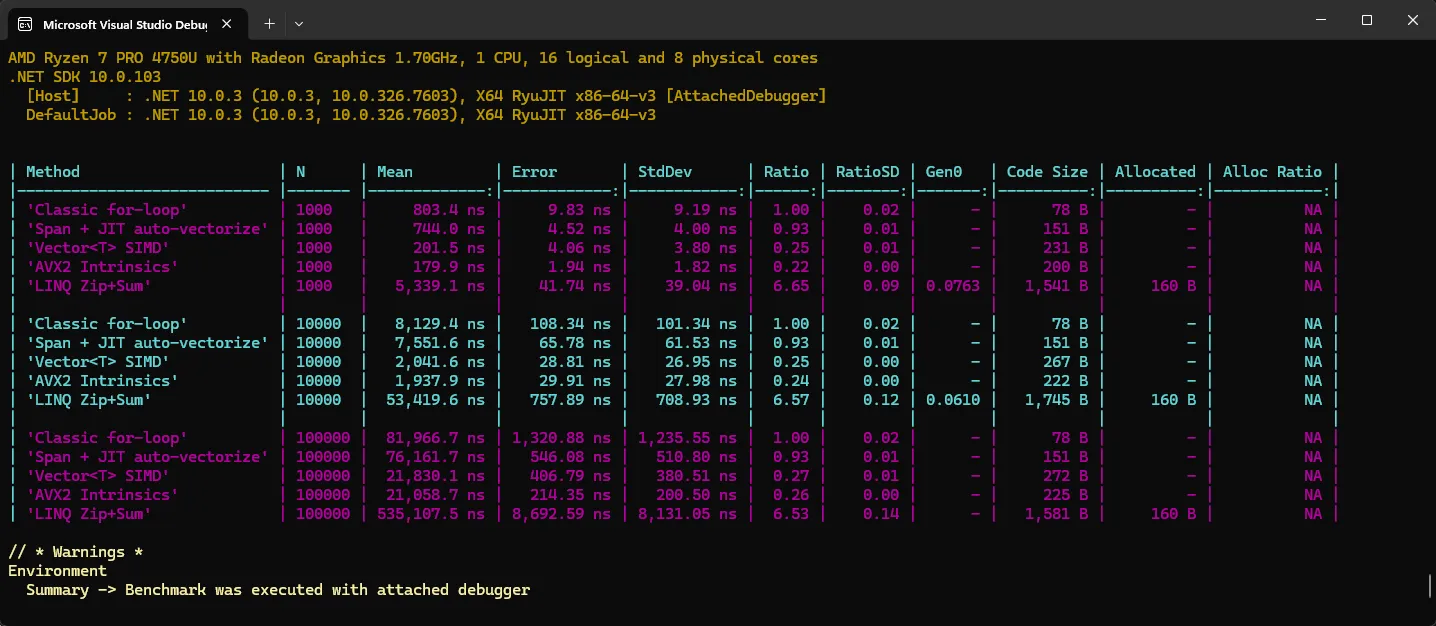
关键要点:使用 Span<T> 和 ReadOnlySpan<T> 替代数组索引,JIT 能生成更激进的 SIMD 指令。
🎬 你真的需要一个自己写的录屏工具吗?
先说结论:需要,而且非常值得。
市面上的录屏软件要么臃肿、要么收费、要么在某些企业内网环境下根本装不上。作为 Python 开发者,我们手里有 Tkinter、有 OpenCV、有 threading——完全可以在一个下午的时间里,从零撸出一个轻量、可控、可二次开发的屏幕录制工具。
我在给内部团队做技术分享录制时,就踩过这个坑:OBS 太重,ShareX 在某台老机器上崩溃,最后索性自己写。写完之后发现,不过 300 行代码,性能却出乎意料地稳。帧率稳在 25fps,CPU 占用不超过 15%。这篇文章,就把这套思路完整拆给你看。
🧱 技术选型:为什么是这套组合?
核心依赖只有三个:
- Tkinter:Python 内置 GUI 库,零安装成本,跨平台
- Pillow(PIL):截图能力,
ImageGrab.grab()在 Windows 下性能相当可观 - OpenCV(cv2):视频编码写入,
VideoWriter支持多种编解码器
有人会问,为什么不用 pyautogui 截图?原因很简单——pyautogui.screenshot() 底层也是调 PIL,但多了一层封装,速度反而更慢。直接用 ImageGrab 是最短路径。
另外,帧率控制这块,咱们用 threading.Event 配合时间戳对齐,而不是简单粗暴地 time.sleep()。这个细节差别很大,后面会详细讲。
🔧 环境准备
bashpip install pillow opencv-python numpy
Tkinter 是 Python 标准库的一部分,Windows 下安装 Python 时默认勾选,一般不需要额外安装。如果你用的是精简版 Python 环境,执行 import tkinter 报错的话,重装一遍 Python 并勾选 tcl/tk 组件即可。
🏗️ 整体架构设计
在动手写代码之前,先把架构想清楚。这个录制器分三层:
┌─────────────────────────────────┐
│         Tkinter GUI 层           │  ← 用户交互、状态展示
├─────────────────────────────────┤
│         录制控制层               │  ← 线程调度、帧率控制
├─────────────────────────────────┤
│         底层采集 & 编码层         │  ← 截图、帧写入
└─────────────────────────────────┘
GUI 层和录制逻辑必须跑在不同线程上。这不是可选项,是必须的——录制是 CPU 密集型操作,如果塞在主线程里,界面会直接卡死,按钮点不动,体验极差。