
🤖 GPT是什么?揭开AI大模型的神秘面纱
你有没有想过,为什么ChatGPT能像人类一样自然地对话?为什么它能写诗、编程、甚至帮你分析复杂的商业问题? 很多人以为这只是简单的"关键词匹配"或"模板填充",但实际上,GPT背后的技术原理远比你想象的精妙。
今天,咱们就用最接地气的方式,把GPT这个看似高深的技术"掰开揉碎"讲清楚。读完这篇文章,你不仅能理解GPT的工作原理,还能向身边的朋友科普这项改变世界的技术。
🔍 GPT三个字母背后的秘密
GPT这个名字可不是随便起的,它是三个英文单词的缩写,每个字母都藏着关键信息:
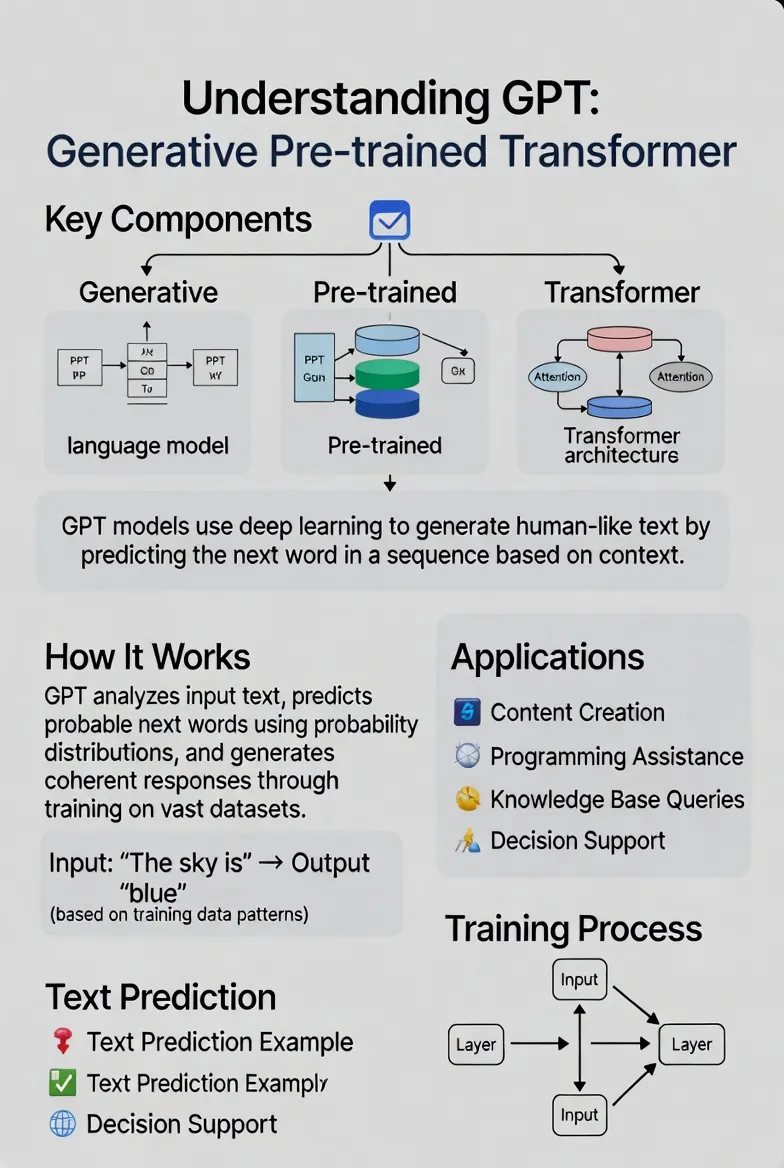
G = Generative(生成式)
这意味着模型具备"创造"能力——不是简单地检索现有内容,而是真正生成全新的文本。
P = Pre-trained(预训练)
在正式"上岗"之前,模型已经读过海量的书籍、网页、文章,掌握了语言的基本规律和常识。
T = Transformer(变换器)
这是一种革命性的神经网络架构,让机器能够理解复杂的上下文关系,就像人类阅读时能联系前后文一样。
听起来还是有点抽象?别急,咱们一个一个拆开来讲。
🎨 什么是"生成式"?用例子说透它
很多人误以为GPT只是在"复制粘贴"互联网上的内容。其实不然——它是通过预测概率来生成文本的。
原理很简单:猜下一个词
想象你在跟朋友聊天,对方说了半句话:"今天天气真…",你的大脑会自动预测下一个词可能是"好"、"热"、"冷"。GPT做的就是同样的事,只不过它是基于数学概率来预测。
Python openpyxl实战指南:从Excel小白到自动化大师
作为Windows下的Python开发者,你是否经常遇到这样的场景:老板给你一个复杂的Excel表格,要求批量处理数据、生成报表,或者需要定期更新Excel中的数据?手工操作不仅效率低下,还容易出错。
本文将带你深入掌握openpyxl这个强大的Excel操作库,从基础读写到高级应用,让你告别重复的Excel操作,实现真正的办公自动化。无论你是Python新手还是有一定经验的开发者,都能在这里找到实用的解决方案。
🔍 问题分析:为什么选择openpyxl?
在众多Python Excel操作库中,为什么推荐openpyxl?让我们来看看实际场景:
传统方式的痛点:
- 手工复制粘贴,效率极低
- 格式丢失,需要重新设置
- 数据量大时容易出错
- 重复性工作占用大量时间
openpyxl的优势:
- ✅ 完美支持Excel 2010+格式(.xlsx)
- ✅ 保持原有格式和样式
- ✅ 支持公式、图表、条件格式
- ✅ 内存占用相对较小
- ✅ 与pandas无缝集成
💡 解决方案:openpyxl核心功能解析
🚀 环境准备
首先安装必要的库:
bashpip install openpyxl pandas
📊 基础操作:读写Excel文件
创建和保存工作簿
pythonfrom openpyxl import Workbook
from openpyxl.utils import get_column_letter
# 创建新的工作簿
wb = Workbook()
ws = wb.active # 获取活动工作表
ws.title = "销售数据" # 设置工作表名称
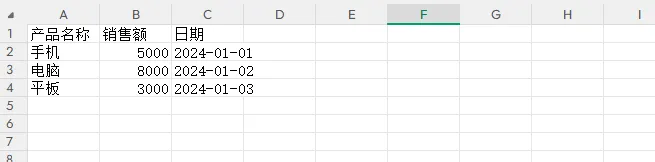
# 写入数据
ws['A1'] = '产品名称'
ws['B1'] = '销售额'
ws['C1'] = '日期'
# 批量写入数据
data = [
['手机', 5000, '2024-01-01'],
['电脑', 8000, '2024-01-02'],
['平板', 3000, '2024-01-03']
]
for row_num, row_data in enumerate(data, start=2):
for col_num, value in enumerate(row_data, start=1):
ws.cell(row=row_num, column=col_num, value=value)
# 保存文件
wb.save('销售数据.xlsx')
print("✅ Excel文件创建成功!")
🔥 SkiaSharp + WinForms:打造工业级动画系统的完整指南
你是否曾经被客户要求开发一个酷炫的工业监控界面?或者想要在WinForms应用中实现流畅的动画效果?传统的GDI+绘图性能有限,而WPF又显得过于重量级。今天我们来探索一个完美的解决方案:SkiaSharp + WinForms,它能让你轻松实现60FPS的工业级动画效果。
本文将手把手教你构建一个完整的工业动画演示系统,包含齿轮转动、传送带、机械臂等多种动画效果,代码开箱即用!
🎯 为什么选择SkiaSharp?
传统绘图方案的痛点
在WinForms开发中,我们经常遇到这些问题:
- GDI+性能瓶颈:复杂动画卡顿明显
- WPF过度设计:简单项目引入复杂度过高
- 第三方控件昂贵:商业动画控件价格不菲
SkiaSharp的优势
c#// SkiaSharp:硬件加速 + 跨平台 + 开源免费
using SkiaSharp;
using SkiaSharp.Views.Desktop;

// 60FPS丝滑动画,告别卡顿
private Timer animationTimer = new Timer { Interval = 16 };
核心优势:
- 🚀 硬件加速:GPU渲染,性能强劲
- 🎨 丰富API:路径、渐变、滤镜应有尽有
- 💰 开源免费:Google出品,质量保证
- 🔧 易于集成:几行代码即可在WinForms中使用
🏗️ 项目架构设计
核心组件结构
c#// 主窗体:FrmMain
public partial class FrmMain : Form
{
    private SKControl skiaCanvas;        // 绘图画布
    private Timer animationTimer;        // 动画定时器
    private float rotationAngle = 0f;    // 旋转角度
    private float animationSpeed = 1.0f; // 动画速度
}
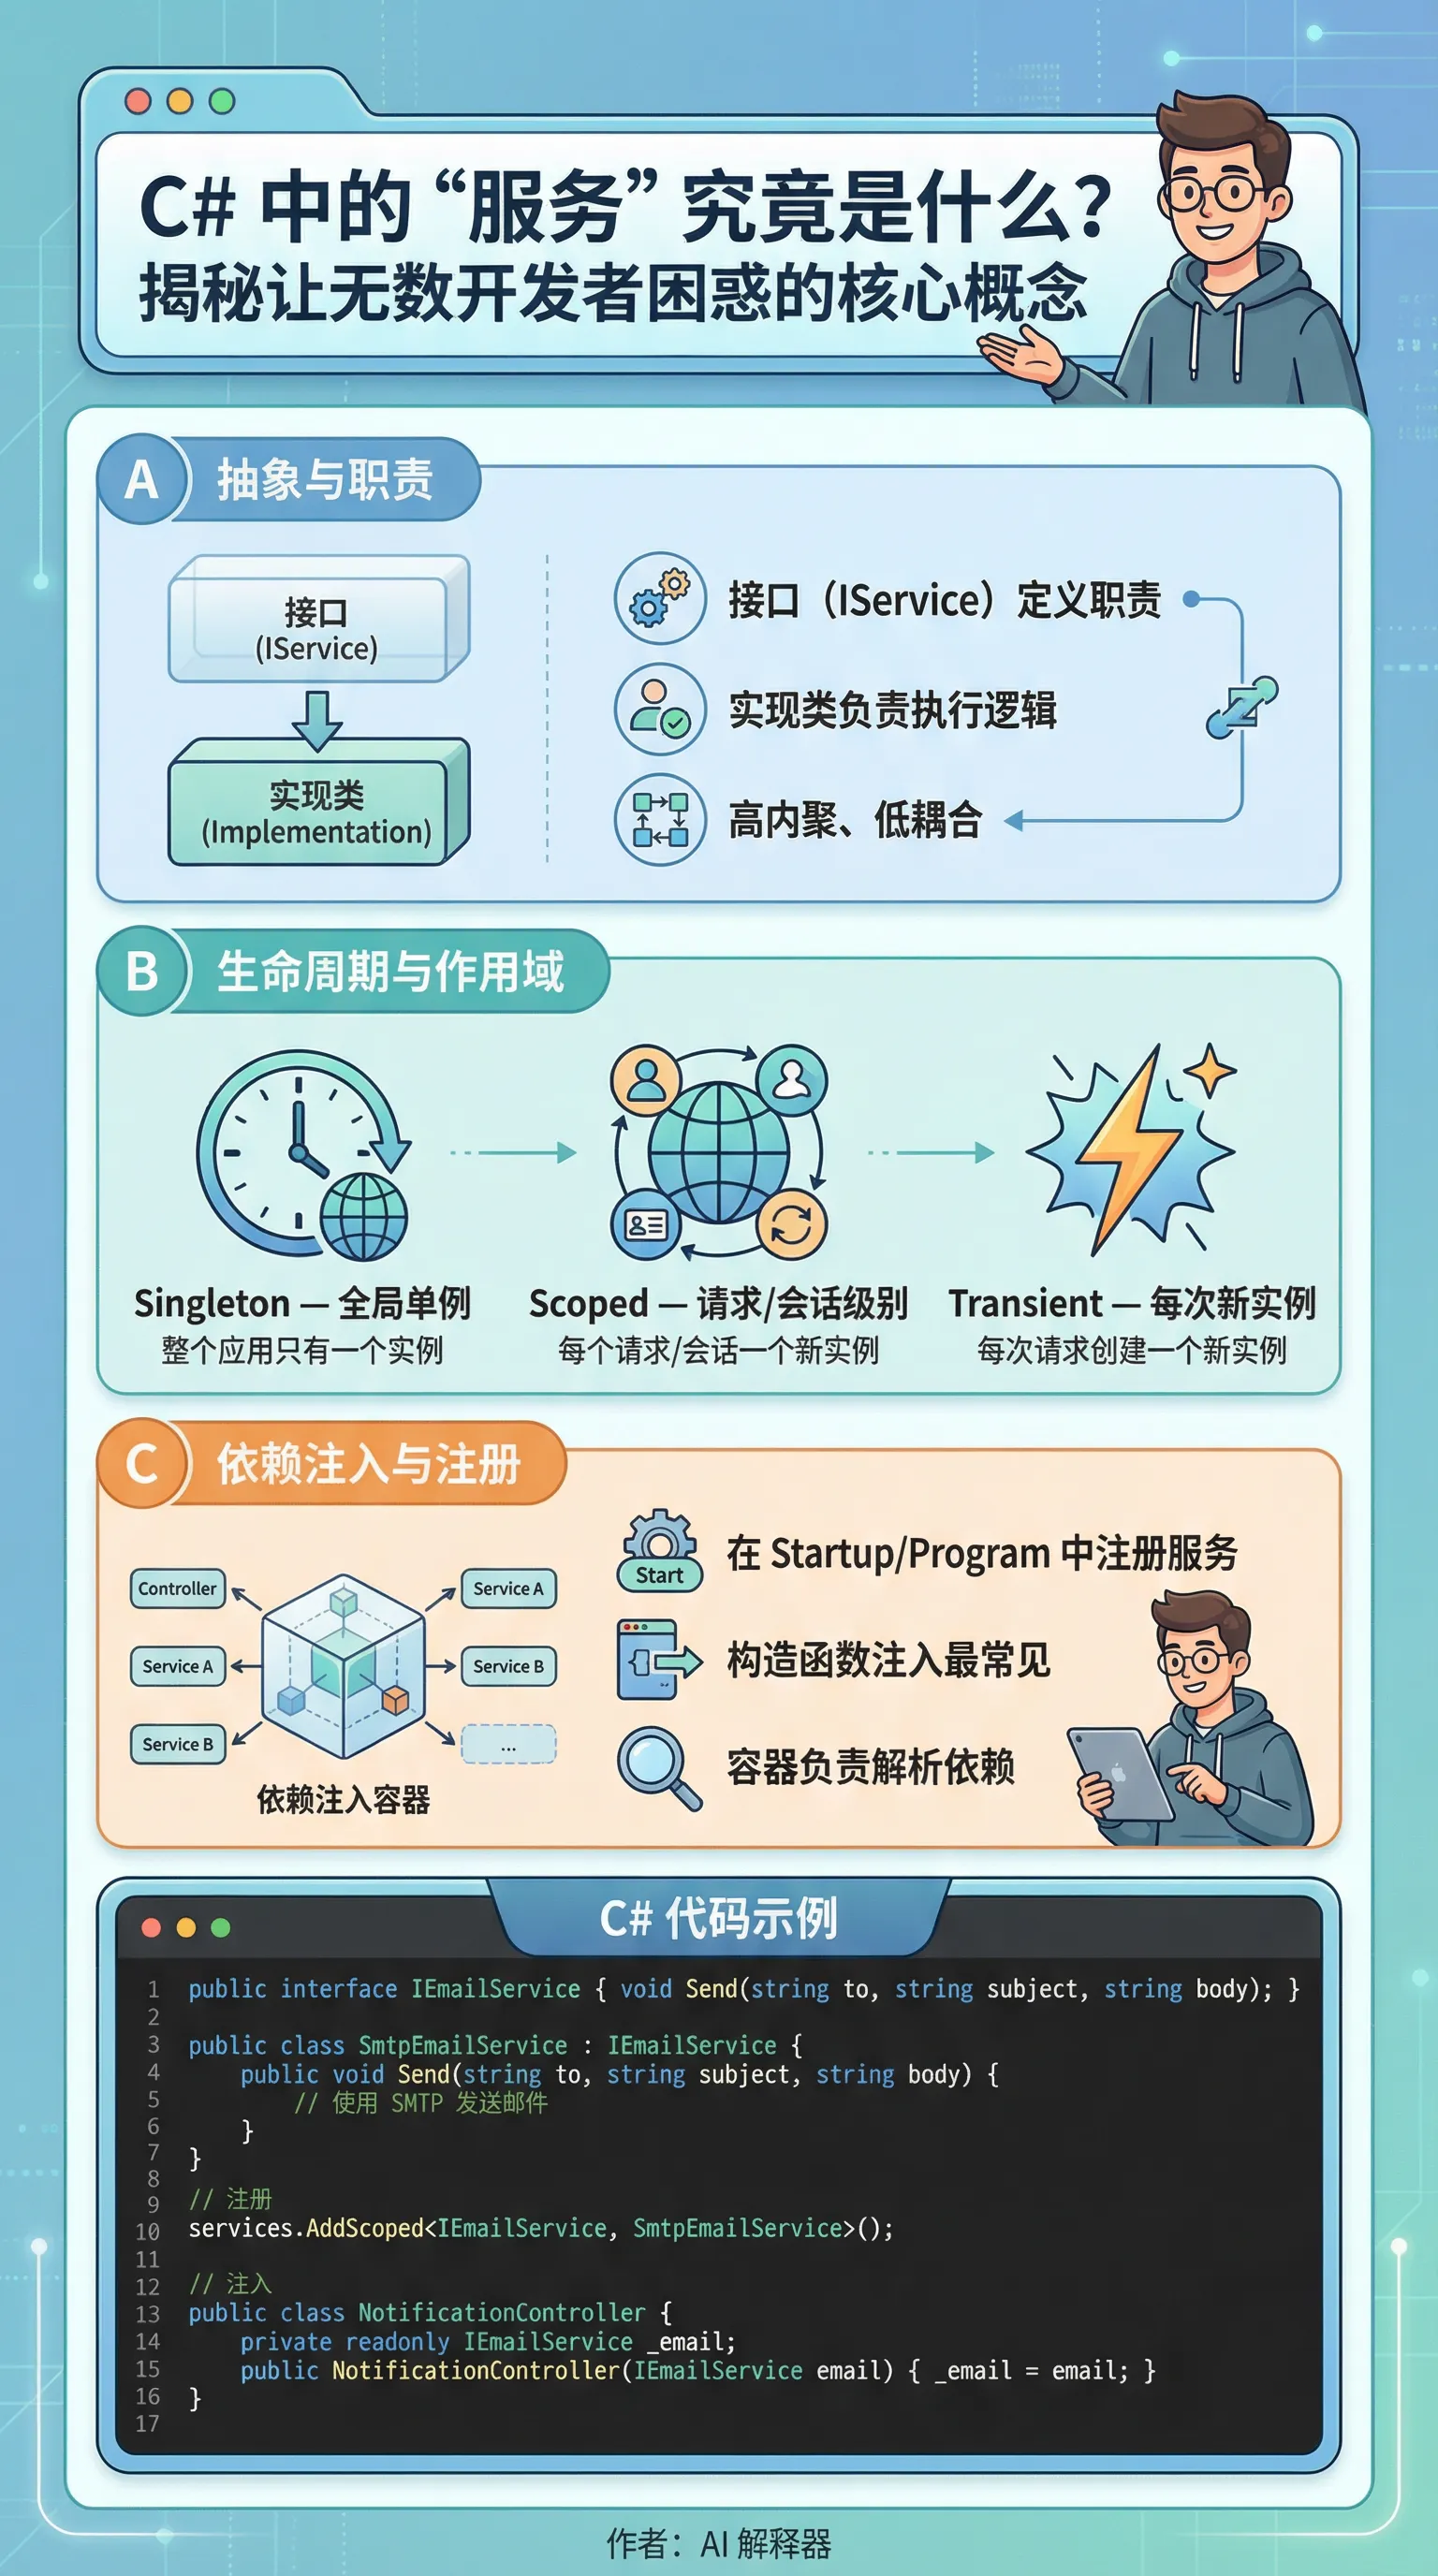
🔥 C#中的"服务"究竟是什么?揭秘让无数开发者困惑的核心概念
你会发现现在的C#项目或是Java也一样,打开代码后,他发现到处都是UserService、LoggingService、FileService等以"Service"结尾的类。作为.NET新手,他开始疑惑:这些"服务"到底是什么?有标准定义吗?
如果你也有同样的困惑,不用担心!不少C#开发者在职业生涯初期都被这个看似简单的概念困扰过。今天我们就来彻底搞清楚C#中"Service"的真正含义和最佳实践。
🎯 问题分析:为什么Service概念如此混乱?
💡 缺乏标准定义
事实上,C#语言本身并没有定义"Service"。这更多是一种命名约定和架构设计模式,而不是语言特性。正如一位资深开发者所说:
"Service只是我们用来描述'做某件事'的类的词汇,与表示数据的类相对应。"
🤔 多重含义混淆
在不同上下文中,"Service"可能指代:
- 业务逻辑封装类(最常见)
- 依赖注入容器中的服务
- Windows系统服务
- Web服务/微服务
💼 Service的五大核心理解
🎪 行为vs数据的分离
核心原则:Service负责行为(方法),Model负责数据(属性)
c#// 数据模型 - 只包含属性
public class Customer
{
    public string Name { get; set; }
    public string Email { get; set; }
    public DateTime CreatedAt { get; set; }
}

// 服务类 - 包含业务逻辑行为
public class CustomerService
{
    private readonly ICustomerRepository _repository;

    public CustomerService(ICustomerRepository repository)
    {
        _repository = repository;
    }

    // 业务逻辑:验证并创建客户
    public async Task<bool> CreateCustomerAsync(Customer customer)
    {
        // 验证逻辑
        if (string.IsNullOrEmpty(customer.Email))
            return false;

        // 重复检查
        var existing = await _repository.GetByEmailAsync(customer.Email);
        if (existing != null)
            return false;

        // 设置创建时间
        customer.CreatedAt = DateTime.UtcNow;

        // 保存到数据库
        await _repository.CreateAsync(customer);
        return true;
    }
}
⚠️ 常见坑点:新手容易把所有逻辑都塞进Controller,记住Controllers只负责HTTP请求处理!哈哈,好像Admin.net框架就是Controller+Service合一起了,说实话中小项目开发就是快。
🔧 Service vs Repository的明确分工
c#// Repository:纯数据访问层
public interface IUserRepository
{
    Task<User> GetByIdAsync(int id);
    Task CreateAsync(User user);
    Task UpdateAsync(User user);
}

// Service:业务逻辑层,使用Repository
public class UserService
{
    private readonly IUserRepository _userRepository;
    private readonly IEmailService _emailService;

    public UserService(IUserRepository userRepository, IEmailService emailService)
    {
        _userRepository = userRepository;
        _emailService = emailService;
    }

    // 复杂业务流程:用户注册
    public async Task<RegistrationResult> RegisterUserAsync(RegisterRequest request)
    {
        // 1. 业务验证
        if (!IsValidEmail(request.Email))
            return RegistrationResult.InvalidEmail();

        // 2. 检查重复
        var existingUser = await _userRepository.GetByEmailAsync(request.Email);
        if (existingUser != null)
            return RegistrationResult.EmailExists();

        // 3. 创建用户
        var user = new User
        {
            Email = request.Email,
            PasswordHash = HashPassword(request.Password),
            CreatedAt = DateTime.UtcNow,
            IsActive = false // 需要邮箱验证
        };

        await _userRepository.CreateAsync(user);

        // 4. 发送验证邮件
        await _emailService.SendVerificationEmailAsync(user.Email);

        return RegistrationResult.Success(user.Id);
    }

    private bool IsValidEmail(string email) { /* 验证逻辑 */ }
    private string HashPassword(string password) { /* 密码哈希 */ }
}
💡 金句总结:Repository管数据(这块有不少老程序师一时不习惯),Service管业务,Controller管请求.
C#字符串操作的性能"陷阱":为什么你的代码慢得像蜗牛?
你有没有遇到过这种情况?
写了个看似简单的日志记录功能,循环里拼接几千条数据,结果程序卡得像PPT。打开性能分析器一看——好家伙,90%的CPU时间都耗在字符串操作上。改用StringBuilder后,速度直接提升了50倍。
这不是段子。上周帮一个朋友排查生产环境的性能问题,发现他们的报表生成模块,处理5000条数据需要18秒。罪魁祸首?一个无辜的+=操作符。
今天咱们就掰开揉碎了讲讲:字符串拼接为啥这么慢?StringBuilder凭什么快?以及——什么场景该用哪个?
读完这篇,你能拿到:
✅ 字符串不可变性的底层真相(不是背概念)
✅ 3种实战场景的性能对比数据(附完整测试代码)
✅ 2个可直接复用的优化模板
✅ 避开5个常见的性能陷阱
🔍 为什么字符串操作会成为性能杀手?
不可变性:被忽视的内存杀手
很多人知道C#的string是"不可变的"(immutable),但真正理解其影响的不多。
咱们看个例子。假设你这样写:
c#string result = "Hello";
result += " World";
result += "!";
你以为的操作:在原字符串后面追加内容。
实际发生的事:
- 创建新字符串"Hello World"(分配新内存)
- 复制"Hello"的内容过去
- 追加" World"
- 原来的"Hello"变成垃圾,等待GC回收
- 再创建新字符串"Hello World!"
- 复制"Hello World"... (又是一轮循环)
三次赋值 = 创建3个字符串对象 + 2次完整内容复制
想象一下:如果循环1000次呢?每次操作都要复制之前所有的内容。这就像搬家——每次添置新家具,都要把整个房子的东西搬到更大的房子里。
真实场景的恐怖数据
我专门做了个测试(测试环境:. NET 10.0,100000次拼接操作):
c#// 方法1:直接用+拼接
var sw = Stopwatch.StartNew();
string result = "";
for (int i = 0; i < 100000; i++)
{
    result += "Item" + i + ",";
}
sw.Stop();
c#// 方法2:使用StringBuilder
var sw = Stopwatch.StartNew();
var sb = new StringBuilder();
for (int i = 0; i < 100000; i++)
{
    sb.Append("Item").Append(i).Append(",");
}
string result = sb.ToString();
sw.Stop();
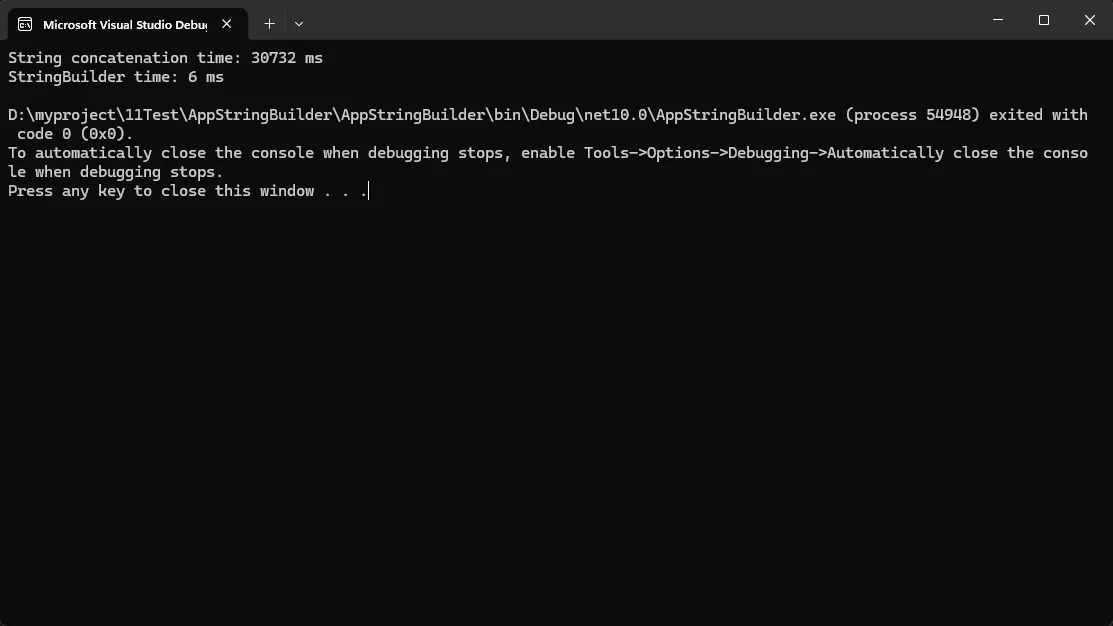 这还只是1万次,性能差距几十倍。生产环境动辄几十万条数据,差距会更夸张。