上周和一位刚上班的C#小孩聊天,他苦恼地说:"每次面试都会被问到值类型和引用类型的区别,我总是答得模糊不清。更要命的是,线上系统偶尔出现内存泄漏,但我根本不知道从哪里排查。"
今天这篇文章,我将用最通俗的语言和实战代码,帮你彻底搞懂C#变量类型与内存分配的核心机制,让你在技术面试和实际开发中都能游刃有余。
🔍 问题分析:为什么内存机制如此重要?
在深入解决方案之前,我们先来分析一下,为什么理解变量类型和内存分配如此关键:
- 性能影响:不同的变量类型在内存中的存储和访问方式差异巨大
- 内存泄漏:错误的变量使用方式可能导致内存无法释放
- 面试必考:几乎所有C#技术面试都会涉及这个话题
- 代码质量:深入理解有助于写出更高效、更稳定的代码
💡 解决方案一:深入理解值类型与引用类型
🎯 核心概念解析
C#namespace AppVariableMemory
{
internal class Program
{
static void Main(string[] args)
{
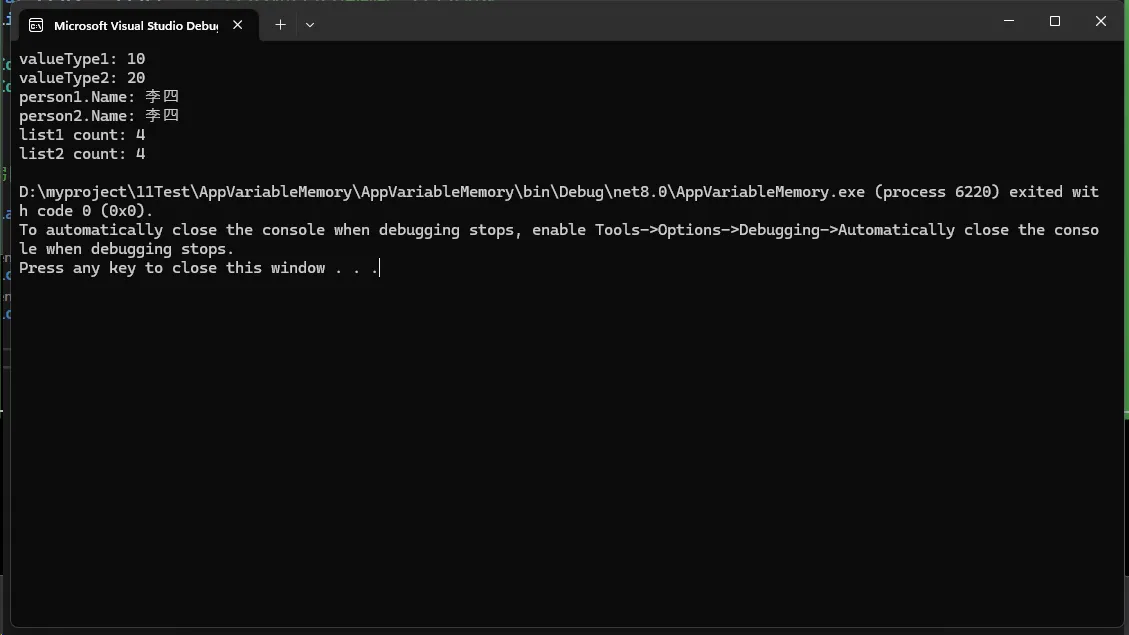
// 值类型示例 - 存储在栈上
int valueType1 = 10; // 直接存储值
int valueType2 = valueType1; // 复制值
valueType2 = 20; // 修改副本,不影响原值
Console.WriteLine($"valueType1: {valueType1}");
Console.WriteLine($"valueType2: {valueType2}");
// 引用类型示例 - 对象存储在堆上,引用存储在栈上
Person person1 = new Person { Name = "张三", Age = 25 };
Person person2 = person1; // 复制引用,指向同一个对象
person2.Name = "李四"; // 修改对象属性
Console.WriteLine($"person1.Name: {person1.Name}");
Console.WriteLine($"person2.Name: {person2.Name}");
// 关键差异演示
DemonstrateMemoryAllocation();
}
static void DemonstrateMemoryAllocation()
{
// 值类型:每次赋值都创建新的内存空间
int a = 5;
int b = a; // 在栈上创建新的内存位置
b = 10; // 只修改b的值,a不受影响
// 引用类型:多个变量可以指向同一个对象
var list1 = new List<int> { 1, 2, 3 };
var list2 = list1; // list2和list1指向同一个List对象
list2.Add(4); // 通过list2修改,list1也能看到变化
Console.WriteLine($"list1 count: {list1.Count}");
Console.WriteLine($"list2 count: {list2.Count}");
}
}
// 自定义引用类型
public class Person
{
public string Name { get; set; }
public int Age { get; set; }
}
}
最近在Reddit上看到一个引起千万程序员共鸣的帖子:一位仅有2年经验的C#开发者独自维护着一家公司的核心系统,面对百万级数据查询时束手无策。他的困惑让我想起了自己的成长经历——谁没有在LINQ的性能陷阱里跌过跟头呢?
据统计,70%的C#开发者在处理大数据量时都遇到过性能问题,而其中60%的问题源于LINQ使用不当。今天,我将结合实际案例,分享5个立竿见影的LINQ性能优化技巧,让你从此告别查询超时!
🔥 问题分析:为什么你的LINQ查询这么慢?
常见痛点梳理
许多开发者面临的核心问题包括:
- 物化陷阱:不理解
.ToList()的后果 - 过度获取:拉取不需要的数据
- 延迟加载:造成N+1查询问题
- 盲目使用Include:加载无关数据
让我们看看这个真实案例:
C#// ❌ 危险操作 - 会导致内存溢出
var allCustomers = db.Customers.ToList();
var filteredCustomers = allCustomers.Where(c => c.Country == "China");
问题分析:这段代码会将整个Customers表加载到内存中,如果表中有百万条记录,直接导致内存溢出。
💡 解决方案:5个实战优化技巧
🎯 技巧1:善用Select投影,只取所需
核心原则:永远不要获取超过需求的数据
C#namespace AppLinq5
{
// Customer 实体类
public class Customer
{
public int Id { get; set; }
public string Name { get; set; }
public string Email { get; set; }
public string Phone { get; set; }
public string Address { get; set; }
public bool IsActive { get; set; }
public string Description { get; set; } // 大文本字段
}
// DTO 类 - 只包含需要的字段
public class CustomerDto
{
public int Id { get; set; }
public string Name { get; set; }
public string Email { get; set; }
}
public class CustomerRepository
{
private readonly List<Customer> _customers;
public CustomerRepository()
{
// 模拟数据
_customers = new List<Customer>
{
new Customer { Id = 1, Name = "张三", Email = "zhang@email.com", Phone = "123456", Address = "北京市", IsActive = true, Description = "很长的描述文本..." },
new Customer { Id = 2, Name = "李四", Email = "li@email.com", Phone = "789012", Address = "上海市", IsActive = true, Description = "另一个很长的描述..." },
new Customer { Id = 3, Name = "王五", Email = "wang@email.com", Phone = "345678", Address = "广州市", IsActive = false, Description = "第三个长描述..." }
};
}
public IQueryable<Customer> GetCustomers()
{
return _customers.AsQueryable();
}
}
public class CustomerService
{
private readonly CustomerRepository _repository;
public CustomerService(CustomerRepository repository)
{
_repository = repository;
}
// ❌ 错误做法 - 查询所有字段
public List<Customer> GetAllCustomersBad()
{
return _repository.GetCustomers()
.Where(c => c.IsActive)
.ToList(); // 返回所有字段,包括不需要的大文本字段
}
// ✅ 正确做法 - 只选择需要的字段
public List<CustomerDto> GetCustomerSummary()
{
return _repository.GetCustomers()
.Where(c => c.IsActive)
.Select(c => new CustomerDto
{
Id = c.Id,
Name = c.Name,
Email = c.Email // 只选择需要的字段
})
.ToList();
}
}
internal class Program
{
static void Main(string[] args)
{
var repository = new CustomerRepository();
var customerService = new CustomerService(repository);
// ✅ 获取客户摘要信息 - 只包含需要的字段
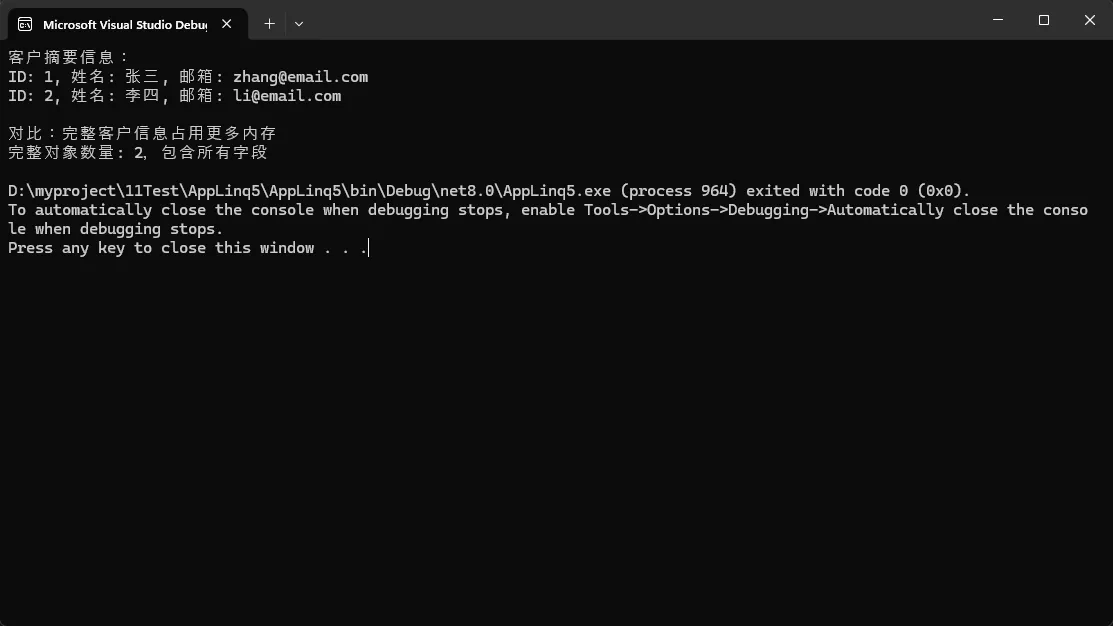
var customerSummaries = customerService.GetCustomerSummary();
Console.WriteLine("客户摘要信息:");
foreach (var customer in customerSummaries)
{
Console.WriteLine($"ID: {customer.Id}, 姓名: {customer.Name}, 邮箱: {customer.Email}");
}
Console.WriteLine("\n对比:完整客户信息占用更多内存");
var fullCustomers = customerService.GetAllCustomersBad();
Console.WriteLine($"完整对象数量: {fullCustomers.Count},包含所有字段");
}
}
}
你是否遇到过这样的场景:需要定时更新界面数据、实现倒计时功能,或者创建自动保存机制?作为C#开发者,这些需求在WinForms开发中几乎每天都会碰到。今天我们就来深入探讨System.Windows.Forms.Timer这个"小而美"的控件,让你彻底掌握定时任务的开发技巧。
本文将通过实战案例,教你如何用Timer控件解决常见的定时任务问题,避开开发中的常见陷阱,让你的应用更加专业和稳定。
🎯 Timer控件核心原理解析
在深入实战之前,我们先理解Timer的核心机制。WinForms中的Timer并不是"真正"的多线程定时器,而是基于Windows消息循环的组件。
🔧 三大核心属性
- Enabled:控制定时器启停状态(true/false)
- Interval:时间间隔,单位毫秒,最小值通常为15-55ms
- Tag:存储自定义数据的万能属性
⚡ 核心事件与方法
- Tick事件:定时触发的核心事件处理器
- Start()/Stop():编程式启停控制
💡 实战应用1:打造专业数字时钟
这是Timer最经典的应用场景。让我们创建一个高颜值的实时时钟:
C#using Timer = System.Windows.Forms.Timer;

namespace AppWinformTimer
{
    public partial class FrmClock : Form
    {
        private Label timeLabel;
        private Timer clockTimer;
        public FrmClock()
        {
            InitializeComponent();
            InitializeUI();
            SetupTimer();
        }
        private void InitializeUI()
        {
            this.Text = "专业数字时钟";
            this.Size = new Size(400, 200);
            this.StartPosition = FormStartPosition.CenterScreen;

            timeLabel = new Label
            {
                Dock = DockStyle.Fill,
                TextAlign = ContentAlignment.MiddleCenter,
                Font = new Font("Microsoft YaHei", 28F, FontStyle.Bold),
                ForeColor = Color.DodgerBlue,
                BackColor = Color.Black
            };

            this.Controls.Add(timeLabel);
        }

        private void SetupTimer()
        {
            clockTimer = new Timer
            {
                Interval = 1000  // 1秒更新一次
            };
            clockTimer.Tick += ClockTimer_Tick;
            clockTimer.Start();

            // 立即显示当前时间
            UpdateTimeDisplay();
        }

        private void ClockTimer_Tick(object sender, EventArgs e)
        {
            UpdateTimeDisplay();
        }

        private void UpdateTimeDisplay()
        {
            timeLabel.Text = DateTime.Now.ToString("yyyy-MM-dd HH:mm:ss");
        }

        protected override void OnFormClosed(FormClosedEventArgs e)
        {
            // 🚨 重要:记得释放资源
            clockTimer?.Dispose();
            base.OnFormClosed(e);
        }
    }
}

你是否在WPF开发中遇到过这样的困惑:为什么有些属性支持数据绑定,而有些却不行?为什么WPF控件的属性看起来如此"神奇",能够自动响应变化?这背后的秘密就在于WPF的依赖属性系统。
作为WPF的核心特性之一,依赖属性(Dependency Property)与传统的CLR属性有着本质的不同。理解这两者的区别,不仅能帮你解决数据绑定、样式设置等常见问题,更能让你的WPF应用程序性能更优、功能更强大。
本文将通过实战代码和深度分析,带你彻底搞懂依赖属性系统的工作原理与应用场景。
🔍 问题分析:为什么需要依赖属性?
传统CLR属性的局限性
传统的C#属性本质上是对字段的封装,存在以下限制:
- 无法支持数据绑定:WPF的双向绑定机制需要属性具备变化通知能力
- 缺乏值优先级:无法处理样式、模板、继承等多种值来源的优先级
- 内存占用大:每个对象都需要存储所有属性的值
- 缺乏元数据支持:无法提供验证、强制转换等扩展功能
WPF的解决方案:依赖属性系统
依赖属性通过以下机制解决了这些问题:
- 属性系统:统一管理属性值的存储和获取
- 值优先级:支持本地值、样式、模板等多层级值源
- 变化通知:内置PropertyChanged机制
- 内存优化:稀疏存储,只存储被设置的属性值
💡 核心区别深度解析
🔥 1. 定义方式的根本不同
传统CLR属性定义:
C#public class TraditionalControl : Control
{
    private string _title;

    public string Title
    {
        get { return _title; }
        set
        {
            _title = value;
            // 需要手动触发PropertyChanged
        }
    }
}
依赖属性定义:
C#public class ModernControl : Control
{
    // 1. 注册依赖属性
    public static readonly DependencyProperty TitleProperty =
        DependencyProperty.Register(
            nameof(Title),                    // 属性名
            typeof(string),                   // 属性类型
            typeof(ModernControl),           // 所有者类型
            new PropertyMetadata(            // 元数据
                string.Empty,               // 默认值
                OnTitleChanged,             // 变化回调
                CoerceTitle                 // 值强制转换
            ));

    // 2. 提供CLR包装器
    public string Title
    {
        get { return (string)GetValue(TitleProperty); }
        set { SetValue(TitleProperty, value); }
    }

    // 3. 属性变化回调
    private static void OnTitleChanged(DependencyObject d,
        DependencyPropertyChangedEventArgs e)
    {
        var control = (ModernControl)d;
        // 处理属性变化逻辑
        control.OnTitleChanged((string)e.OldValue, (string)e.NewValue);
    }

    // 4. 值强制转换
    private static object CoerceTitle(DependencyObject d, object value)
    {
        // 确保Title不为null
        return value ?? string.Empty;
    }

    protected virtual void OnTitleChanged(string oldValue, string newValue)
    {
        // 子类可重写此方法
    }
}
🚀 2. 数据绑定支持
传统属性的绑定问题:
C#public class StudentViewModel : INotifyPropertyChanged
{
    private string _name;

    public string Name
    {
        get { return _name; }
        set
        {
            if (_name != value)
            {
                _name = value;
                // 必须手动实现PropertyChanged
                PropertyChanged?.Invoke(this,
                    new PropertyChangedEventArgs(nameof(Name)));
            }
        }
    }

    public event PropertyChangedEventHandler PropertyChanged;
}
依赖属性的自动绑定:
XML<Window x:Class="AppDependentPropertiesThan.MainWindow"
xmlns="http://schemas.microsoft.com/winfx/2006/xaml/presentation"
xmlns:x="http://schemas.microsoft.com/winfx/2006/xaml"
xmlns:d="http://schemas.microsoft.com/expression/blend/2008"
xmlns:mc="http://schemas.openxmlformats.org/markup-compatibility/2006"
xmlns:local="clr-namespace:AppDependentPropertiesThan"
mc:Ignorable="d"
Title="MainWindow" Height="450" Width="800">
<Window.Resources>
<Style TargetType="{x:Type local:ModernControl}">
<Setter Property="Template">
<Setter.Value>
<ControlTemplate TargetType="{x:Type local:ModernControl}">
<Border Background="LightBlue"
BorderBrush="DarkBlue"
BorderThickness="2"
CornerRadius="5"
Padding="10">
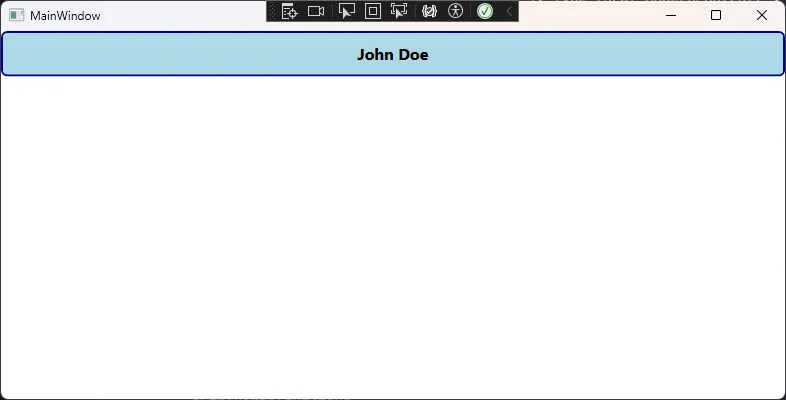
<TextBlock Text="{TemplateBinding Title}"
FontSize="16"
FontWeight="Bold"
HorizontalAlignment="Center"
VerticalAlignment="Center"/>
</Border>
</ControlTemplate>
</Setter.Value>
</Setter>
</Style>
</Window.Resources>
<Grid>
<Grid.RowDefinitions>
<RowDefinition Height="Auto"></RowDefinition>
<RowDefinition Height="Auto"></RowDefinition>
</Grid.RowDefinitions>
<local:ModernControl Title="{Binding Name}" Grid.Row="0" />
</Grid>
</Window>
在工业4.0浪潮下,设备数字化转型已成为制造业的核心竞争力。想象一下,如果你的工厂设备能像"钢铁侠"的贾维斯一样智能,24小时监控每一个传感器,预测故障,优化维护时间,这将为企业节省多少成本?
今天,我们将用C#从零构建一套完整的工业传感器智能分析系统,涵盖实时数据采集、智能异常检测、预测性维护和AI对话分析。
🎯 为什么选择C#构建工业物联网系统?
💪 C#在工业场景的天然优势
强类型安全:工业数据不容错误,C#的编译时类型检查为数据安全提供了第一道防线。
丰富生态:从底层硬件通信到上层AI分析,.NET生态提供了完整的解决方案。
跨平台部署:支持Windows、Linux部署,适应不同工业环境需求。
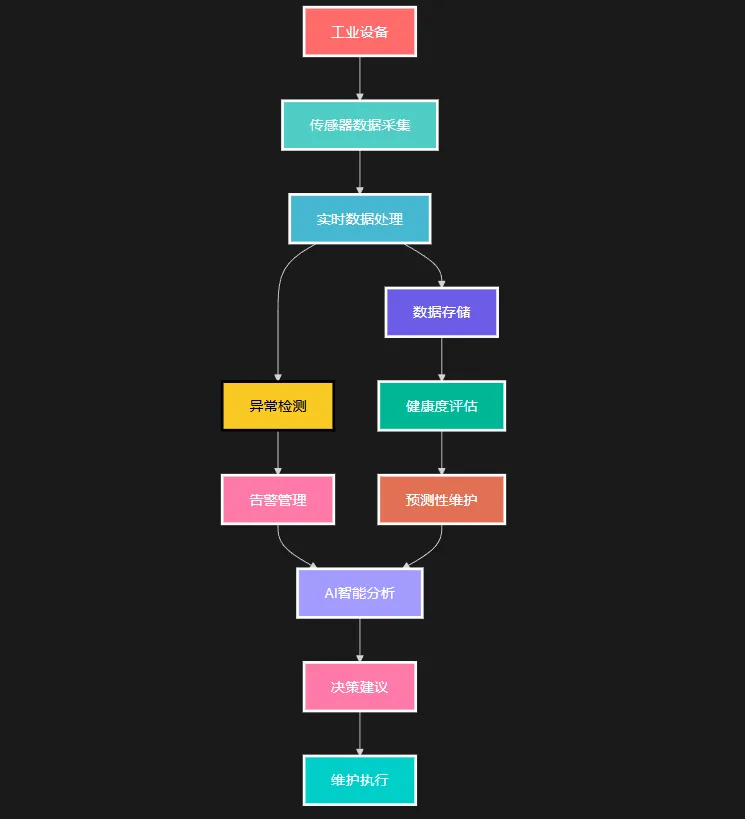
🏗️ 系统架构设计:五层架构保证可扩展性
我们的系统采用经典的分层架构:
Markdown┌─────────────────────────────────────┐
│        AI智能分析层                    │  ← Semantic Kernel + OpenAI
├─────────────────────────────────────┤
│        业务逻辑层                      │  ← 告警管理、预测性维护
├─────────────────────────────────────┤
│        数据处理层                      │  ← 实时分析、异常检测
├─────────────────────────────────────┤
│        数据模型层                      │  ← 设备、传感器抽象
├─────────────────────────────────────┤
│        数据采集层                      │  ← 模拟真实传感器数据
└─────────────────────────────────────┘